Wood has always been considered a good material for interior and exterior decoration. Therefore, today, wood carvings, photographs, drawings and sketches are used to create an improved interior. Following this direction, they decorate furniture sets and the interior, using latest technology, techniques and elements that make it possible to obtain products with excellent appearance and quality, as well as having a high artistic value.
Wood is a fairly light material that can be easily processed and has been used since ancient times to decorate palaces, temples, and houses. With a great desire, craftsmen from all over the world apply patterns for woodcarving, using natural material in their work to create a unique stylistic image in the interior of the house.

Relief carving is a rather laborious type of carving
For decor from wooden elements using carvings use different woods:
- Linden. A very soft material for carving, from which you can get small items in the form of photo frames, various boxes, household utensils with patterns. They just draw attention. This material is perfect for learning woodcarving, as it has a soft pliable wood structure and a beautiful color on the cut.
- Birch. It is an excellent raw material for obtaining a dazzling overhead decor or creating excellent souvenirs.
- Nut. Solid material, very good in processing and polishing. An extensive range from small items and furniture decor to a variety of sculptural compositions.
- Pear. Unique material, almost does not crack. They are used to create exclusive decorations and souvenirs.
- Alder. It is considered an aristocratic tree. Wood has a variety of colors from rich red and purple to black. This often replaces valuable tree species.
- Pine, yew, spruce, cedar. These types of tree species are used to form massive carved sculptures, architraves, which are used in the design of cornices, home decoration.

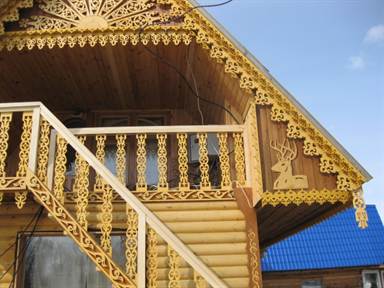
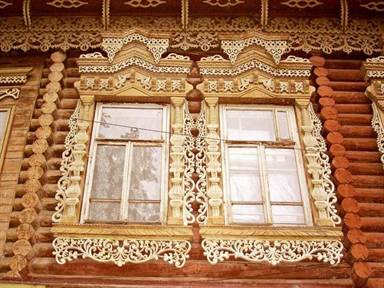
Carving is used to decorate the outside of the house due to various ornaments and figures.
Variety of wood carvings
AT modern world more than one type of manual woodworking technique can be used. Of these, you can focus on such ways:
- Through carving. It is characterized by the complete removal of wood chips from the boundaries of the pattern. There is a simple look and openwork with a variety of heights and edges. Thanks to this technique, frames, linings, doors, decorative elements are made. If you want to do wood carving in an oriental style, then a jigsaw will come to the rescue.
- Thread with flat notches. It is characterized by the presence of a flat surface into which the thread elements are deepened. There are several subspecies of thread - contour, when, thanks to the grooves of a semicircular or triangular section, patterns are obtained on a flat surface; bracketed, when the pattern is obtained from semicircular notches; geometric, when several types of elements are used for a drawing - pegs and a trihedral pyramid buried in the middle. Patterns are made with a wood carving knife - a jamb. In this case, various figures are obtained in the form of rhombuses, chains, honeycombs. Black-lacquer carving is also performed, when the front side is covered with black paint or varnish, and then grooves are cut out.
- Relief carving. Elements are located on the same level with the front surface or above. This is a rather laborious type of carving. Thanks to this type, images of coats of arms, various ornaments, and emblems are created. Subsequently, the image is completed by the play of light and shadow.
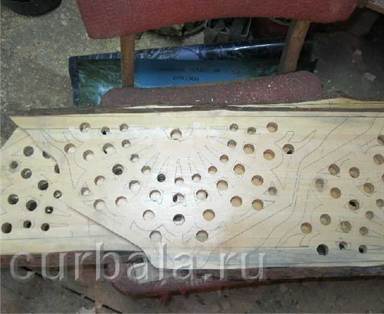
- Carving for home decoration. They are used to decorate the outside of the house due to various ornaments and figures that are located on the back of the wooden elements. They decorate cornices, porch posts, balusters.
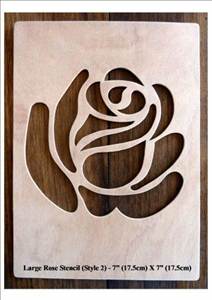
A stencil for wood carving always comes to the aid of the master. In this difficult matter, he is always an indispensable assistant.
Varieties of stencils
Wood carving stencils are used to perform rather difficult and painstaking work, which will then decorate the house. It is divided into the following types:
- stencils designed for ribbon ornament, platband, pilasters;
- stencils for carved boards - depict ornaments;
- stencils for brackets, rosettes, balusters and the like.
What stencil is preferred for woodcarving?
To select the right stencils, you need to follow a few rules:
- you need to choose the stencil that you can work with, especially if this is done for the first time, do not think that this is an easy job - you can ruin the material;
- for cut woodcarving, you need to choose only the types of stencils that correspond to it, while trying to transfer the drawing more accurately and not go beyond its scope, otherwise the work will be sloppy.

You need to choose the stencil with which you can work
By what parameters to choose a template for woodcarving
Firstly, for large wooden elements, it is necessary to choose large stencils, otherwise the elements will be small and not visible. But for caskets and frames, patterns are chosen more complicated.
For different carving techniques, the appropriate schemes and patterns for woodcarving are selected:
- slotted thread requires templates and stencils of proper quality and fast work. After the drawing has been transferred, those areas that turn out to be through will need to be shaded.
- Geometric technique is the basis of woodcarving. When the sketch is selected, it is applied to the wood panel.
- Sculptural or relief carving is more laborious and requires certain skills from the master. First, the sketch is made on paper, but if this is a voluminous craft, then it is necessary to create a figure from a plastic material, for example, from clay.
House carving is a beautiful and practical solution for interior and exterior decoration. The carving was intended to decorate your home outside and inside with the help of carved items. With the help of a carved facade, you can make your home festive. All protruding and overlaid elements of the facade of the house were decorated with carvings: cornice, architraves, chapels, porch pillars, roofs.

Varieties of technology
There are such types of house carving: embossed, flat-relief, contour, slotted. If you need to decorate a table, mirror frames, a wardrobe, you should choose a blind relief carving. It has the appearance of a relief pattern and is performed on a dull background. When performing, floral ornaments, images of mythological creatures and animals are used. In the photo it looks like this:
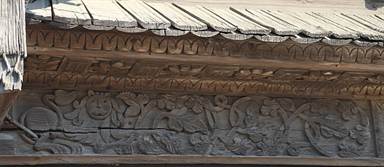
Flat-relief carving is a “relief on a plane”. It is characterized by a deepening or selection of the background around the ornament by 5-7 mm. The image will be voluminous. In engineering relief carving compositions depicting people, birds and animals look great. This type is very popular for bathing themes.

Contour carving is characterized by a contour outline of images. This is one of the most simple species threads. It is used to decorate dishes, cutting boards, household items. In contour carving, pictorial motifs are used: flowers, leaves, animal figures.

Slotted carving (openwork) was used to decorate railings, stairs, architraves, doors, etc. This is the youngest type of carving, which is about 150 years old.
Operating procedure
- Preparing a rough sketch of the house;
- We count required amount material, we select the type of material and prepare the boards of the desired size;
- We make the necessary templates for house carving. To do this, you should think carefully about the ornament, the elements of the composition must certainly be repeated;

- Prepare machines for carving.

It is impossible to start carving without getting acquainted with its technique. You need to start with the execution of geometric patterns.
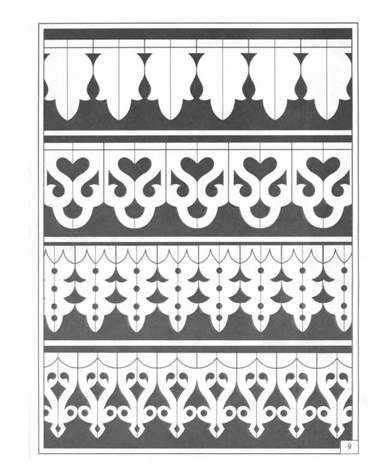
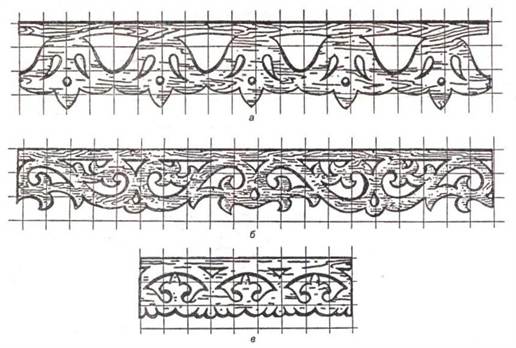
Templates can be made by the master to order. For this, your sketch, drawing or photo is provided. Many craftsmen make tape stencils for carving on their own.

Template making
Ready-made templates are used for the manufacture of platbands. They can be found freely available on the Internet. You can make a template yourself if you could not find the right option:
- We select a suitable drawing;
- We transfer the contours of the pattern to the tracing paper. To do this, use a ballpoint pen or a soft pencil;
- If you need to enlarge or reduce the picture, use the grid. We transfer the contours to tracing paper. The image field is divided into squares and each is numbered. On a cardboard sheet or thick paper there should be the same number of squares with larger or smaller sizes. The selected image needs to be redrawn into a new grid;
- With the help of carbon paper, the drawing is transferred to a wooden blank.
The template can also be made from plywood.
Features of the method
If we drive through the Russian hinterland, we will definitely see overhead elements of house wood carving on the facades of houses. Since pagan times, there has been a tradition to decorate the exterior with carved patterns. Today, it has regained relevance.


Russia has always been famous for its timber reserves and its forests. Therefore, most of the houses and outbuildings were built from high-quality wood, and many such houses still stand today.

Milling cutter, or manual milling machine- a universal tool suitable for various types of wood processing. With it, you can drill holes, cut grooves, grooves and chamfers, process the edges and edges of a wooden product. It is very convenient for installing locks in doors, when assembling floors and furniture, and other work with this material. Carving on a pre-prepared tree with the help of a milling cutter can be mastered with your own hands quickly if you immediately choose the type of manual machine for yourself.
There are several types depending on the work performed. So, allocate:
- The router is used both for making through holes and for cutting blind grooves in the rock.
- Edging is useful for processing the edges of a tree. Has little power, big advantage is low weight
- Combined serves both of the above purposes, has two bases for them.
We disassemble wood carving techniques with a do-it-yourself milling cutter
The now popular art, wood carving, can also be done using this tool. There are many milling cutters, that is, working heads, for various purposes. Advanced craftsmen even make cutters or parts themselves. The main task when working with a manual router is to learn how to work with it correctly. When mastering this tool, you can perform any kind of artistic carving.

In order to learn how to carve a pre-prepared tree using a router with your own hands, you can sign up for thematic courses. However, not everyone has the time and desire to visit them. For such people, there are many video tutorials that will give you an idea of this skill.
Even before watching the video, it is important for beginners to carefully read the instructions for use of their electric assistant. There you can find a lot of practical advice on how to assemble the tool, adjust the depth of the cut, what each cutter is for, read about the completeness of your router model, and also find out what nozzles you can buy additionally to achieve exactly your goals. Be sure to check the safety section and specifications device.
After that, you can proceed to the first small steps in developing the skill of carving with a wood cutter. These training activities are described below.

To have general idea about the learning process, suffice it to say that most craftsmen start by cutting simple patterns from a template. To do this, you need to take a piece of wood and draw a sketch on it. There is a large selection on the Internet and in art books, in addition, looking at the photo finished works with abstract ornaments, it is easy to copy these drawings with a pencil.

After the sketch is applied to the log, the router should be adjusted so that it makes through cuts. Start working with the outer parts, and when the form is ready, you need to cut holes, give the pattern an openwork. If you cut out platbands or other elements of the facade of the house, then you need to take a canvas made of hardwood. Conifers are well suited, as well as oak. For smaller, interior products, it is better to take a softer linden or birch.

After mastering the technique of through threading, you can proceed to more complex elements. For example, by adjusting the depth of the cut, add a pattern to the finished trim using V-shaped or other cutters. Not just flat figures look beautiful, but complemented by notched carvings or made using other techniques. Chamfers on flat or rounded surfaces of large diameters will look very handy.
Various types of bevels.

After training in these techniques, you can take on more complex ones. With the help of a customized router, it will not be difficult to make your first product in flat-relief technology. Such drawings look amazingly beautiful on wall panels, caskets, and besides, photographs of furniture with carved elements make you look closely and consider the whole pattern.
We hone the skills of owning a milling cutter and woodcarving
To achieve mastery in absolutely any business, constant practice is important. Even if the first time the products turn out to be a little clumsy or nothing comes out at all, you should not give up. After all, each time the cutout will turn out smoother, the finish is thinner, and the products are more beautiful.
Wood carving with a milling cutter - photo for inspiration.

Video tutorials and videos on the topic of the article
The presented wood carving lessons will introduce beginners to this craft so that you can create objects from wood with your own hands. natural material.
The history of the craft and types
Wood carving is a type of arts and crafts that originated in antiquity. In Russia, woodcarving was called carving, and the drawing performed in this technique was called a sign, a pattern, or a pattern. In this technique, masters made braids, teeth, grooves, poppy seeds, fungi, etc. on a flat surface. You can see such samples in the Assumption Cathedral by visiting the royal place.
Russia owes the development of woodcarving to the monk Ambrose, a novice of the Trinity-Sergius Lavra, who at the end of the 15th century combined Russian ornament with Western and Eastern in his works.
In 1660, the masters decorated the royal dining room with German carvings, which were figured, with Gothic motifs. This is how German elements appeared in Russian carving, including new tools and terms.
Thread types are conditionally divided into:
- through;
- deaf;
- brownie;
- sculptural;
- chainsaw thread.

Here's how they differ:
- The through thread is subdivided into consignment note and through thread. This includes slotted carving, when through sections are cut with chisels and chisels; and profile carving, where such sections are cut with a jigsaw or saw. If these types of carving are performed using a relief ornament, then this is called openwork.
- If there is not a single through hole in the processed tree, such a thread is called blind.
- Facades of buildings are decorated with house carvings.
- Sculptural - one of the most complex types of carving, requires great skill. In this technique, figures of animals, sculptures of people are made.
- With the help of carving with a chainsaw, global work is performed. This requires strength, therefore it is more suitable for men, while women also successfully master other types of carving.
Woodworking tool, cutting blanks
Beginners can use only 2 tools - a well-honed penknife and a joint knife.
When you learn how to perform simple elements with them, you want to improve, then you can buy wood tools, for example, such a set.

There may be even more tools, but only professional carvers who perform complex work need such a number.

See what kind of cuts you can make with semi-circular cutters different sizes, acute-angled.

But what set of tools should a cabinetmaker have in order to perform the following types of woodwork:
- carving;
- sawing off;
- splitting and trimming;
- planing;
- turning;
- chiselling.

- Pay attention to the cutters that are used for manual turning of wood. In addition to the semicircular, there is also a flat oblique, angular, detachable, beveled, angular, etc.
- Saws are used to saw off the workpiece. They can be transverse, longitudinal, universal. The teeth of the rip saws are chisel-shaped; in the transverse they are triangular, sharp. Universal are equipped with teeth having a right angle. Such a tool can cut fibers both along and across and at an angle. Each of these saws can be hacksaws, simple, one-handed.
- If the workpiece is made from a ridge, beam or trunk, then axes or cleavers are used. Adze - a kind of ax, the blade here is located perpendicular to the handle, is used to create figured and concave products.
- To remove chips from the workpiece, turning or hand tools are used, planers can be used.

The most popular carving tools are chisels. They usually consist of:
- steel rods;
- cutting blades;
- shank.
- Wide and straight are used for cutting or stripping flat or convex workpieces.
- With round blades - for working with horn knots or hardwood.
- With the help of narrow workpieces are processed in narrow places.
- A chisel with a thick steel rod is used to clean a deep cavity or workpiece with a hollow. Deepen the chisel into the wood with a mallet.
- Cranberries make gutters of various depths and radii.
- Corner chisels make grooves and triangular recesses.
Wood carving: sketches and master classes
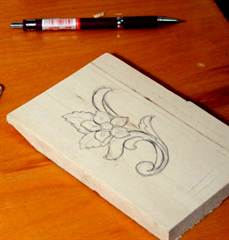
After you have learned a lot of useful things, got the necessary, let's try to cut a flower. To make it, you need the following:
- flat wooden blank;
- pencil;
- transparent paper;
- v-shaped chisel-corner;
- narrow and wide semicircular chisels.
If you don't already have a v-shaped chisel, you can use a sharp knife for this pattern.
Attach a sheet of paper to the screen, redraw the diagram.

Then transfer it to a wooden blank. Start by cutting along the outline of the center circle, then cut towards the center from the outer circle using a large semi-circular chisel.

Mark up the flower petals.

Using a v-shaped chisel, cut the petals along the outline.

With the same tool, remove the excess wood between the petals (“triangles”).

Take the next woodworking tool in your hand - a semicircular chisel to cut out the outer contour of the petal. In doing so, it will become similar to the upper part of the heart.

With a large semi-circular chisel, make cuts inside the contour of the petal.

With a small semicircular chisel, make two cuts on this contour from the center of the flower.

To increase the cut area, just cut again.

Unfold the chisel and round the center of the flower.

Now you need to take the next carving tool - a v-shaped chisel and make such cuts in the center of the flower.

Everything, you can admire the result of the work.

If you want to carve a fox, the following sketches will come in handy.

If you want to make butterflies, wood carving sketches are also included.

If you want to make a mold for printed cookies with the image of the Snow Maiden, then prepare:
- beech plank;
- ruler;
- jigsaw;
- simple pencil;
- ruler;
- sandpaper;
- eraser;
- linseed oil.
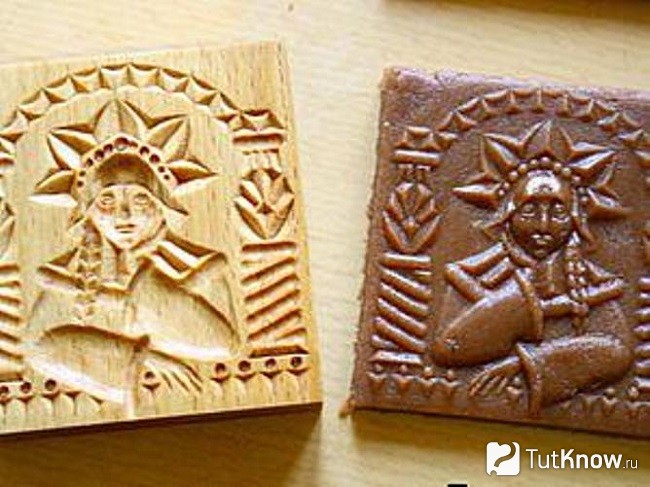
Draw a rectangle on the board. Drink it up.

If you do not have an electric jigsaw, then you can cut the workpiece with a saw or an ordinary manual jigsaw.
Make the surface of the cuts even with sandpaper. If the farm has a grinder, use it for this procedure. Transfer the drawing to the workpiece using a simple pencil.

With the help of a semicircular chisel, we make a recess in place of the face, then we again apply its contours here.

The ongoing wood carving sketches will help you carve out the facial features correctly. At this stage, we also make a cape on the head of the Snow Maiden. Note that it is at a level above the face.

Based on the sketch, cut out other elements of the workpiece.

Now you need to erase the pencil with an eraser-rubber, then with the finest sandpaper. If you immediately do this with sandpaper, then part of the stylus will rub into the tree.
Pour linseed oil into a container, dip our wooden mold into it for an hour. If you are doing a lot of work, then saturate it with oil using a swab or squirrel brush and leave to dry for 3-4 days.

Everything, you can roll out the dough, cut it into rectangles, apply a pattern using a wooden blank and bake.

To prevent the cookies from burning in some places, you need to cut a stamp out of wood so that there are no too prominent elements on it.
How to cut a sign for a bath?
For her, take:
- a board (in this case, a coniferous wood step was used);
- triangular ruler;
- simple pencil;
- saw;
- furniture varnish in a can;
- stain;
- brush;
- sandpaper.

To draw letters, download the letters you like from the Internet, then redraw them on wood. You can use this sample.

Draw oak leaves on the right and left on the plate.

Next, the carving begins. For beginners, such tasks are great, because they do not require long training and a lot of tools. Here, 3 types of cutters were used: a joint-cutter and chisels "Tatyanka". Make cuts according to the pattern with a chisel cutter along the outlined contours, cut it under the contour with a chisel to highlight the pattern above the background.

Next, the carved surface is sanded with sandpaper No. 180 and No. 220. Draw clouds at the top and bottom of the plate, cut them out with a chisel and a chisel, and then sand them.
This soap will be a nice present for friends. After all handmade much appreciated. In order to make a rose out of soap, you will need a little, namely:
- a piece of soap;
- cutter;
- tassel.

Then you need to cut out the second and subsequent petals. At the same time, move from left to right in a circle.

This is what the job should look like after you make the first circle.

Perform the second and subsequent ones in a checkerboard pattern in relation to the previous ones.

Here's how to decorate soap with your own hands by combining carving and woodcarving.
In conclusion, 3 plots are offered to you. From the first one you will learn in detail about wood carving, about tools for beginners.
After viewing the second, you will be able to carve a spoon with a beautiful carved handle.
From the third, you will learn how to carve a charming rose from wood.
Having barely learned to hold objects in his hands, the little man shows a craving for creativity. Over time, he will have the opportunity to try himself in various types of skills: needlework, modeling, origami, woodcarving, drawing. Of course, certain skills that the child received in early childhood will be useful for this. Sometimes a simple hobby gradually turns into a hobby, and then becomes a matter of life. So many centuries ago in Russia, one of the main types of creativity was woodcarving. And in the 21st century, it still arouses genuine interest among people.
Popular types of intricate art
 For a long time, people have decorated their homes with wooden carvings. All sorts of paintings, kitchen utensils, religious objects, children's toys were considered valuable things for any family. Perhaps that is why they appeared different kinds woodcarving. The most popular options are:
- geometric;
- flat notched;
- slotted;
- sculptural;
- embossed;
- openwork;
- invoice.
Fortunately, the list does not end there, because this type of creativity is widespread throughout our vast country. Let's consider just a few of them.
 Geometric wood carving involves the use of various figures in the work. These are triangles, circles, squares and polyhedra. It is used for the manufacture of furniture elements, household utensils, as well as wall crafts. The oldest type of such a carving is a trihedral-notched carving. This is one of the simplest methods, since it is performed with only one tool - a joint knife. For such woodcarving, you will need a simple set of items:
- lime board;
- special knife-jamb;
- ruler;
- pencil.
First, sketches are applied to the board from geometric shapes or a finished ornament. It is better for novice amateurs not to use complex drawings so that the work turns out to be flawless. For the first works suitable material from deciduous trees, since it is more convenient to draw straight lines on it with a sharp knife.
The wooden surface should be as smooth as possible. This is achieved by planing the board. However, it does not need to be sanded with sandpaper. Otherwise, the thread will not turn out clear and accurate, and the tool will quickly become dull.
The flat-pitted method is used to cut out recesses of various sizes and shapes on a plane. It can be oval contours and all kinds of bulges.
 The slotted type of thread is also considered quite simple. It is done with a jigsaw. A sketch of any figure applied to a wooden plane is cut out along the contour. As a result, cute crafts come out. A slotted carving is used for the manufacture of background objects through which other planes are visible. She is often called openwork carving, and it is used to decorate furniture in the Baroque style. It can also be elements of cupboards, window casings, doors, and sometimes decorative screens. If crafts are attached to a special base, then this type of thread is considered to be overhead.
The process of working with a slotted method begins with a sketch, which is applied to a pre-polished workpiece. It is transferred to the surface using a special template or transparent white paper. Then holes are made on the contours and cut out on the desktop using a thin jigsaw file.
 Relief carving includes two main methods: flat and deaf. In addition, the deaf option implies a low or convex relief. The bottom line is that the pattern is formed due to the main background of the surface.
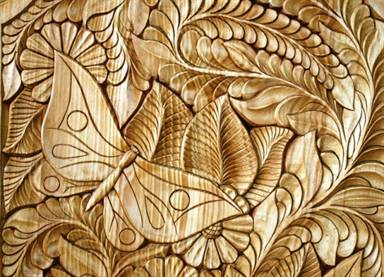
 The flat-relief method is performed in such a way that the pattern and the background surrounding it are made at the same depth over the entire area of the base. Blind carving is characterized by a convex pattern that does not have a flat outline. Such products are valued for their high decorativeness and richness of composition. After all, a kind of miniature landscape is created on the plane with hills, depressions and depressions. To create such masterpieces, masters use elements of almost all types of woodcarving. Therefore, beginners should master each method separately in order to apply skills with more.
First steps towards mastery
 History shows that wood was traditionally used to decorate a living space. Nowadays, various photographs, drawings and sketches of woodcarving are exhibited in local history museums or printed publications. This suggests that smart people who are willing to learn are able to master this art form. Wood is a wonderful natural material from which you can create decorative compositions, paintings, furniture elements and kitchen utensils. Having mastered the basics of ancient art, some have become true masters of woodcarving, devoting their whole lives to this.
Folk wisdom says: "Dashing trouble - the beginning." This is how it is if you do nothing. Practical Tips woodcarving for beginners opens the door for brave people to the world of magnificent DIY crafts. First you need to prepare the tools and understand the basic nuances of the craft.
It is advisable for beginners to choose high-quality and durable equipment for work in order to acquire valuable craftsmanship skills.
 For wood carving, you need to prepare the following tools:
- sharp knife;
- chisel;
- jigsaw;
- bit;
- drill;
- needle files;
- spoon cutter;
- bars;
- milling machine.
Of course, for beginners, it will be enough to purchase a special set of tools for woodcarving, which includes a knife, a jigsaw and an awl. With their help, it is very convenient to master the skills of ancient craftsmanship.
The next step is the choice of raw materials. This is what the quality of the product depends on. In nature, there are two types of wood: hard and soft. The first group includes mahogany, oak and beech. To the second -, aspen, pine, spruce, birch. Of course, soft wood is easier to work with, but with one wrong move, it quickly deteriorates. Despite this, it is considered the most suitable raw material for beginners.
Hardwoods are used by professionals because they are very expensive.
In addition to the strength of the material, the color of the wood also plays a key role. A suitable raw material to learn the craft is birch. It lends itself wonderfully to cutting and drilling in any direction. When choosing drawings for woodcarving, it should be borne in mind that birch wood darkens over time. Despite this, she is very easy to work with. 
When the pattern is selected, it must be transferred to a wooden blank. In the age of technology, you can use ready-made photographs or drawings provided by specialists. The theme of the images is very different, but each has its own unique beauty. When everything is ready, you can start creating your own masterpieces. An invaluable help for beginners are thematic woodcarving lessons.
Master class simple crafts
 When you look at ready-made crafts, it seems that it is not at all difficult to make them. Therefore, many lovers folk craft took the tool in their hands and set to work. To cut an ordinary flower, you need to prepare the following set of items:
- wood blank;
- double soft pencil;
- tracing paper;
- chisels.
It must be borne in mind that only special chisels for woodcarving are suitable. They should be v-shaped, narrow and semicircular. The next step is drawing. It can be taken from the Internet. To do this, a sheet of paper is applied to the screen, the diagram is redrawn, and then applied to a wooden plane. 
Start work from the central part of the sketch, carefully cutting out a circle. Then, using a v-shaped chisel, the petals are cut along the contour. Waste wood between them is removed in the course of work. If there is no such chisel, professional wood carving knives are suitable, which are no worse to wield in this craft. 
The outer part of the petal is cut out with a semicircular chisel. It becomes similar to the outline of a heart, but it's not scary. Then cuts are made in the inner part of the petal, connecting it to the center of the flower. It remains only to round it and the flower is ready. Now you can admire the first creation of your own hands. An invaluable help for beginners is a thematic wood carving video that encourages you to immediately get to work.
Modern technology for experienced craftsmen
In the modern world, many works have long been performed mechanically. Applied craft does not lag behind in this. The use of technology enables craftsmen to save their strength and precious time. Wood carving machines make it possible to quickly and efficiently prepare the source material for work. The only drawback of such devices is their high cost, but people for whom carving is not just a hobby are ready to purchase them.
Pantograph
 The device is designed to work with any wooden surfaces. It performs operations of various kinds, both volumetric and on the plane. The pantograph is used to process arcuate, bent or rotating parts. So with the help of a machine cut out various elements of furniture, statues or panels.
Drill
 Excellent device for working with hard wood. It is important to take into account the properties and location of the fibers of natural material. With the help of a drill, craftsmen sharpen tools, grind wood, and, if necessary, polish it.
Wood species with dense wood that do not tend to chip are suitable for working with a drill.
CNC milling machine
 This technique is mainly applied to the production of wooden furniture with carved decoration. The machine is designed to work with plywood of any kind and wood. It is characterized by high functionality and technical capabilities. When working on such equipment, it is important to use special protective equipment - goggles and gloves. Also follow the instructions for use of the device.
 As practice shows, such machines simplify the process of wood carving. They make it possible to create a huge number of products in a short time. Devices are used not only in industry, but also for a personal workshop.
In any case, handmade products bring real satisfaction to a person. They create a pleasant atmosphere in the house, help to express the feelings of the master to his loved ones, and serve for the benefit of the household for a long time. Wooden crafts retain their natural beauty for a long time and never go out of style. Woodcarving is an art that has been passed down from generation to generation. It is available to anyone who wishes to master this craft. The main thing is not to be afraid of failures, but to be willing to learn, pick up tools and create masterpieces.
Wood carving video tutorial for beginners


Only lovers will survive
Features of advertising aimed at children
retouching old photos in photoshop retouching old photos
What is an NPO: decoding, definition of goals, types of activities Does a non-profit organization have the right
Gleb Nikitin First Deputy