relief carving - one of the most common types of ornamental carving. In this technique, rather complex plant motifs and plot compositions are performed. The following varieties of flat-relief carving are distinguished: with an oval contour, with a pillow and with selected backgrounds.
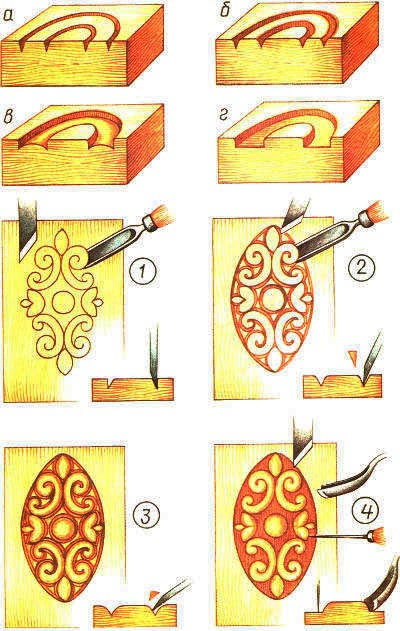
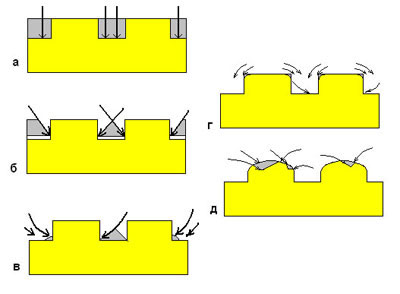
In a carving with an oval contour on a wooden surface, a solid relief without a background is obtained, since the pattern itself and the background itself act as equivalent. All details of the ornament are first worked out along the contour with jambs or a semicircular chisel with a wide bending radius. Notches and undercuts of the groove are made to a depth of 3-4 mm. Then, chamfers are removed from the upper faces of the groove, the contours of the pattern are ovalized, giving them a rounded configuration softened from the surface deep into. Chamfers are removed along the contour of the pattern evenly on both sides with a cutter knife, which is held with an inclination to the left. The steeper the line ovals, the higher you need to raise the heel of the cutter. On straight and gentle curved lines, the chamfer can be chamfered in directions away from you and towards you and the heel of the cutter, and the thread with the heel is cleaner. Straight and gentle lines in large carvings are covered with a straight chisel, slightly tilting it to the line of the drawing. On steep curved lines, it is convenient to chamfer with a semicircular chisel.
A carving with a pillow background is a kind of carving with an oval contour, only the lines oval both from the side of the contour - steeply, and from the side of the background - more sloping. It turns out that each gap of the background is rounded, finished, and the ornament protrudes above the background, as if lying on a small pillow. The pillow background makes the composition more saturated, while in the carving with an oval contour it looks more graphic, drier. Carving with a selected background is performed in the same way as with a pillow, but the background is removed in it - they are selected. First, an incision is made along the outer contour of the pattern. The depth of the incision is not the same everywhere: on steep lines it is large, and in sharp corners and places where the elements of the ornament come into contact with each other - it is minimal. When making an incision, put the tool on a line vertically. Then the background is sampled: rough to a depth of 3 mm - with semicircular sloping chisels, the second - with flat ones. After that, an undercut of the ornament forms is made, the tool is held at an angle to the incision. Rolling is performed, as in the case of carving with a pillow background. Finally, the background is cleaned with cranberries, cycles, skins. You can decorate it with a punch with a chased pattern.
Of the flat-relief types of carving with selected and pillow backgrounds, the most formed is Abramtsevo-Kudrinskaya,
or just kudrinskaya carving. The name and character of the carving are surprisingly combined with appearance the village of Kudrin near Moscow, where this type of carving originated: the continuity of the movement of plant shoots, the fluidity of garlands of leaves and flowers, branches make you want to call these patterns curly. See pictures below.
Let's consider what flat-relief wood carving is, what types still exist and what is necessary for their implementation. Since ancient times, products made from this material have entered human life (from toys to houses). And when creating wooden objects, they try to show their natural beauty. Carving is one of the first decorations that was applied to fences, dishes, caskets, furniture, etc. But different techniques were used to make each item.
The picture is made of flat-relief carving
For example, slotted or openwork carving was used to decorate a house, furniture or utensils, and when decorating a ship, souvenir or toy -.
First, consider what types of wood can be used for this. exciting activity. For beginners, it is better to choose soft breeds. There are the following types of wood:
- solid - beech, walnut, oak, ash;
- very hard - acacia, yew, hornbeam;
- soft - aspen, linden, pine.
In order to make a triangular notched thread, you must have:
There are the following types of thread:
Flat-relief has subspecies:
- Carving with oval kennel - with interesting game chiaroscuro, which comes out due to a combination of a steeper rounding (from the side of the pattern) and a hollow one (from the background).
- With a pillow or matched background - almost the same as with a contour, but with the difference that the background is not flat, and sometimes is located below the ornament itself. The pattern seems to be superimposed on a plane. And the background in this case is made by chasing.
How to prepare the foundation and get started
Basically, this is a difficult job that requires certain skills and knowledge. In order to do everything correctly, you need to be able to use the tools. The processing of the base begins with the preparation of wood for carving.
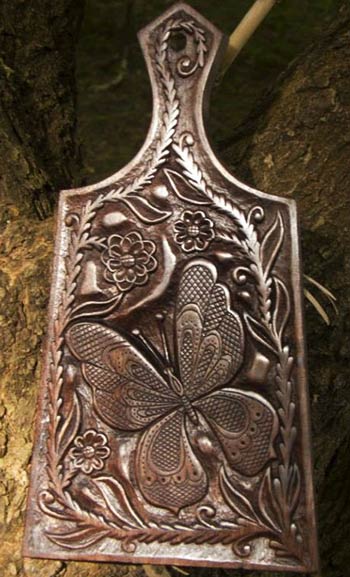 An example of a varnished plank for the kitchen
 First, it must be planed, and if the background is made of light wood, then this is done with a planer. And for a dark background of the composition, the workpiece is tinted. To obtain a shiny surface, the wood is varnished, in this case black is used, after it dries, it is polished with polish.
When using dyes such as tempera, ink, mordants, watercolors and other similar dyes, the surface remains matte or covered with a light varnish and polished. To fix the workpiece, it is clamped in a workbench. To do this, use the clamps of the machine or holders (plates that cover and hold the workpiece). Flat-relief carving allows you to perform a floral pattern, bas-relief of an animal, bird or person. 
When wood carving is done, the drawings are selected from special books, magazines or albums. For the correct execution of the ornament, it is transferred using tracing paper or carbon paper. It is better to first apply transparent paper, which is drawn into squares. Their size depends on the size of the original pattern. If it is necessary to increase it, then a pantograph is used. maybe double or quadruple.
In order for the wood carving, the sketches of which are transferred to the workpiece, to be done correctly, a quarter or half of the pattern is chosen, the tracing paper is folded horizontally and, if necessary, also vertically. After that, outlines of the ornament are transferred to it or a contour is drawn. Half of the image is received on one side, it is bent, and a whole one comes out.
 Making a sketch of a drawing for a flat-relief carving
 It is transferred to a wooden blank by any of existing methods. The main thing is that all parts free from slotted threads are placed in a place with a beautiful texture. And the rest have frame elements. The contours of the pattern must necessarily coincide with the direction of the fiber.
Woodcarving is an amazingly beautiful and very popular type of manual woodworking in our time. Carved interior details captivate with their magnificent appearance and reflect rich national traditions.

Creative people who simply “itch” their hands to do something very interesting and useful should pay attention to woodcarving. Girls and women may think that this is only a male occupation. And they will be wrong, because there are no less women masters of woodcarving than men.

About woodcarving for beginners
Can be used to decorate indoor and outdoor space different kinds carvings and techniques for translating what was conceived. If you are interested in this type of needlework, then you should understand that you need to master the methods and techniques of wood processing, acquire the necessary tools and improve your carving skills.
AT modern world smartphones and tablets wooden stand, decorated with wood carvings, looks very original.


Skillfully executed carving in the form of simple and ornate patterns and ornaments seems to enliven the world and endows it with sophistication, charm, emphasizes the taste of the owner of luxurious things and the talent of the master.


The works of the best carvers adorn the temples. Pay attention to the photo of the iconostasis of the upper church of the Savior Not Made by Hands, which is located in Moscow, in the Church of the Intercession of the Most Holy Theotokos in Fili.

Modern masters with a delicate taste create real masterpieces.

And thanks to finishing and protection technologies finished product from the destructive effects of mold, insects, these carved wood crafts have served people for hundreds of years.
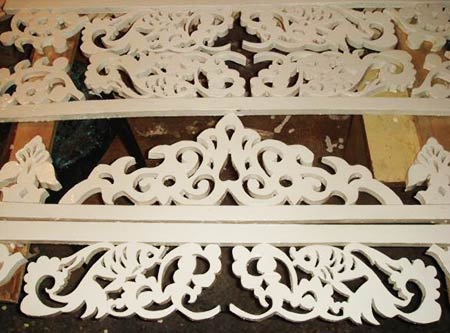
Pay attention to the magnificent carved pieces of furniture:


Stylish doors:

Amazing handmade figurines:


Very often, connoisseurs collect handmade carvings. Wonderful chess worthy of any collection.

Perhaps, over time, your masterpieces of woodcarving will be carefully kept by collectors or decorate temples.
Types of woodcarving
Of all types of woodcarving, the most interesting openwork or through thread on a tree, which has some transparency, in which only the image remains, without a background. An example is an overlaid carving - this is an ornament that is attached to a finished background after being made by a master.

Geometric carving on wood – this is a type of carving in which a pattern is formed using many simple geometric shapes (often a diamond is used).

Oriental carving on wood is distinguished by bizarre forms. Egypt is the cradle of oriental wood carving.


relief carving on wood. In this technique, the image is located above the background or at the same level with it. These are carved panels of various shapes with a three-dimensional image.

- This is a flat-relief carving, but distinguished by an abundance of carved and stucco decorations, various flowers, curls, leaves, figures of people in unnatural poses, fabulous fantastic animals.

It originated in the village of Kudrino. Well-known products in this type of carving are caskets, vases, dishes, ladles, and home decor items. The main element is a floral ornament: rosettes, curls and twigs.

Volumetric (sculptural) carving Great for making sculptures, animal and human figurines, toys. - a subspecies of volumetric thread. This is the main craft of the village of Bogorodskoye in the Moscow region. The famous Bogorodsk toys are figurines of animals and people made of linden and alder.

Most often used to decorate wooden Scandinavian churches. With images of Gods and various animals, wood carvers decorated inside and outside church buildings.

- the simplest and rather peculiar type of carving. On a flat background, the master cuts grooves - grooves, forming a pattern. Carved landscapes - images of landscapes on a tree.


All these types of carving are rather conditional. Each master chooses the most acceptable of them, taking into account work experience, wood quality and creative inspiration.
What can be carved?
The simplest staircase is transformed, decorated with carved balusters. Balusters- these are curly columns in the form of columns, a stylish and noble decoration of the stairs. Wooden balusters look organic with a spiral wooden staircase.

Bas-relief. Another name for "low relief". This is a sculptural image on a plane. Most often these are figures of people and animals. .

Choosing wood carving tools
As in every business, wood carving has its own secrets, nuances that allow you to reveal the beauty of wood in a wonderful ornament. It is necessary to pick up special tools for woodcarving and stock up on the necessary blanks and sketches for woodcarving, which will be embodied in the form of drawings, borders, lace or genre scenes.
Basic Toolkit
Highly high requirements applied to the quality of carving tools. Of course, craftsmanship plays an important role, but well-chosen and sharpened tools will help bring your idea to life. Experienced carvers at first glance at the tool will tell about its quality, and beginners are lost in the store from a huge selection.
The basic set for woodcarving includes:
- several knives and chisels;
- needle files;
- hacksaws for metal;
- vise;
- sandpaper;
- drill with several types of drills;
- bars.

Knives should be made only from high-quality steel. It is better to buy them in specialized stores for creativity. Although at the initial stage, just sharply sharpened knives will do. Knives from Tatyanka, Narex, Kogatana and others will serve as an excellent start.
It is not necessary to choose an expensive foreign-made tool, because domestic tools can be the same good quality but much cheaper
With the growth of skill, you may need a set of tools, a milling machine, a drill, etc.

Chisels for carving
Sometimes, instead of a chisel for wood carving, a sharpened screwdriver or file is used.

Flat chisel- This is a long rod, at the end of which there is a flat cutting edge. Very often it is used for the primary processing of wood.
Chisel semicircular- is one of the most important tools for work. They differ somewhat in the degree of roundness, that is, they are medium, round and sloping.
Still happens V- a figurative version of chisels. It can be useful for geometric woodcarving, which we will introduce you to below.
For beginners, a small set for woodcarving, but of good quality, is enough to immediately get used to the correct movements and pressure.
In this video, a wonderful master A. Yuriev shared with us which tools to choose for carving.
How to protect yourself from injury when carving wood
Any tool of a master carver can be compared with a straight razor, therefore, when working with it, safety measures must be strictly observed. The material must be positioned so that the knife or chisel can be worked freely, eliminating the possibility of a sharp edge hitting the hands.
The place to work should be comfortable and clean. Everything superfluous in this moment Tools must be neatly stacked as they are very sharp and can cause injury.

Work materials
Each type of wood for carving has its pros and cons. It is easy to work with soft wood, but there can also be a lot of marriage. These are aspen, linden, birch. For beginners this wood will do the best thing.

Oak, boxwood, mahogany are more expensive and complex woods. It is hard and durable, so it is difficult to carve from such wood. Very often there are troubles when working with such types of wood. Either the instrument or the master may be damaged.
An experienced carver can easily work with various woods, including juniper. Well, for beginners it is better to use inexpensive materials - spruce, pine, pear or birch.
Whatever tools are chosen for woodcarving, safety precautions must be strictly observed!
Geometric thread technology
Geometric wood carving is considered the easiest and is great for beginners. To create a conceived drawing, you need to have small set wood carving tools and clearly withstand the pattern. For geometric woodcarving, symmetry and repetition are of the utmost importance. This achieves a wonderful play of light and shadow.


Cutting boards in this technique, wooden panels look great in the kitchen.

Geometric carving consists of sequential sawing out of simple geometric shapes: rectangles, triangles, squares, rhombuses. But the result is a wonderful ornament that looks different in different lighting conditions.
Execution sequence any wood carving is like this:
- First, a blank is made of wood (board, deck, blank).
- Next, rough leveling of the surface of the workpiece, in which all defects and roughness are removed.
- Then a decorative relief is formed with special cutters.
- After the completion of the main thread, finishing - grinding, impregnation, painting, varnishing.
You can not work with the workpiece on your knees! The master must have a table to work with.
Master class "Geometric woodcarving on a cutting board"

Tools. You will need 2 wood carving knives: a triangular joint knife and a pen knife, a ruler, a compass, a pencil.

A triangle joint knife is needed for cutting triangular shapes of various configurations, as well as for cutting long straight lines. To cut long lines such as a petal or a groove, a pen knife is used. Carving knives should be sharp and comfortable.
First stage. We make a sketch of the pattern on the board. It can be applied with a compass and ruler. Or you can print the patterns for carving taken on the Internet and transfer them to the prepared cutting board using a carbon paper.

Second phase. Cut out the petals. We use a pen knife.

During operation, the thumb is firmly pressed against the board, and the index finger lightly touches the wood. This will help to adjust the depth of entry of the knife into the surface and the angle of inclination. And the thumb will help move the blade smoothly. First, cut in one direction at an angle, then turn the board over and cut on the other side.

If the shavings curl in a “string” - the knife is good, sharp. It must be periodically undermined with a piece of leather with GOI paste.

Third stage. Cut out the triangles with a cutter. With a “heel”, at an angle of 45 degrees, we cut the knife into a tree, without bringing it to the edges of the pattern on three sides. The slots should be joined on all sides in the form of a pyramid. The sliver, falling out, forms a beautiful triangle.


Fourth stage. What could not be cut off, we carefully clean it so that the edges are frequent and even. By the same principle, we cut grooves and triangles around the perimeter of the board.
Fifth stage. We grind everything with sandpaper, process it with natural impregnation. All! The work is done. We decorate the kitchen with a useful and beautiful cutting board with wood carvings.
Drawings for woodcarving
To perform wood carving, photographs, drawings and sketches are simply necessary. A large pattern for wood carving is used for dimensional products: for the facades of houses, interior decoration with carvings of churches, windows.
For interior items and furniture, carvers use small patterns, which are carefully worked out by the master.
YOU WILL USE
We offer you an archive of . Choose, print, create.
Video wood carving workshops for beginners
Of course, the wood carving looks especially impressive in the video. Channel "HAND-CARVED WOOD" shows the features of geometric carving for beginners.
Women's view of woodcarving. Channel tatiankacarving shows us how to make flower petals and leaves.
Konstantin Belyaev on his channel he talks in detail about the cutters for woodcarving.
And on this video Ivan the Builder shows how to make relief plane carving:
We will be very happy if this article inspired you to take up woodcarving!
Depending on which master, what technique he has, what plan the carving can be done in different types. It can be both simple and complex. There are various types of woodcarving: relief carving, flat-relief, volumetric, as well as flat-cutting and slotted thread. Now we will characterize these types of threads separately.
flat washing divided into two types, the first type - geometric ornament, second view - planimetric contour, which is sometimes also called a floral ornament. By the name of this type, you can guess in what technique the work will be performed. This carving will consist of notches, which together will make up the contour lines, cut to a certain depth.
geometric carving or geometric ornament, it is so called because it is made of circles, triangles, almond-shaped recesses, rosettes, stars, the so-called geometric elements. Depending on how many excavation elements you take, this will be the ornament.
There is another ornament - contour. I also call it in our literature as vegetable. But, in my opinion, we need to delve into this concept, since contour drawing is often performed in the technique with contour carving. This carving technique is a bit similar to metal engraving, the difference is that the grooves made, which make up the contour lines on the wood, have a greater width and depth, and the tools have a different sharpening. The contour carving in execution is very simple. This carving can be done on any wood and on plywood with a semicircular chisel or an ordinary joint knife.
relief carving
One of the most distinguishing features of this type is that we select the background around the ornament to the same depth. The edges of this ornament can be rolled up. There is also another type in which the ornament can be deepened into the wood, and the background on the surface will remain intact. It is not difficult to perform this type of carving, but you are tormented by cleaning and choosing a plane or background of an in-depth ornament on your own. This process can be facilitated with a manual milling machine. The background of your ornament can be minted. With the help of embossing, you can smooth out the bumps that form during manual processing, and improve the visual effect of your creation. You can also apply various deepenings to the background: cells, grooves, grooves, using small incisors.
slotted thread
This wood carving has no background. If we remove the background in a flat-relief ornament, then we get a slotted carving. In products like a box, for expressiveness and delicacy, colored paper or fabric is placed underneath.
relief carving
main goal our study guide- this will share experience with the masters, and help novice carvers to master this carving. Without taking into account other types of thread, we will dwell on relief carving, as it is complicated in execution and development. If we make ornamental products using the technique of relief carving, then they will be very decorative and expressive.
Relief wood carving has long been used by the Russian people in Orthodox churches. And in our time, some monuments of Russian architecture and art have been preserved, for example: the Kiev-Pechersk Lavra. relief carving with painting and gilding is unusually and solemnly beautiful.
Now let's decipher the relief. Relief is a bulge or convex ornament on a plane, or a combination of various irregularities on the surface of our earth's crust.
bas-relief(low relief) - a sculptural ornament or image, convex above a flat surface of wood less than one second of its thickness.
High relief this is a sculptural ornament or image that can protrude above some plane by at least half the thickness of the entire sculpture. These definitions clearly show that relief carving is divided into two types: 1) high relief - with high relief, 2) bas-relief - with low relief.
Volumetric thread, it is also called sculptural. Unlike the previous types, voluminous objects are trimmed with this carving from several sides or even from all. In architecture, these are columns of balconies, wooden columns, carved balusters, etc. Furniture legs are often trimmed with volumetric carvings. These details may well be considered sculptural images.
Relief woodcarving can be more than just a hobby. Having mastered the skills of owning tools and getting acquainted with the technology, the master will be able to get a good and stable source of additional income. Wooden decorations are in demand both in apartments and in country houses.
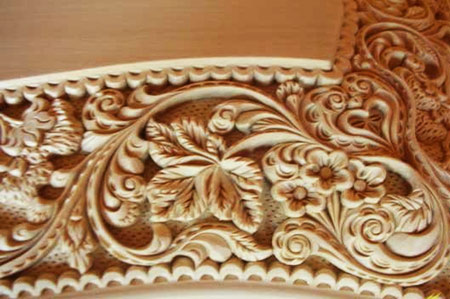
An example of a painting made in relief carving
Wood carving is a traditional craft of many nations. This type applied arts has a long history. And during this time, the masters have created several types of technologies, such as:
In addition, as a separate variety, experts distinguish wood processing in the Kudrin style (Kudrinsko-Abramtsevo). The style owes its name to the place of its birth - the village of Kudrino in the Moscow region. It is distinguished by abundant floral ornaments, garlands of flowers, in which peculiar animals and birds are placed.
The type of wood processing got its name from the word "relief", which in our case is understood as areas raised above the common surface. Flat-relief carving, in turn, is divided according to the methods of execution into:
- bas-relief;
- high relief.
The first type has a high relief, the second - a lower one. A sign of a deaf variety of wood processing is a solid carved background surface without even surfaces.
 Step-by-step execution of flat-relief carving
 The background is located below the level of the drawing, and it is chosen with a chisel of one type or another. One of the varieties of artistic woodworking is. It differs from relief in that a pattern is applied to the surface of the material, the contours of which are selected with a special tool.
The protruding part remains flat, and only the contours emphasize the image, while the relief carving has a figured surface of the pattern.
Note that slotted processing implies a complete selection of the background, that is, the picture seems to be hanging in the air.
What can be obtained by carving wood
The main pattern that is performed in the technique of flat-relief carving or its other variety is. It can be a simple geometric pattern or vegetation, stylization.
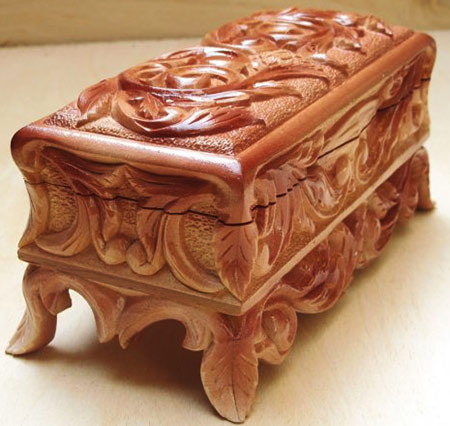 An example of a casket made with embossed carvings
 More experienced craftsmen include images of animals, birds, people in their works. There are both traditional folk stories and compositions on contemporary themes. Everything depends on the skill of the author and his ability to transfer the image to the board.
Read also
Hand carved wood furniture
Since the source material for this type of work is a wooden board, then it is made from it:
The range of products is very large. Relief can be processed surface cutting board and window sill, in general, any thing in the house that has a flat surface. The most popular are souvenirs made in the style of relief or contour carving.
A hand-made thing in the traditional folk spirit will be a wonderful gift for relatives and friends. And yet, having mastered the work, the master will be able to sell souvenirs via the Internet. Such products are in great demand, especially abroad.
How to choose and prepare wood for carving
You can start training to make carved embossed surfaces on ready-made boards. Shelves from old racks will do, parts that can be bought for next to nothing in any carpentry shop or at a sawmill. Linden wood is considered the most suitable for carving. Of the advantages of this breed, craftsmen note a uniform density, slight shrinkage during drying and quick drying, in addition, the ability to cut in relief both along the fibers and across them.
Before work, the material must be dried. The tree is harvested from November to February, when there is little juice in it. If the master buys a ready-made workpiece, then you need to clarify whether it has been dried. If he does it himself, then the process is as follows. First, the trunk is cleared of branches and bark, then cut into pieces. 
Then the wood for carving is boiled in a container with the addition of salt for 4 hours. This will remove juices and speed up the drying process. Then the blanks are lowered into the basement, where they are placed upright on a concrete floor. This will draw out excess moisture, after which the wood is laid in a ventilated room under a canopy for drying. Moisture content in the range of 12-10% is considered normal. Without special devices, the content can be found like this. A piece 3 cm long and 15 cm wide is cut off from the end (excess is removed).
The fragment is weighed, and then dried for 5 hours at a temperature of +100°C in the oven. Then weigh again and make calculations. To do this, the resulting difference is divided by 150 and multiplied by 100. The result will show the available humidity.


Only lovers will survive
Features of advertising aimed at children
retouching old photos in photoshop retouching old photos
What is an NPO: decoding, definition of goals, types of activities Does a non-profit organization have the right
Gleb Nikitin First Deputy