Making an icon case
05.02.2019, 09:14
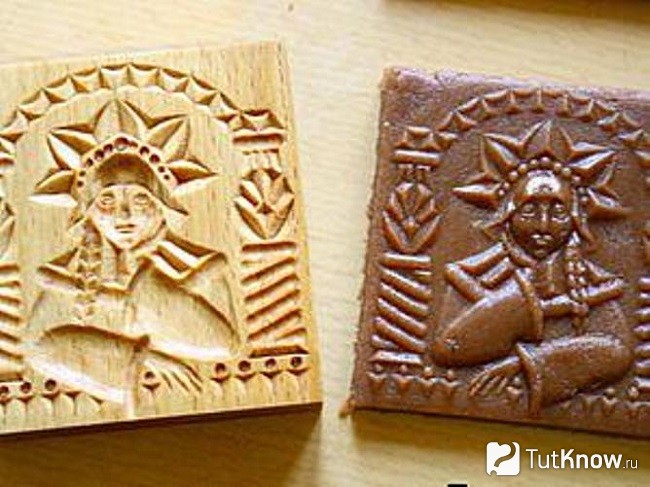
Making a table of contents with wood carving for the icon case
In a similar way, the table of contents (top) for the icon cases in the photo below were made.
To enlarge the image - click on it with the mouse.
First, on paper, in accordance with the dimensions and proportions of the future icon case, a sketch of the table of contents is drawn in real size. It is determined where the wood carving will be located, the sketch of the carving itself is preliminarily drawn.
Then the drawing is transferred to a sheet of fiberboard or plywood and carefully, as accurately as possible, cut out with a jigsaw at low speed, without turning on the pendulum stroke. File with a fine tooth (I use files BOCH T101 AO or Gepard T101 AO)
Thus, we made a template, according to which we will make the top (crown, table of contents) of the icon case using a milling cutter.
There are two ready-made templates in the photo below: the first of the fiberboard is the wall of the table of contents, the background on which the woodcarving will be attached. The second plywood template is the cornice, the arched frieze of the kiot, it will be made of wood.
All bends, roundings, lines of templates are carefully polished with emery cloth. How symmetrical, even and neat our template will be depends on the appearance of the finished table of contents of the icon case in the future.
The following photos are a template for the bottom and top of the kiot
We lay the fiberboard template on a sheet of plywood and circle it with a pencil.
After that, we cut with a jigsaw close to the drawn line, but without touching the line itself.
We fasten the template in a plywood blank.
With the help of a milling cutter and a direct copy cutter with a bearing, we go around the workpiece along the contour.
The bearing on the cutter moves along the edge of the template, and the cutter removes excess material from the workpiece.
In this case, the workpiece exactly copies the profile of the template.
We also circle the arched cornice with a pencil on a wooden shield.
Cut with a jigsaw, roughly, without touching the line.
We attach the template to the workpiece and repeat the previous operations.
We fix the template with self-tapping screws on the back side of the part, not on the front - so that no traces of self-tapping screws are visible on the finished element.
Although if you make a mistake - putty to help.
We repeat the same when making an element for the lower part of the icon case.
Using an edge molding cutter, select the desired profile from the front side of the eaves.
Then we select a shallow (5-8mm) groove inside the eaves.
We connect the cornice with the wall of the table of contents.
You can immediately glue together two parts and then paint as an assembly, but it’s more convenient for me to varnish and tint these two elements separately.
View from the front and back.
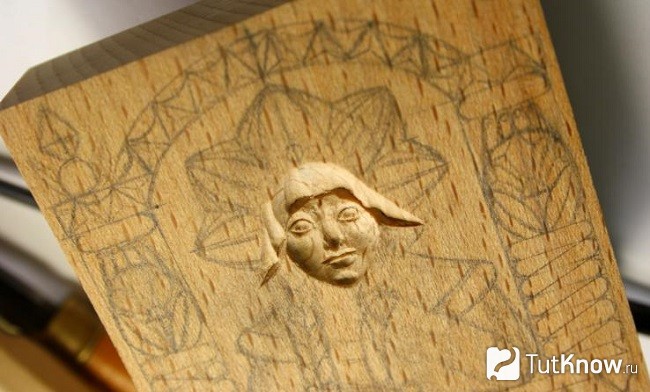
Sketch, wood carving template
Laid on carving for an icon case
25.01.2019, 06:50
Production of carved decor for the table of contents of the floor icon case.
The top (or table of contents, crown) of the floor icon case is an arch with overlaid wood carvings.
Inside the arch there will be an Orthodox eight-pointed cross with carved decoration.
At the beginning, we draw the arch itself on a scale of 1: 1 and then the cross, around which our woodcarving will be placed.
Initially, the sketch is drawn "by hand", the accuracy of the lines, the smoothness of the curves at this stage do not play a significant role. The main thing is to arrange the pattern evenly around the cross, observing the proportions in general terms, to create a logical and complete drawing of a floral ornament.
After that, with the help of patterns, we align the lines drawn "by hand", achieving smooth transitions, roundness of the curls, and adding small details to the sketch.
We draw, as usual, only one left part of the pattern - the right one will be strictly symmetrical to it.
In order to understand how the finished carving will look like, you can attach a mirror along the vertical line (passing along the cross). The right side of the thread sketch will be reflected in the mirror, that is, the whole pattern as a whole will become visible to us.
I shade with a pencil those parts of the sketch that will be cut with straight chisels. Unshaded areas - semicircular incisors.
Some craftsmen cut out a sketch and glue it onto a piece of wood. Then, along the lines of the sketch, using a jigsaw, remove unnecessary parts of the pattern and cut with cutters directly on the paper and on the workpiece at the same time.
With this method, the sketch template is not saved, and if later you need to make exactly the same decor, you have to re-create the drawing.
I do it differently: I laminate the sketch drawing with a simple transparent adhesive tape on both sides. Then, with the help of cutters, I carefully cut it out and get a carving template that can be used many times. You can call it a stencil.
I apply the template to the workpiece and circle it with a sharpened pencil or pen. With the help of a jigsaw, I remove all unnecessary and get a blank for carving. Outwardly, this is a house slotted carving, but we still have to work on itcutters and chisels. In order to make it clear to me where, what and how to cut, I transfer the sketch drawing to a wooden part. Also with the help of patterns.
After processing with cutters, the finished decor is manually polished with fine sandpaper.
With a sandpaper we remove burn marks from a jigsaw file, smooth out irregularities after working with chisels.
By turning the thread over, you can cut the reverse side of the pattern with cutters in some places. Thus, we will, as it were, raise, separate our carved decor from the background to which it will be attached.
In the following photos, the wood carving is covered with a transparent varnish.
The wooden shield for the blank was glued from different plots - this can be seen from the different colors of the planks. In this case, it does not matter - the finished carved decor will be painted with gold paint.
The lacquer acts as a primer and several coats will give you a smooth finish before gold plating.
Woodcarving on the icon case painted "under gold".
Floor icon case with wood carvings
Wood carving, sketches, photos
14.09.2018, 04:29
Transferring a woodcarving sketch to a lime board using a template
If the applied thread is symmetrical in the horizontal or vertical plane, then only half of the sketch (template) is drawn
"Spruce and Drill" - hand carving workshop in Belarus
Decorative panel for church furniture
12.09.2018, 06:50
Panels are made by us only from wood: ash, oak, birch, alder. Most often, of course, from linden.
If necessary, we will do the finishing: tinting with stains or stain, varnishing.
All wood carvings are carved by hand.
A drawing, a sketch, a sketch of a carved ornament is discussed in advance. As are the sizes.
Carved panels can be used as wood carvings for church furniture, for example, for a floor icon case or a church iconostasis.
Carved panel for a wooden altar
08.09.2018, 07:57
Decorative panel made of wood, hand-carved
At the first stage of work on the panel, a wooden shield is glued together, assembled from identical lime slats (lamellae).
A sketch for wood carving is marked on the shield and all unnecessary parts of the ornament are removed using an electric jigsaw. It turns out a slotted or through saw thread.
A decorative panel can become an element of a furniture facade
In our case, wood carving (carved panel) was made for the door of a wooden altar in an Orthodox church.
You can order the manufacture and buy an altar with a canopy in the form of a floor icon case from us.
06.09.2018, 07:36
Wood carving - from sketch to finished product
Creating a sketch or drawing is the first step in making a carved decor.
The sketch is drawn on a scale of 1:1.
This takes into account not only the external, aesthetic appearance of the future product, but also the capabilities of the carver, his skill, the presence of the necessary cutters, the complexity and size of the carved decor.
To enlarge the picture - click on it with the mouse.
The next step, after creating a sketch of woodcarving, is laminating it (for example, with ordinary transparent tape) and cutting the template along the outline of the picture.
With this method, the thread template can be used repeatedly if several carving patterns are to be cut.
Just trace the template along the contours with a pencil.
The next step is cutting out a welt pattern with a jigsaw.
We remove everything superfluous, leaving what we will work with incisors.
In principle, this is the so-called house carving.
A simple slotted wood carving used to decorate houses.
With the help of patterns or "by hand" we apply cut lines, drawings on the workpiece.
After working with cutters, sanding, tinting and painting, this is a wooden carved decor.
This applied cross with a carved pattern was cut out for a church lectern made by our workshop.
You can see his photo and description in the "Analoi" section.
When copying images and reprinting an article, a link to the site is required!
21.05.2016, 07:50
Wood carving for the front part of the church lectern.
Step by step manufacturing.
Transferring the drawing, sketch to the board.
You can transfer the pattern to the workpiece through a carbon paper or using a cut out template.
With the second method, a template once made and cut out, for example, from thick cardboard, can be used many times if you need to make many identical products.
The finished slotted pattern is processed with cutters and chisels of various shapes.
At the final stage, wood carving is polished with a fine-grained sandpaper before painting or coating with oil, wax, stain.
Wood carving, for a mirror
26.03.2016, 09:19
Making a sketch of a carved pattern
Transferring the pattern to a lime board and cutting out the outline with a jigsaw
Finished work... Then sanding, tinting, painting...
A small video clip of a master class for making a carved frame for a mirror or picture
There is a legend among the locals that tells why the village has such a name: they say that once a small unknown village burned down near Slonim. Two inhabitants of this village - two brothers, who bore the surname Krakot, went down the Jordan River to these places. The first brother settled in the headwaters of the Jordan River, and the other went down the river. The place where the older brother settled was called Great Krakotka, and where is the youngest - Malaya Krakotka. To date, these two Krakotki are still one next to the other ....
Here is another story from that time.
Once they decided to involve the boyars living in Velyka Krakotka in the usual daily work, which was done by the peasants. The boyars then began to resist, saying that digging the earth, carrying hay are duties and occupations for the peasants. And their boyar business is military service. Offended and went to the capital - Warsaw, to the king himself ZhigimontVase.
He listened to the boyars and said that no one would do this to them anymore and gave them a paper in which it was written that the boyars should not be involved in any other work, except military service. The kings did not give offense to their subjects and tried to adhere to the ancient laws.
After three sections of the Commonwealth, Krakotka ended up in the Russian Empire in the Slonim Povet. There is evidence that in 1798 31 men lived in the village. The fact is that before that there was a liberation uprising under the command of Tadeusz Kosciuszko.
In the 18th century, almost all of our country was Uniate. Uniates lived then and in Great Krakotka, and in Malaya Krakotka, behind which there has long been a Uniate cemetery.
At the Krakotka cemetery
Attractions
The village is famous for its natural monuments.
On the very outskirts of the village is the Republican geological geomorphological monument of nature "Krakotskaya ridge". Scientists say that it appeared 220 thousand years ago during the Ice Age! Such ridges, they say, appeared from sand, stones, in the openings of water flows in ice cracks.
The famous Krakot boulder
When the ice came down, a man came here.
On the outskirts of Krakotka, in the forest, there is a very beautiful juniper grove. If someone was in the Crimea, he saw such juniper groves. In Belarus, such groves are rare.
On the outskirts of the juniper grove, an old cemetery has been preserved, along which stones are scattered. The fact is that according to the local rite, when someone who took his own life was buried, a stone was placed above the head and at the feet, where a wooden cross was also placed. It is believed that when the day of judgment comes, and everyone goes to the judgment of God, it will be easier for him to get up, holding on to the cross. Now these stones are destroyed, because the cemetery was plowed up and planted there.
About the holy healing spring
In the village there is a holy spring with healing water, which has been known since ancient times.
There is a local legend about the krinichka.
They say that once this land belonged to Pan Skurat, who had a daughter, she had very poor eyesight. Once an old man came to the village, stopped near the mountain, from which water flowed.
The elder drank this water, rinsed his face, and immediately his eyes began to see better. They came to the village, told the people about it, who passed everything on to Pan Skurat. Pan began to take this water and treat his daughter, wipe her eyes - the girl was cured. Then Pan Skurat dug a well on the mountain, and from that time on, this little cup was called Pan Skurat's little cup.
Now the crinichka is consecrated in honor of Forerunner and Baptist of the Lord John. They say that on holidays the water is scooped up to the bottom, but it quickly fills up. Water helps with diseases of the eyes and stomach. There are examples that people were cured by this water. But it is known that water helps those who believe.
The Holy Krinichka is located near a river with an interesting name Jordan. It was deeper and wider until reclamation was carried out. And when reclamation was carried out, it became a small stream. The name of the river is mysterious. The legend says that once a man who called himself Jordanas was killed in these places. Or maybe there is a connection between the Jordan River and the famous Jordan River, in which John the Baptist baptized Jesus Christ?
Here, water-blessing prayers are performed, with special solemnity - on the day of the Nativity of John the Baptist (July 7). Water from this source is taken not only locals, but also pilgrims, travelers from near and far abroad.
Famous personalities of Great Krakotka
In the part of the village that used to be called Malaya Krakotka, Ivan Solomevich was born - a Belarusian literary critic, folklorist, bibliographer, translator, encyclopedist.
He signed his works with the pseudonym Krakotsky or Yan Solomevich.
The writer was born in Malaya Krakotka, and went to school in Velikaya.
By the way, the famous Belarusian Grigory Okulevich was also born in Velyka Krakotka. During the occupation in Polotsk, he was an active figure in the national liberation movement of Belarus. He was also one of the organizers of the BKRG and TBSH. When the Poles began to hunt Okulevich, he was forced to emigrate to Canada to avoid arrest. But he did not leave the Belarusian activity there, and together with his friends he created the first Russian newspaper in Canada, which had its own Belarusian page in the Belarusian language. And when World War II began, Grigory Okulevich volunteered for the war. After the war, he became the chief secretary of the Russians in Canada Federation in Canada, and later became the editor-in-chief of an emigre newspaper. In Canada, Okulevich wrote and published two books: "50 Years of the Belarusian Republic" and "Russians in Canada".
In Velikaya Krakotka, Grigory Okulevich and his friends created a Belarusian library on the basis of TBSh and named it after Yanka Kupala. And the Poles did not like everything that was Belarusian, they did not like the local Belarusian movement, so the Poles closed the library. All Belarusian books were taken out of the library. Only in 1939, the Belarusian library of Yanka Kupala was updated in the village.
The Second World War, and the library was destroyed, but in 1946 the Yanka Kupala library in Velyka Krakotka was born for the third time. The wife of Yanka Kupala, Vlada Frantsevna Lutsevich, corresponded with this library.
Yakub Kolas, Arkady Kuleshov, Kondrat Krapiva, Ivan Shamyakin, Mikhail Lynkov sent books with their autographs to the library. In 1970, a new library named after Yanka Kupala was built in the village, but today it no longer exists. Pavel Tavlai, the father of the famous Belarusian poet Valentin Tavlai, took an active part in the construction of Yanka Kupala.
Tavlai began writing poetry at an early age. When he studied at the Slonim Teachers' Seminary, during the census he registered as Belarusian, and wrote Belarusian in his native language, for which he was expelled from the seminary. In 2014, the 100th anniversary of the birth of the poet Valentin Tavlay was celebrated. He spent 7 years in Polish prisons for his Belarusian activities, but, fortunately, he did not fall under Soviet repression and did not rot in Stalin's camps, he died a natural death in 1947. He wrote a lot about Valentin Tavlay, studied his work, his fellow countryman, Belarusian poet Mikola Arochka dedicated many poems to him.
Mikhail was born in a neighboring village, but he liked to come to Velyka Krakotka, he loved these places. In the village they are proud of their countryman-poet.
The Great Patriotic War
In 1941, a strong battle took place near Velyka Krakotka. On the German side, the Gulden regiment fought here against the Red Army. 160 German soldiers died here and were buried on the mountain near the church. And in 1944, when the Germans were retreating, they dug up the remains of each of their dead soldiers, put them in new coffins and took them to Germany.
No one can say today how many Red Army soldiers died. Only 1600 soldiers were taken prisoner, they were led through the streets of the village. In the middle of the village of Velikaya Krakotka, 17 known and 338 unknown Red Army soldiers are buried in a mass grave in the middle of the village. And how many of them lie still, covered in funnels, trenches?
A house was recently built in the village and the remains of 4 more Red Army soldiers were found. They were brought to a mass grave and buried there.
On the outskirts of the village and in the forests, and now there are still amateurs studying the history of the Great Patriotic War, the history of the Great Krakotka is found by objects of those times, testifying to strong, bloody battles.
One of the old finds, the cross was found on the road leading to the temple in Malaya Krakotka
Search at the monastery lake (formerly Lake School)
Solidus 1663. Much was found along the road near the temple in Malaya Krakotka
ringlet
10 pfenings
The program "Journey of an amateur" and "Hope for the village"
Interesting and educational program BT has finally visited our village!
Velyka Krakotka is rich in interesting sights and people.
A story about them and much more - in the video report offered to you.


You can make so many decorative items and useful little things from carved wood and plywood that it is stupid to limit the scope of the work. In fact, it can be absolutely everything that your imagination has enough for: caskets, covers for decorative and collectible books, lampshades, panels, shutters, furniture elements, platbands, cornices ... But the most attractive thing about creating exclusive works is that everyone can do them willing, if applied a certain amount of efforts.
Slotted wood carving: photos, drawings and sketches
The main key to success in creating interesting gizmos with slotted carvings is the choice of pattern. It is he who conveys the general concept and sets the aesthetic tone for the entire product.
The easiest way for beginners is to make geometric patterns, as in the photo.


Carved drawings of floral and animalistic themes are classic ornaments for any application.


Inscriptions - a modern version of the use of carving on wood and plywood. At the same time, you are unlikely to be able to find drawings and sketches on the net - they will have to be compiled purely individually for personal requirements for sizes, fonts, words.

Stencils for slotted threads
However, unlike cut-out inscriptions on plywood, drawings with plant, animal and fantasy themes can be found on the net. So feel free to choose your favorite stencils in the album, and there will be enough ideas for creativity for a long time!
The simplest sketches are suitable both for training at the very beginning of the manufacturing process, and can become separate elements of a complex design. For example, this is how carved houses are decorated.


More complex templates will require some skill and patience, but the result is worth it. Such pictures can serve as an independent product, even a gift.


Whole compositions with an idea and meaning usually serve either as a separate work or form the basis of the work.


Tools for slotted carving: jigsaw or router
However, the choice of drawing is only a third of success. Another important aspect, which must be considered before proceeding with the work itself. Namely, the choice of a tool that will be used for carving wood or plywood.
Equipment depends on:
- how thin the thread will turn out;
- the complexity of the pictures;
- cutting speed;
- accuracy of work.
Therefore, it is important to evaluate all the pros, cons, capabilities and limitations of each of the traditional sawing tools:
Jigsaw - a device for curly cutting out parts. It is quite laborious to work with a hand tool, but it allows you to very accurately cut out according to the drawing. The power tool allows you to quickly produce figured products from plywood, but requires caution.

A milling cutter is a tool that makes flat relief slotted carvings look thinner and more complete. It is with its help that it turns out to round the edges, remove chips, make gaps, and carry out the most difficult cutting.

Theoretically, a milling cutter can perform the same work as a jigsaw, and even more, but in fact such handling of the tool is fraught with its rapid failure, frequent replacement of the frieze.
Materials for slotted threads
In most cases, plywood is chosen for this type of work - it is uniformly thin, has a pleasant color and structure, and does not lead to further use or storage, unlike solid wood. It is the choice of material that becomes the third pillar of successful work.
The modern market abounds different types materials, so it's easy to get confused. For such work, you should choose:
- plywood FK - harmless to humans and the environment, durable, easy to cut, practical;
- FB plywood is also safe for humans, but resistant to aggressive environments, since it undergoes special processing and receives a protective coating, which can cost an order of magnitude more.
Note! In no case do not choose FSF class plywood for interior work - it is treated with carcinogenic preservatives and is only acceptable for use on fresh air- they are perfectly lined with a bathhouse or a house outside.
Photo of carved wooden houses
For Russia, slotted carving is of particular importance as a decoration for building facades. Since ancient times, ornaments carved on birch bark and other similar materials have been decorating huts, baths, churches, which is colorfully demonstrated by photographs.


Wood milling video with a manual router
If you just decided to try your hand at curly slotted carving, it would be useful to watch a video with a master class. It will help to better understand how drawings are created, and how such house beauty appears.
When decorating a living space, you can use a variety of materials, but traditionally wood is used for these purposes. To date, artistic processing is carried out using a huge number of techniques, but perhaps the most spectacular results are obtained when using slotted woodcarving.
The technology cannot be called complicated, but the resulting products amaze with their beauty and grace. We will discuss this technique in more detail later.

What is carving?
Through drilling and cutting through any background are the essence of openwork cutting. Upon completion of the work, light and airy patterns are obtained. There are through and overhead thread options. The first option creates the desired effect in the light, the second involves applying it to some kind of background (base).


To make through cutting through wood, drills, special chisels, and saws are used. The most suitable tool would be an electric jigsaw, which allows you to quickly and easily complete almost any drawing.

The work process itself assumes the presence of pre-prepared drawings for slotted threads. Therefore, we will briefly consider some of the steps that are important to go through at the preliminary stage.

Preparatory stage
For first-time carvers, it makes sense to focus on theory. Printed publications, needlework sites will provide comprehensive information about the method of decoration in question.

After studying the technology, it is worth preparing the tools, if necessary, purchase them in the store. In addition to a jigsaw, you may need chisels of different sizes, a drill and drill bits, cutters, expendable materials for grinding, etc.


Another important milestone at this stage will be the choice of patterns and sketches for the future decoration. You can try to make the latter yourself or find suitable ones on the net, since there are plenty of specialized sites on this topic. Printing in the right scale will complete the preliminary stage.

Wood
The main requirements for the material are its dryness and quality. There are many blanks in specialized stores dedicated to handicrafts. Suitable wood can be found in hardware stores and sawmills.

In addition, you can make a good profit at furniture enterprises, where there is always a large number of unnecessary cuts. Another possible variant- crates and pallets, used.

The quality of work depends not only on the master, but also on the type and type of wood. Each has unique properties, which is important in the presence of specific creative goals. Let's take a quick look at some material options.

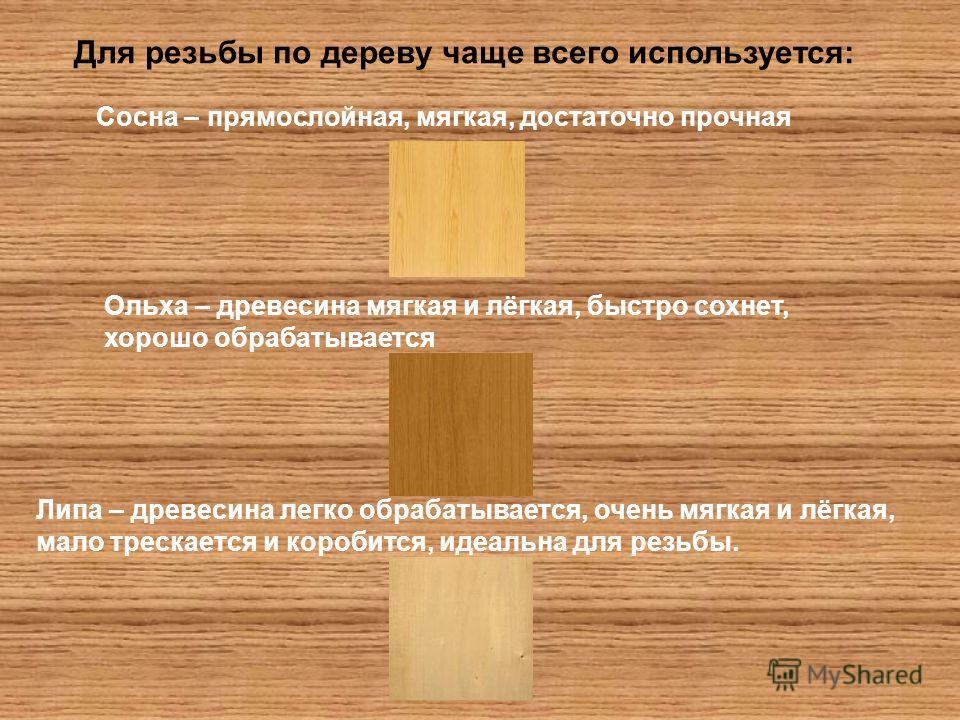
Pine is the most accessible and inexpensive breed. However, it only works in rare cases. There are several reasons: resinousness, different density of layers, a noticeable texture that interferes with the creation of a small pattern.

Aspen is considered a soft material and not suitable for a beginner. It is easy to cut, the wood is wrinkled and requires a lot of experience to work with it.

Birch and linden have an excellent structure, have the right density, which makes it possible to realize even the most daring sketches of slotted carving.


Plum is excellent due to its pliability in processing, at the same time it has the right hardness. Small drawings and women's jewelry made of plum will become an excellent product in the hands of the master. Beginners should also try themselves on this material.

In order to avoid subsequent cracking and curvature of the slotted product, it is important to remember that the material is dry. Random drying in a warm and well-ventilated room is the best way. The boards are placed on the end and on the dies to provide air access to all sides.

creative process
Woodwork begins with the transfer of the drawing to the workpiece. For this, all the templates were prepared at the preliminary stage. When the drawing is applied to the part, the stage of drilling holes next to the drawn lines begins.


The drill should be of such a diameter that a jigsaw file can easily pass into the resulting hole. Where it is not possible to make cuts with a jigsaw (too small a pattern and sharp bends), a narrow hacksaw blade is used.

Experienced craftsmen advise using saws with fine teeth, otherwise the edges of the slots will have a torn contour and the product will lose its aesthetics. It is desirable to drill with pen drills, having prepared a thin hole in advance.

From torn edges with slotted carving on plywood, gluing thick paper on the back of the workpiece helps. For beginners, it is better to try simple patterns with large details and a minimum number of corners.

Finishing
Refinement of the product is performed to obtain smooth and clean edges. Chisels are used, a sharp knife is useful in hard-to-reach areas.

Cleaning is carried out using sandpaper, a needle file or an abrasive wheel. The finished product is polished on both sides to obtain the proper appearance.


Looking at the photo of the slotted carving, it becomes clear that the resulting patterns are an excellent decorative element for furniture, window trims, and cornices. The elegance of the product makes it possible to create excellent women's jewelry, decorate screens and much more.

Photo slotted thread


The presented wood carving lessons will introduce beginners to this craft so that you can create objects from natural materials with your own hands.
The history of the craft and types
Wood carving is a type of arts and crafts that originated in antiquity. In Russia, woodcarving was called carving, and the drawing performed in this technique was called a sign, a pattern, or a pattern. In this technique, masters made braids, teeth, grooves, poppy seeds, fungi, etc. on a flat surface. You can see such samples in the Assumption Cathedral by visiting the royal place.
Russia owes the development of woodcarving to the monk Ambrose, a novice of the Trinity-Sergius Lavra, who at the end of the 15th century combined Russian ornament with Western and Eastern in his works.
In 1660, the masters decorated the royal dining room with German carvings, which were figured, with Gothic motifs. This is how German elements appeared in Russian carving, including new tools and terms.
Thread types are conditionally divided into:
- through;
- deaf;
- brownie;
- sculptural;
- chainsaw thread.

Here's how they differ:
- The through thread is subdivided into consignment note and through thread. This includes slotted carving, when through sections are cut with chisels and chisels; and profile carving, where such sections are cut with a jigsaw or saw. If these types of carving are performed using a relief ornament, then this is called openwork.
- If there is not a single through hole in the processed tree, such a thread is called blind.
- Facades of buildings are decorated with house carvings.
- Sculptural - one of the most complex types of carving, requires great skill. In this technique, figures of animals, sculptures of people are made.
- With the help of carving with a chainsaw, global work is performed. This requires strength, therefore it is more suitable for men, while women also successfully master other types of carving.
Woodworking tool, cutting blanks
Beginners can use only 2 tools - a well-honed penknife and a joint knife.
When you learn how to perform simple elements with them, you want to improve, then you can buy wood tools, for example, such a set.

There may be even more tools, but only professional carvers who perform complex work need such a number.

See what kind of cuts you can make with semi-circular cutters different sizes, acute-angled.

But what set of tools should a cabinetmaker have in order to perform the following types of woodwork:
- carving;
- sawing off;
- splitting and trimming;
- planing;
- turning;
- chiselling.

- Pay attention to the cutters that are used for manual turning of wood. In addition to the semicircular, there is also a flat oblique, angular, detachable, beveled, angular, etc.
- Saws are used to saw off the workpiece. They can be transverse, longitudinal, universal. The teeth of the rip saws are chisel-shaped; in the transverse they are triangular, sharp. Universal are equipped with teeth having a right angle. Such a tool can cut fibers both along and across and at an angle. Each of these saws can be hacksaws, simple, one-handed.
- If the workpiece is made from a ridge, beam or trunk, then axes or cleavers are used. Adze - a kind of ax, the blade here is located perpendicular to the handle, is used to create figured and concave products.
- To remove chips from the workpiece, turning or hand tools are used, planers can be used.

The most popular carving tools are chisels. They usually consist of:
- steel rods;
- cutting blades;
- shank.
- Wide and straight are used for cutting or stripping flat or convex workpieces.
- With round blades - for working with horn knots or hardwood.
- With the help of narrow workpieces are processed in narrow places.
- A chisel with a thick steel rod is used to clean a deep cavity or workpiece with a hollow. Deepen the chisel into the wood with a mallet.
- Cranberries make gutters of various depths and radii.
- Corner chisels make grooves and triangular recesses.
Wood carving: sketches and master classes
After you have learned a lot of useful things, got the necessary, let's try to cut a flower. To make it, you need the following:
- flat wooden blank;
- pencil;
- transparent paper;
- v-shaped chisel-corner;
- narrow and wide semicircular chisels.
If you don't already have a v-shaped chisel, you can use a sharp knife for this pattern.
Attach a sheet of paper to the screen, redraw the diagram.

Then transfer it to a wooden blank. Start by cutting along the outline of the center circle, then cut towards the center from the outer circle using a large semi-circular chisel.

Mark up the flower petals.

Using a v-shaped chisel, cut the petals along the outline.

With the same tool, remove the excess wood between the petals (“triangles”).

Take the next woodworking tool in your hand - a semicircular chisel to cut out the outer contour of the petal. In doing so, it will become similar to the upper part of the heart.

With a large semi-circular chisel, make cuts inside the contour of the petal.

With a small semicircular chisel, make two cuts on this contour from the center of the flower.

To increase the cut area, just cut again.

Unfold the chisel and round the center of the flower.

Now you need to take the next carving tool - a v-shaped chisel and make such cuts in the center of the flower.

Everything, you can admire the result of the work.

If you want to carve a fox, the following sketches will come in handy.

If you want to make butterflies, wood carving sketches are also included.

If you want to make a mold for printed cookies with the image of the Snow Maiden, then prepare:
- beech plank;
- ruler;
- jigsaw;
- simple pencil;
- ruler;
- sandpaper;
- eraser;
- linseed oil.
Draw a rectangle on the board. Drink it up.

If you do not have an electric jigsaw, then you can cut the workpiece with a saw or an ordinary manual jigsaw.
Make the surface of the cuts even with sandpaper. If the farm has a grinder, use it for this procedure. Transfer the drawing to the workpiece using a simple pencil.

With the help of a semicircular chisel, we make a recess in place of the face, then we again apply its contours here.

The ongoing wood carving sketches will help you carve out the facial features correctly. At this stage, we also make a cape on the head of the Snow Maiden. Note that it is at a level above the face.
Based on the sketch, cut out other elements of the workpiece.

Now you need to erase the pencil with an eraser-rubber, then with the finest sandpaper. If you immediately do this with sandpaper, then part of the stylus will rub into the tree.
Pour linseed oil into a container, dip our wooden mold into it for an hour. If you are doing a lot of work, then saturate it with oil using a swab or squirrel brush and leave to dry for 3-4 days.

Everything, you can roll out the dough, cut it into rectangles, apply a pattern using a wooden blank and bake.

To prevent the cookies from burning in some places, you need to cut a stamp out of wood so that there are no too prominent elements on it.
How to cut a sign for a bath?
For her, take:
- a board (in this case, a coniferous wood step was used);
- triangular ruler;
- simple pencil;
- saw;
- furniture varnish in a can;
- stain;
- brush;
- sandpaper.
To draw letters, download the letters you like from the Internet, then redraw them on wood. You can use this sample.
Draw oak leaves on the right and left on the plate.

Next, the carving begins. For beginners, such tasks are great, because they do not require long training and a lot of tools. Here, 3 types of cutters were used: a joint-cutter and chisels "Tatyanka". Make cuts according to the pattern with a chisel cutter along the outlined contours, cut it under the contour with a chisel to highlight the pattern above the background.

Next, the carved surface is sanded with sandpaper No. 180 and No. 220. Draw clouds at the top and bottom of the plate, cut them out with a chisel and a chisel, and then sand them.
This soap will be a nice present for friends. After all handmade much appreciated. In order to make a rose out of soap, you will need a little, namely:
- a piece of soap;
- cutter;
- tassel.

Then you need to cut out the second and subsequent petals. At the same time, move from left to right in a circle.

This is what the job should look like after you make the first circle.

Perform the second and subsequent ones in a checkerboard pattern in relation to the previous ones.

Here's how to decorate soap with your own hands by combining carving and woodcarving.
In conclusion, 3 plots are offered to you. From the first one you will learn in detail about wood carving, about tools for beginners.
After viewing the second, you will be able to carve a spoon with a beautiful carved handle.
From the third, you will learn how to carve a charming rose from wood.
Woodcarving is an amazingly beautiful and very popular type of manual woodworking in our time. Carved interior details conquer with their magnificent appearance and reflect rich national traditions.

Creative people who simply “itch” their hands to do something very interesting and useful should pay attention to woodcarving. Girls and women may think that this is only a male occupation. And they will be wrong, because there are no less women masters of woodcarving than men.

About woodcarving for beginners
Can be used to decorate indoor and outdoor space different kinds carvings and techniques for translating what was conceived. If you are interested in this type of needlework, then you should understand that you need to master the methods and techniques of wood processing, acquire the necessary tools and improve your carving skills.
AT modern world smartphones and tablets wooden stand, decorated with wood carvings, looks very original.


Skillfully executed carving in the form of simple and ornate patterns and ornaments seems to enliven the world and endows it with sophistication, charm, emphasizes the taste of the owner of luxurious things and the talent of the master.


The works of the best carvers adorn the temples. Pay attention to the photo of the iconostasis of the upper church of the Savior Not Made by Hands, which is located in Moscow, in the Church of the Intercession of the Most Holy Theotokos in Fili.

Modern masters with a delicate taste create real masterpieces.

And thanks to finishing and protection technologies finished product from the destructive effects of mold, insects, these carved wood crafts have served people for hundreds of years.
Pay attention to the magnificent carved pieces of furniture:


Stylish doors:

Amazing handmade figurines:


Very often, connoisseurs collect handmade carvings. Wonderful chess worthy of any collection.

Perhaps, over time, your masterpieces of woodcarving will be carefully kept by collectors or decorate temples.
Types of woodcarving
Of all types of woodcarving, the most interesting openwork or through thread on a tree, which has some transparency, in which only the image remains, without a background. An example is an overlaid carving - this is an ornament that is attached to a finished background after being made by a master.

Geometric carving on wood – this is a type of carving in which a pattern is formed using many simple geometric shapes (often a diamond is used).

Oriental carving on wood is distinguished by bizarre forms. Egypt is the cradle of oriental wood carving.

relief carving on wood. In this technique, the image is located above the background or at the same level with it. These are carved panels of various shapes with a three-dimensional image.

- this is relief carving, but distinguished by an abundance of carved and stucco decorations, various flowers, curls, leaves, figures of people in unnatural poses, fabulous fantastic animals.

It originated in the village of Kudrino. Well-known products in this type of carving are caskets, vases, dishes, ladles, and home decor items. The main element is a floral ornament: rosettes, curls and twigs.

Volumetric (sculptural) carving Great for making sculptures, animal and human figurines, toys. - a subspecies of volumetric thread. This is the main craft of the village of Bogorodskoye in the Moscow region. The famous Bogorodsk toys are figurines of animals and people made of linden and alder.

Most often used to decorate wooden Scandinavian churches. With images of Gods and various animals, wood carvers decorated inside and outside church buildings.

- the simplest and rather peculiar type of carving. On a flat background, the master cuts grooves - grooves, forming a pattern. Carved landscapes - images of landscapes on a tree.


All these types of carving are rather conditional. Each master chooses the most acceptable of them, taking into account work experience, wood quality and creative inspiration.
What can be carved?
The simplest staircase is transformed, decorated with carved balusters. Balusters- these are curly columns in the form of columns, a stylish and noble decoration of the stairs. Wooden balusters look organic with a spiral wooden staircase.

Bas-relief. Another name for "low relief". This is a sculptural image on a plane. Most often these are figures of people and animals. .

Choosing wood carving tools
As in every business, wood carving has its own secrets, nuances that allow you to reveal the beauty of wood in a wonderful ornament. It is necessary to pick up special tools for woodcarving and stock up on the necessary blanks and sketches for woodcarving, which will be embodied in the form of drawings, borders, lace or genre scenes.
Basic Toolkit
Highly high requirements applied to the quality of carving tools. Of course, craftsmanship plays an important role, but well-chosen and sharpened tools will help bring your idea to life. Experienced carvers at first glance at the tool will tell about its quality, and beginners are lost in the store from a huge selection.
The basic set for woodcarving includes:
- several knives and chisels;
- needle files;
- hacksaws for metal;
- vise;
- sandpaper;
- drill with several types of drills;
- bars.

Knives should be made only from high-quality steel. It is better to buy them in specialized stores for creativity. Although at the initial stage, just sharply sharpened knives will do. Knives from Tatyanka, Narex, Kogatana and others will serve as an excellent start.
It is not necessary to choose an expensive foreign-made tool, because domestic tools can be the same good quality but much cheaper
With the growth of skill, you may need a set of tools, a milling machine, a drill, etc.

Chisels for carving
Sometimes, instead of a chisel for wood carving, a sharpened screwdriver or file is used.

Flat chisel- This is a long rod, at the end of which there is a flat cutting edge. Very often it is used for the primary processing of wood.
Chisel semicircular- is one of the most important tools for work. They differ somewhat in the degree of roundness, that is, they are medium, round and sloping.
Still happens V- a figurative version of chisels. It can be useful for geometric woodcarving, which we will introduce you to below.
For beginners, a small set for woodcarving, but of good quality, is enough to immediately get used to the correct movements and pressure.
In this video, a wonderful master A. Yuriev shared with us which tools to choose for carving.
How to protect yourself from injury when carving wood
Any tool of a master carver can be compared with a straight razor, therefore, when working with it, safety measures must be strictly observed. The material must be positioned so that the knife or chisel can be worked freely, eliminating the possibility of a sharp edge hitting the hands.
The place to work should be comfortable and clean. Everything superfluous in this moment Tools must be neatly stacked as they are very sharp and can cause injury.

Work materials
Each type of wood for carving has its pros and cons. It is easy to work with soft wood, but there can also be a lot of marriage. These are aspen, linden, birch. For beginners this wood will do the best thing.
Oak, boxwood, mahogany are more expensive and complex woods. It is hard and durable, so it is difficult to carve from such wood. Very often there are troubles when working with such types of wood. Either the instrument or the master may be damaged.
An experienced carver can easily work with various woods, including juniper. Well, for beginners it is better to use inexpensive materials - spruce, pine, pear or birch.
Whatever tools are chosen for woodcarving, safety precautions must be strictly observed!
Geometric thread technology
Geometric wood carving is considered the easiest and is great for beginners. To create a conceived drawing, you need to have small set wood carving tools and clearly withstand the pattern. For geometric carving On wood, symmetry and repetition are of great importance. This achieves a wonderful play of light and shadow.


Cutting boards in this technique, wooden panels look great in the kitchen.

Geometric carving consists of sequential sawing out of simple geometric shapes: rectangles, triangles, squares, rhombuses. But the result is a wonderful ornament that looks different in different lighting conditions.
Execution sequence any wood carving is like this:
- First, a blank is made of wood (board, deck, blank).
- Next, rough leveling of the surface of the workpiece, in which all defects and roughness are removed.
- Then a decorative relief is formed with special cutters.
- After the completion of the main thread, finishing - grinding, impregnation, painting, varnishing.
You can not work with the workpiece on your knees! The master must have a table to work with.
Master class "Geometric woodcarving on a cutting board"
Tools. You will need 2 wood carving knives: a triangular joint knife and a pen knife, a ruler, a compass, a pencil.

A triangle joint knife is needed for cutting triangular shapes of various configurations, as well as for cutting long straight lines. To cut long lines such as a petal or a groove, a pen knife is used. Carving knives should be sharp and comfortable.
First stage. We make a sketch of the pattern on the board. It can be applied with a compass and ruler. Or you can print the patterns for carving taken on the Internet and transfer them to the prepared cutting board using a carbon paper.

Second phase. Cut out the petals. We use a pen knife.

During operation, the thumb is firmly pressed against the board, and the index finger lightly touches the wood. This will help to adjust the depth of entry of the knife into the surface and the angle of inclination. And the thumb will help move the blade smoothly. First, cut in one direction at an angle, then turn the board over and cut on the other side.

If the shavings curl in a “string” - the knife is good, sharp. It must be periodically undermined with a piece of leather with GOI paste.

Third stage. Cut out the triangles with a cutter. With a “heel”, at an angle of 45 degrees, we cut the knife into a tree, without bringing it to the edges of the pattern on three sides. The slots should be joined on all sides in the form of a pyramid. The sliver, falling out, forms a beautiful triangle.


Fourth stage. What could not be cut off, we carefully clean it so that the edges are frequent and even. By the same principle, we cut grooves and triangles around the perimeter of the board.
Fifth stage. We grind everything with sandpaper, process it with natural impregnation. All! The work is done. We decorate the kitchen useful and beautiful cutting board with wood carving.
Drawings for woodcarving
To perform wood carving, photographs, drawings and sketches are simply necessary. A large pattern for wood carving is used for dimensional products: for the facades of houses, interior decoration with carvings of churches, windows.
For interior items and furniture, carvers use small patterns, which are carefully worked out by the master.
YOU WILL USE
We offer you an archive of . Choose, print, create.
Video wood carving workshops for beginners
Of course, the wood carving looks especially impressive in the video. Channel "HAND-CARVED WOOD" shows the features of geometric carving for beginners.
Women's view of woodcarving. Channel tatiankacarving shows us how to make flower petals and leaves.
Konstantin Belyaev on his channel he talks in detail about the cutters for woodcarving.
And on this video Ivan the Builder shows how to make relief plane carving:
We will be very happy if this article inspired you to take up woodcarving!


For beginners: breeding a broiler at home Boiled water for broilers
Only lovers will survive
Features of advertising aimed at children
retouching old photos in photoshop retouching old photos
What is an NPO: decoding, definition of goals, types of activities Does a non-profit organization have the right