Love Marich
Presentation of the project "Magic Water" for children of secondary preschool age. Experimentation
Project« Sorceress water» For middle preschool age
Experimenting with water
Relevance:
Children know only what they encounter in everyday life, in everyday life.
And I would like children to know much more than elementary things. It is necessary to give the most profound knowledge to children about water, about its properties, qualities, about the importance of water in the life of man and nature.
The best way to do this is through experience- children's experimental activities. I think the topic the project is relevant, timely, it will allow you to expand your horizons, develop independence, the desire to learn new, interesting things in the world around you.
Passport project:
Target project:
Develop curiosity children of middle preschool age in the process of experimental experimental activities.
Tasks project:
View Extension children about the properties and qualities of water through experiments and experiments.
View Extension children about the importance of water in human life and nature.
Development of cognitive interest and coherent speech children.
Raising a careful, caring attitude to water and nature.
Type project:
Cognitive research.
Subject project:« Sorceress water»
Duration project: short term (October November)
Supervisor project: caregiver
Marich Lyubov Sergeevna
Members project: children middle group, parents, educator.
Product project: Exhibition of children's drawings, making a sliding folder with poems and riddles, an exhibition joint work children and parents.
Related publications:
Presentation of the didactic game for children of middle preschool age "What is superfluous" budget institution vocational education Khanty-Mansiysk Autonomous Okrug-Yugra"Nyagan Technological College" Didactic.
Presentation "Didactic game on ecology" Vegetables, fruits and berries "for children of middle preschool age" Budgetary institution of vocational education of the Khanty - Mansiysk Autonomous Okrug - Yugra "Nyagan Technological College Didactic.
Abstract of the lesson on the development of speech "Sorceress Water" for children of middle preschool age Abstract of the lesson on the development of speech "Sorceress-Water" for middle-aged children. Alena Vetlugina Purpose: To consolidate the knowledge of children about various.
Presentation of the project "Water Magic" In preschool childhood, the foundations of personality are laid, including a positive attitude towards nature and the world around. Kindergarten is the first.
Presentation of the project for children of senior preschool age "Where does the Motherland begin?" Project for children of senior preschool age Where does the Motherland begin? Responsible: educator: Kulichenko E. A. Art. teacher: Isupova.
Project with children of middle preschool age "Water Magic" Problem: Children of middle preschool age do not have enough knowledge about water, its properties, possibilities and role in the life of all life on the planet.
Presentation of the project "Magic Clay" for children of senior preschool age Development of tactile perception in children of senior preschool age through the implementation of the project "Magic Clay". Svetlana Gennadievna.
Ecological holiday scenarios for preschool children "Water Magic" The purpose of the holiday: to consolidate children's knowledge about the different states of water, about the water cycle in nature. Preparatory work: children draw "portraits".


1 of 26
Presentation on the topic: Experiences and experiments
slide number 1
Description of the slide:
slide number 2
Description of the slide:
slide number 3

Description of the slide:
Transparent water Purpose: to introduce children to another property of water - transparency Material: a glass of water, a glass of milk, 2 spoons. The teacher offers to put sticks or spoons in both cups. In which of the cups are they visible, and in which are they not? Why? We have milk and water in front of us, in a glass of water we see a stick, but not in a glass of milk. Conclusion: water is clear, but milk is not.
slide number 4

Description of the slide:
Water has no smell Purpose: To introduce the children to the properties of water Materials: Glasses of tap water Have the children smell the water and say what it smells like (or doesn't smell at all). As in the previous case, with the best of intentions, they will begin to assure you that the water smells very pleasant. Let them sniff again and again until they are sure that there is no smell. However, emphasize that tap water may have an odor, as it is purified with special substances to make it safe for your health.
slide number 5
Description of the slide:
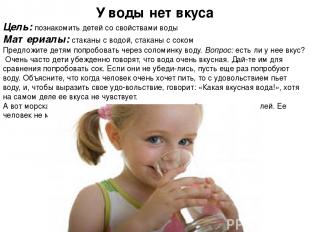
Water has no taste Purpose: To introduce children to the properties of water Materials: glasses of water, glasses of juice Invite the children to try water through a straw. Q: Does it have a taste? Very often, children confidently say that the water is very tasty. Let them taste the juice for comparison. If they are not convinced, let them taste the water again. Explain that when a person is very thirsty, he drinks water with pleasure, and to express his pleasure, he says: “What delicious water!”, although he does not actually taste it. But sea water tastes salty, because it has a lot of different salts. Her man cannot drink.
slide number 6
Description of the slide:
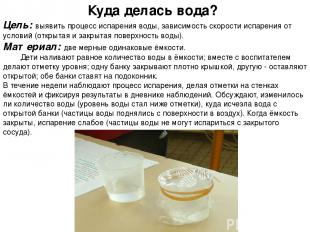
Where did the water go? Purpose: to identify the process of water evaporation, the dependence of the evaporation rate on the conditions (open and closed water surface). Material: two dimensional identical containers. Children pour an equal amount of water into a container; together with the teacher make a mark of the level; one jar is closed tightly with a lid, the other is left open; both banks put on the windowsill. During the week, the evaporation process is observed, making marks on the walls of the containers and recording the results in the observation diary. They discuss whether the amount of water has changed (the water level has fallen below the mark), where the water has disappeared from the open can (water particles have risen from the surface into the air). When the container is closed, evaporation is weak (water particles cannot evaporate from a closed container).
slide number 7
Description of the slide:
Water is liquid, can flow and has no form Purpose: Prove that water is liquid, can flow, has no form Materials: An empty glass, a glass of water, vessels of various shapes Give the children two glasses - one with water, the other empty, and offer to gently pour the water from one to the other. Is water pouring? Why? Because it's liquid. If water were not liquid, then it could not flow in rivers and streams, it would not flow from a tap. Since water is liquid and can flow, it is called a liquid. Now offer to pour water into vessels of various shapes. What happens to water, what form does it take?
slide number 8
Description of the slide:
Coloring water Purpose: to reveal the properties of water: water can be warm and cold, some substances dissolve in water. The more of this substance, the more intense the color; the warmer the water, the faster the substance dissolves. Materials: containers with water (cold and warm), paint, stirring sticks, measuring cups. An adult and children examine 2-3 objects in the water, find out why they are clearly visible (the water is clear). Next, find out how you can color the water (add paint). An adult suggests coloring the water by yourself (in cups with warm and cold water). In which cup will the paint dissolve the fastest? (in a glass of warm water). How will the water be colored if there is more dye? (The water will become more colored
slide number 9

Description of the slide:
Some substances dissolve in water, others do not dissolve Purpose: to consolidate the understanding that substances in water do not disappear, but dissolve. Materials: glasses of water, sand, granulated sugar, watercolors, spoons Take two glasses of water. In one of them, the children will put ordinary sand and try to stir it with a spoon. What happens? Has the sand dissolved or not? Take another glass and pour a spoon into it granulated sugar, stir it up. What happened now? In which of the cups did the sand dissolve? Invite the children to stir the watercolor paint into a cup of water. It is desirable that each child has his own paint, then you will get a whole set of colorful water. Why is the water colored? The paint has melted into it.
slide number 10

Description of the slide:
Ice - hard water Purpose: to introduce the properties of water Materials: icicles of various sizes, bowls Bring the icicles into the room, placing each in a separate dish so that the child observes his icicle. If the experiment is carried out in warm time year, make ice cubes by freezing water in the refrigerator. Instead of icicles, you can take balls of snow. Children should monitor the condition of icicles and ice cubes in a warm room. Pay attention to how icicles and ice cubes gradually decrease. What happens to them? Take one large icicle and several small ones. See which one melts the fastest. It is important that children pay attention to the fact that pieces of ice of different sizes will melt in different periods of time. Conclusion: ice, snow is also water.
slide number 11

Description of the slide:
Game: "Where the water hid" - Look at the pictures and find where the water hid. Conclusion: water in environment happens different. Solid as ice, in the form of vapor and liquid. It is transparent, tasteless, colorless and odorless.
slide number 12
Description of the slide:
slide number 13

Description of the slide:
The existence of air Purpose: To prove the existence of air Materials: a basin of water, an empty glass, a straw Experience 1. Turn the glass upside down and slowly lower it into the jar. To draw the children's attention to the fact that the glass must be held very evenly. What happens? Does water get into the glass? Why not? Conclusion: there is air in the glass, it does not let water into it. Experiment 2. Children are invited to lower the glass into a jar of water again, but now they are invited to hold the glass not straight, but tilting it slightly. What appears in the water? (Visible air bubbles). Where did they come from? Air leaves the glass and water takes its place. Conclusion: Air is transparent, invisible. Experience 3. Children are invited to put a straw into a glass of water and blow into it. What happens? (It turns out a storm in a teacup). Conclusion: there is air in the water
slide number 14

Description of the slide:
Air changes volume Purpose: To show that air has volume Materials: plastic bottle, pelvis, plastic bag, ping-pong ball, warm water, ice Experience 1Bouncing coin. With the help of expanding air, you can make the coin bounce. Place a bottle with a long neck in a deep basin. Wet the rim of the neck and place a large coin on top. Now pour warm water into the basin. Warm water will heat the air inside the bottle. The air expands and pushes the coin up. Experience 2 The air is cooled. Do this experiment to find out what happens when the air cools. Place a few ice cubes in a plastic bag and crush them with a rolling pin. Pour ice into the bottle and screw on the lid. Shake the bottle, then put it down. Look what happens to the bottle when the ice cools the air inside it. When air cools, it contracts. The walls of the bottle retract so that there is no empty space left inside. Experience 3. Disappearing dent. Make a dent in the ping pong ball. Now put it in a glass of warm water. The water will heat the air inside the balloon. The air will expand and straighten the dent.
slide number 15

Description of the slide:
How air works. Purpose: To see how air can support objects. Material: two identical sheets of paper, a chair. Invite your child to crumple up one sheet of paper. Then let him stand on a chair and from the same height throw at the same time a crumpled and even piece of paper. Which leaf landed first? Conclusion: the crumpled sheet fell to the floor earlier, as an even sheet descends, circling smoothly. It is supported by air. Air is lighter than water Purpose: to prove that air is lighter than water Material: inflatable toys, a basin of water Children are invited to "drown" toys filled with air, including lifebuoys. Why don't they drown? Conclusion: Air is lighter than water. Air movement - wind Pour water into the basin. Take a fan and wave it over the water. Why did the waves appear? The fan moves and as if the wind is obtained. The air also starts to move. Wind is the movement of air. Make paper boats and drop them into the water. Get on the boats. Ships sail with the wind. What happens to boats if there is no wind? What if the wind is very strong? A storm begins and the boat can suffer a real wreck. (Children can demonstrate all this).
slide number 16

Description of the slide:
slide number 17
Description of the slide:
The air is inside us Purpose: to introduce children to the properties of air Materials: soap bubbles 1. Place a glass of soap bubbles in front of the child and offer to blow soap bubbles. 2. Discuss why they are called soap bubbles, what is inside these bubbles and why they are so light and fly.
slide number 18

Description of the slide:
slide number 19

Description of the slide:
magnetic task. Purpose: to find out if a magnet really attracts metal objects. Material: a small sheet of paper, a nail, a magnet. The kid puts a sheet of paper on the table, and next to it is a nail. How can you lift a piece of paper with a magnet? You need to put a nail under the paper, and put a magnet on top and lift it up. The nail will stick to the magnet and lift the paper. Flying butterfly. Purpose: to get acquainted with the magnet and magnetic force. Material: sheet of colored paper, paper clip, thread, magnet. The kid with your help cuts out a butterfly from paper. Now he attaches a paper clip to it, and a thread to the paper clip. Let him take a thread in one hand and a magnet in the other. How to make a butterfly fly? The magnet attracts the paper clip, and the butterfly rises - “flies”.
slide number 20

Description of the slide:
slide number 21

Description of the slide:
Loose sand Purpose: to introduce children to the properties of sand Materials: tray, sand, magnifying glass Take clean sand and pour it into a large tray. Examine the shape of the grains of sand through a magnifying glass. It can be different, in the desert it has the shape of a rhombus. Take the sand in your hands, it is loose. Try to transfer it from hand to hand. Sand can move Purpose: to introduce children to the properties of sand Materials: tray, sand Take a handful of dry sand and release it in a trickle so that it hits one place. Gradually, a cone is formed at the point of fall, growing in height and occupying all large area at the base. If you pour sand for a long time, then alloys appear in one place or another. The movement of sand is like a current.
slide number 22
Description of the slide:
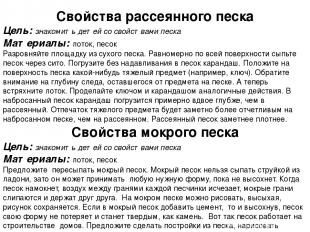
Properties of scattered sand Purpose: to introduce children to the properties of sand Materials: tray, sand Level the area of dry sand. Pour the sand evenly over the entire surface through a sieve. Dip the pencil into the sand without pressure. Place a heavy object (such as a key) on the surface of the sand. Pay attention to the depth of the trace left by the object in the sand. Now shake the tray. Do the same with a key and a pencil. A pencil will sink about twice as deep into scattered sand as it does into scattered sand. The imprint of a heavy object will be noticeably more distinct on thrown sand than on scattered sand. Scattered sand is noticeably denser. Properties of wet sand Purpose: to introduce children to the properties of sand Materials: tray, sand Offer to pour wet sand. Wet sand cannot be poured in a stream from the palm of your hand, but it can take any desired shape until it dries. When the sand gets wet, the air between the edges of each grain of sand disappears, the wet edges stick together and hold each other. On wet sand, you can draw, drying, the drawing is preserved. If cement is added to wet sand, then even after drying, the sand will not lose its shape and become hard, like a stone. This is how sand works in the construction of houses. Offer to make buildings out of sand, draw pictures in the sand.
slide number 23
Description of the slide:
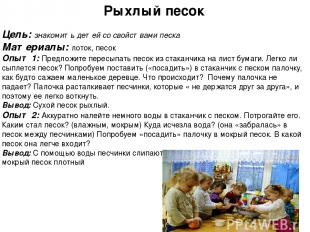
Loose sand Purpose: to introduce children to the properties of sand Materials: tray, sand Experience 1: Offer to pour sand from a cup onto a sheet of paper. Does sand flow easily? Let's try to put (“plant”) a stick in a glass of sand, as if we are planting a small tree. What's happening? Why doesn't the wand fall? The stick pushes apart grains of sand that "do not stick to each other", and therefore it is easy to stick. Conclusion: Dry sand is loose. Experiment 2: Gently pour some water into a glass of sand. Feel it. What was the sand like? (moist, wet) Where did the water go? (she "climbed" into the sand between the grains of sand) Let's try to "plant" the stick in the wet sand. What kind of sand does it fit into more easily? Conclusion: With the help of water, grains of sand stick together and hold tightly to each other, wet sand is dense
slide number 24

Description of the slide:
Where is the water? Purpose: to acquaint children with the properties of sand and clay Materials: tray, sand, clay Invite children to find out the properties of sand and clay by touching them (loose, dry). Children pour cups at the same time with the same amount of water (oxen pour exactly as much as to completely go into the sand). Find out what happened in the containers with sand and clay (All the water went into the sand, but stands on the surface of the clay); why (for clay particles are closer to each other, they do not let water through); where there are more puddles after rain (on asphalt, on clay soil, because they do not let water in; on the ground, there are no puddles in the sandbox); why the paths in the garden are sprinkled with sand (to absorb water.) Hourglass Purpose: to acquaint children with the properties of sand Materials: tray, sand, hourglass Show children an hourglass. Let them watch how the sand is poured. Let the children feel the length of the minute. Ask the children to collect as much sand as possible in their palm, squeeze the fist and watch how the sand runs. Children should not open their fists until all the sand has spilled out.
slide number 25

Description of the slide:
slide number 26

Description of the slide:
Where is the best place to grow? Purpose: to acquaint children with the properties of the soil Materials: trays, sand, clay, soil, seeds, rotted leaves Take a deep tray. Prepare the soil: sand, clay, rotted leaves, then plant a seed of a fast-growing plant there. Pour water and put in a warm place. Together with the children, take care of the sowing, after a while a sprout will appear. Conclusion: that the land is fertile, it has a lot of minerals, it is loose. How water moves in soil Purpose: to introduce children to the properties of soil Materials: soil, flower pot, water Pour dry earth into a flower pot or into a tin can from canned food with holes in the bottom. Place the pot in a bowl of water. It will take some time, and you will notice that the soil is wetted to the very top. When there is no rain, plants live off the water that rises from the deeper layers of the soil.
Elena Nikolaevna
Presentation "Experiments with water in middle group»
Prepared: teacher Berezhnaya E. N.
In a preschool institution, experiments should become the norm of life, they should be considered not as entertainment, but as a way to familiarize children with the outside world and the most effective way to develop thought processes.
Experiments allow you to combine all types of activities and all aspects of education, develop observation and inquisitiveness of the mind, develop the desire to know the world, all cognitive abilities, the ability to invent, use non-standard solutions in difficult situations, create a creative personality.
A few important tips ov:
1. Conduct best experiences in the morning when the child is full of strength and energy.
2. It is important not only to teach, but also to interest the child, to arouse in him the desire to acquire knowledge and make new ones himself. experiments.
3. Explain to the child that unknown substances should not be tasted, no matter how beautiful and appetizing they look.
4. Don't just show your child interesting experience, but also explain in a language accessible to him why this happens.
5. Do not ignore the child's questions - look for answers to them in books, reference books, the Internet.
6. Where there is no danger, give the child more independence.
7. Invite the child to show the most liked experiences to friends.
8. And most importantly: rejoice in the success of the child, praise him and encourage the desire to learn. Only positive emotions can instill love for new knowledge.
Target:
1. Help children get to know the world around them better.
2. Create favorable conditions for sensory perception, improvement of such vital mental processes as sensations, which are the first steps in the knowledge of the surrounding world.
3. Develop fine motor skills and tactile sensitivity, learn to listen to your feelings and pronounce them.
4. Teach children to explore water in different states.
5. Through games and experiments teach children to identify physical properties water.
6. Teach children to make independent conclusions based on the results of the survey.
7. To educate the moral and spiritual qualities of the child during his communication with nature.
Related publications:
"Experiments and Experiments with Water and Air". Experimentation in senior group, as in all others, must be organized as.
Synopsis of GCD in the middle group "Experiments with water" Abstract directly - educational activities in the middle group Theme "Experiments with water" Purpose: To consolidate children's knowledge about properties.
Synopsis of OD in the middle group “Water Sorceress. Experiments with water Synopsis of OD in the middle group "Water Sorceress" (Experiments with water) Program content: to acquaint children with the properties of water (taste, color,.
 Summary of cognitive research activities in the middle group "Experiments with water and sand." Prepared by: Ananyeva E. I. Purpose:.
Abstract of the lesson on the world around in the middle group "Experiments with water" Educational tasks: 1. Expand children's understanding of water and its properties: odorless, tasteless, transparent. 2. Introduce children.
Water, like sand, is the most mysterious material that attracts to itself. All children on the planet love to play with water. They love to splash in the water.
Research work for children of the middle group "Experiments with water" Lesson in the middle group “Research laboratory. Experiments with water. Educator: Solyanik Svetlana Sergeevna Purpose: development.
Games and experiments with water
"Submarine" No. 1. Submarine from grapes
Grab a glass of fresh sparkling water or lemonade and toss a grape into it. It is slightly heavier than water and will sink to the bottom. But gas bubbles, similar to small ones, will immediately begin to sit on it. air balloons. Soon there will be so many of them that the grape will pop up.
But on the surface, the bubbles will burst and the gas will escape. The heavy grape will again sink to the bottom. Here it will again be covered with gas bubbles and rise again. This will continue several times until the water "exhales". According to this principle, a real boat floats up and rises. And the fish have a swim bladder. When she needs to dive, the muscles contract, squeezing the bladder. Its volume decreases, the fish goes down. And you need to get up - the muscles relax, dissolve the bubble. It increases and the fish floats up.
"Submarine" №2. Egg submarine
Take 3 jars: two half-liter and one liter. Fill one jar with clean water and dip a raw egg into it. It will drown.
Pour a strong solution into the second jar table salt(2 tablespoons per 0.5 liters of water). Dip the second egg there - it will float. This is because salt water is heavier, so it is easier to swim in the sea than in a river.
Now put an egg on the bottom of a liter jar. Gradually adding water from both small jars in turn, you can get a solution in which the egg will neither float nor sink. It will be held, as if suspended, in the middle of the solution.
When the experiment is done, you can show the trick. By adding salt water, you will ensure that the egg will float. Adding fresh water - that the egg will sink. Externally salty and fresh water is not different from each other and it will look amazing.
lotus flowers
Cut flowers with long petals from colored paper. Using a pencil, twist the petals towards the center. And now lower the multi-colored lotuses into the water poured into the basin. Literally before your eyes, the flower petals will begin to bloom. This is because the paper gets wet, becomes gradually heavier and the petals open.
natural magnifier
If you need to make out any small creature, such as a spider, a mosquito or a fly, it is very easy to do this.
Plant the insect in a three-liter jar. From above, tighten the neck with cling film, but do not pull it, but, on the contrary, push it so that a small container forms. Now tie the film with a rope or elastic band, and pour water into the recess. You will get a wonderful magnifying glass through which you can perfectly see the smallest details.
The same effect will be obtained if you look at an object through a jar of water, fixing it on the back of the jar with transparent tape.
Miraculous matches
You will need 5 matches.
Break them in the middle, bend them at a right angle and put them on a saucer.
Put a few drops of water on the folds of the matches. Watch. Gradually, the matches will begin to straighten out and form a star.
The reason for this phenomenon, which is called capillarity, is that wood fibers absorb moisture. She crawls further and further along the capillaries. The tree swells, and its surviving fibers "get fat", and they can no longer bend much and begin to straighten out.
LIVING PROPERTIES OF WATER.
Purpose: To show the important property of water - to give life to living things.
Move: Observation of the cut branches of a tree placed in water, they come to life, give roots. Observation of the germination of identical seeds in two saucers: empty and with wet cotton wool. Observation of the germination of the bulb in a dry jar and a jar of water.
Conclusion: Water gives life to living things.
Can paper be glued with water?
We take two sheets of paper and move them one to the other in the other direction. We moisten the sheets with water, press lightly, squeeze out excess water, try to move the sheets - they do not move. (Water has an adhesive effect)
“Does water have a taste?”
Let the kids try drinking water, then salty and sweet. (Water acquires the taste of the substance that is added to it)
“Does water evaporate?”
Pour water into a plate, heat on a flame. There was no water on the plates. (The water in the plates will evaporate, turn into a gas. When heated, the liquid will turn into a gas)
“Drop ball”
We take flour and spray from a spray bottle, we get droplet balls. (dust particles around themselves collect small drops of water, form one large drop, the formation of clouds)
Nomination « multimedia technologies in the pedagogical process in the preschool educational institution "
During preschool childhood, the child discovers the world of nature. Supporting the natural interest of preschoolers in all living things, the teacher leads children from getting to know nature to understanding it.
The ability to learn about the world around the child provides activity, as it is an important condition and means of cognition. To be active means to be active!The fuller and more varied the children's activity, the more significant it is for the child, the more successful his development is.
Prominent domestic psychologist S.L. Rubinstein considers observation as the result of meaningful perception, during which the development of mental activity takes place. He connects the development of different forms of perception and observation with content. The question of the content of observations is important. - what the child can and should see, what features of natural objects to notice.
Target: this presentation provides visibility - a visual row in the classroom. Introduce children to the properties of water.
Tasks: the work on the presentation is structured in such a way that after a conversation (with slide views) about the need for water for all living things, it will smoothly turn into the topic of the lesson. The teacher, moving step by step, tells where water meets, conducting experiments, clearly demonstrates the phenomena of inanimate nature on slides. Develops logical thinking, visual and auditory attention, creative imagination.
Efficiency: consolidates knowledge about inanimate nature, contributes to the creation of an information and communication environment, and meets modern requirements.
Practical significance:
- A visual introduction to the need for water for humans, animals and plants.
- Acquaintance with the phenomena of inanimate nature, with the properties of water.
- Poetry part.
Place of use of multimedia material: can be used as educators preschool institutions as a visual material in a lesson on familiarization with a natural phenomenon - water, and by parents to organize the cognitive and research activities of children at home.
Equipment: Computer, multimedia projector.
STUDY PROCESS
Organize children's attention, create game motivation. A SCIENTIST FROM THE MAGIC LABORATORY enters to the sounds of "Noise of water" in a robe and a rectangular academic cap.
Hello guys! I came to visit you, my name is Scientist, and today I will tell you about one of the greatest wealth of our planet! But first, solve the riddle:
Introduction to the game situation, preparing children for the topic of the lesson
She is in the lake and in the puddle
She is spinning like a snowflake over us,
She is boiling in our kettle,
She runs in the river, murmurs ( water).
Guess what we're going to talk about today? We will talk about water. I want to invite you to my magical laboratory and tell you about the great miracle - water. There we will become young scientists. We will conduct experiments to understand how unique it is. Do you know what a laboratory is? (This is the place where scientists conduct experiments and set up experiments).
And to get there you need to answer a few questions.
SLIDES № 2,3,4,5,6,7,8.
Why do people need water? ( A person drinks water, washes, cooks, waters vegetable gardens, orchards, gets rid of dirt with water).
But not only humans need water! ( Animals, plants, insects, birds and fish need water. Living beings cannot survive without water.)
That's right, now let's play a game.
I gr a "Who needs water?"
Each child chooses a picture depicting various objects of nature (an animal, a plant, a person - a small child, a woman, etc.) and tells why the person shown in the picture needs water (other children can add).
Well done! Let's go to our laboratory, here you will find out what properties it has, but first, let's remember the rule for handling water:
Kohl we deal with water
Let's roll up our sleeves boldly.
Spilled water - no problem
A rag is always at hand.
Let's stand in a circle, join hands and close our eyes.
(SD music "Sound of the surf" sounds).
Here we are in the laboratory of water!
SLIDES No. 9,10 (magic laboratory, globe).
It is difficult to find a place on earth where there would be no water. Water is everywhere: in the oceans, seas, rivers and lakes. Water is contained in the earth, water is in plants, animals, even in man. Look at our planet as it looks from space. Why is there so much blue on it? (These are seas, oceans, lakes, rivers, it's all water).
That's right, now:
Have you heard of water?
They say she's everywhere!
Like an icicle freezes.
Creeps into the forest with mist.
It's called a glacier in the mountains.
Ribbon silver curls.
We are used to the fact that water -
Our companion always!
SLIDES #11, 12, 13.
Tell me what you know about water, where it is found in nature (in seas, oceans, rivers, lakes, swamps).
SLIDES No. 14,15,16,17.
Describe what phenomena of inanimate nature are associated with water. (Dew, fog, cloud, steam, rain, snow, ice, frost).
Conclusion: water is one of the most important substances for nature, it is found everywhere, even inside a living organism. Water not only gives water, but also feeds, you can’t cook a single dish without water. Water produces electricity, helps to transport goods. Although it seems that there is a lot of water on the planet, living organisms need only fresh water, and there is not much of it in nature. And that's why it needs to be protected.
Activate children's knowledge about water, develop social skills in children, prove the correctness of their opinion, consolidate children's knowledge about the properties of water.
SLIDE #18 ( three states of water).
Let's see what state water can be in nature.
EXPERIMENT No. 1 "WATER-LIQUID".
Pour water from one glass to another (from a smaller one to a larger one). Here you can see how the water flows. It means that it is LIQUID and does not have its own form.
SLIDE #19 (liquid water).
EXPERIENCE No. 2 "WATER IS STEAM" (Scientist brings a thermos of hot water).
What comes out of a thermos when water boils? (Steam)
Where did the steam come from in the jar - did we pour water?
Conclusion: When heated, water turns into steam.
SLIDE number 20 (pairs).
EXPERIMENT No. 3 "STEAM IS WATER" (brings cold glass to a jet of steam).
Look what happened to the glass. Where did the water droplets on the glass come from? When the steam fell on the cold glass, it again turned into water.
Conclusion: when cooled, steam turns into WATER.
SLIDE No. 21 (steam turns into water when cooled). This is how it happens in nature.
Fitness minute.
Making scientific discoveries is not easy, so there are breaks in the laboratories for rest. It would be nice for us to get some rest. What do our young scientists think? Let's move away from our lab tables and walk onto the carpet.
(Children are located on the carpet in random order.)
Stretching the lower back, we will not be in a hurry.
Turn right, turn left, look at your neighbor.
(turns in different directions)
To become even smarter, we twist our neck a little.
One and two, one and two, dizzy.
(Rotation of the head to the right and left)
One two three four five. We need to stretch our legs.
(squats)
Finally, everyone knows how to always walk in place.
(Walking in place)
There are benefits to warming up! Well it's time to sit down
Every day the sun heats the water in the seas and oceans - just like it is heated in kettles of water.
Water turns into steam. In the form of vapor, tiny, invisible droplets of moisture rise into the air. The higher the steam rises, the colder the air becomes. The steam turns back into water. The droplets all come together and form a cloud.
SLIDE #22 (cloud).
When there are a lot of water droplets, they become very heavy for the cloud and rain down on the ground.
SLIDE #23 (rain).
What do water droplets turn into in winter? (In snowflakes).
EXPERIENCE No. 4 "WATER - SOLID". (Ice molds are brought in, each child is given an ice cube).
In winter, another amazing phenomenon occurs on the surface, the water turned into ice. See how the ice is SOLID, which means that water can become SOLID.
SLIDES №24,25,26 (snowflakes, ice).
Now let's hold it in our hands, what's going on? From the warmth of our palms, it began to melt as if heated, and again turns into a LIQUID STATE
This is how the water repeats its path. This is called the water cycle in nature.
(The use of a literary word as a means of consolidating the knowledge gained about the water cycle in nature).
SLIDES No. 27,28 (water cycle in nature).
Water travels in nature
She never disappears.
It will turn into snow, then into ice,
It melts and goes on a hike again.
Suddenly up into the sky
It will turn into rain.
Take a look around
Take a look at nature.
Surrounds you everywhere and always
This magical water.
Let's take a break and do some self-massage again.
Pure water flows
We know how to wash ourselves.
(Children rub their hands together).
My nose, my mouth,
(rubbing the wings of the nose).
My neck, my ears.
(rub, earlobes with fingers).
After we wipe dry.
(stroke forehead).
Well, my dears, our trials are coming to an end. Are you interested in being scientists? (Yes). Let's sum up our knowledge gained. Now you guys know what water is like? (Liquid). And if you freeze it, what does the water turn into? (Into the ice). What about when heated? (in pairs).
Reflection
Now I will award each of you with a badge, it says "Young Scientist". This means that you have learned a lot of new things, but do not stop there, and you will continue to learn a lot of new and interesting things about our planet called Earth. Conduct wonderful and unusual experiments.
(Adhesive stickers in the form of droplets on the chest of each child. Create a condition for the psychological comfort of children).
And before you leave my magical laboratory, I want to treat you to some spring water.
Droplets travel not only through the air and land, but also go underground. There they absorb all the healing properties of the earth and come to the surface in the form of springs. This water becomes the most healing. It gives vitality and strength to all living things.
SLIDE No. 29 (springs). (Treating children with spring water)
Now let's hold hands again, close our eyes and listen to the sound of the water, and move to our d / s. Goodbye, my young scientists, see you soon!
(music "The sound of water").


Profession Development Director Job responsibilities of the Regional Development Director
Coursework: Liquidity and solvency of the enterprise, methods of evaluation and management
Using Logistics Performance Indicators
The concept and elements of the logistics process
Job description for the head of the motor transport section Job description for the head of the transport packaging department