Nature paints pictures better than any artist. Therefore, they want to capture. Sunset is one of these paintings, each time drawn anew and uniquely. Landscapes with the setting sun are tried by both professionals and novice photographers.

Here are some tips on how to photograph a sunset in order to get a beautiful and high-quality picture.
A couple of general tips:
- Don't try this without a tripod. It plays a huge role in landscape photography. Clouds move across the sky, tree leaves sway in the wind, and even in complete calm, a couple of birds can fly by, which will make the picture more interesting. It will be annoying if instead of these elements you get blurry spots.
- You have to be careful with exposure. It is better to darken the frame slightly to avoid unnecessary glare and dips. However, make sure that the earth and everything on it does not go into a deaf black color.
- Keep your lens clean: smudges and dust can be a big problem when further processing your photo.
Of course, this is not limited to the features of shooting a landscape in sunset conditions. Let's consider them in more detail from different angles.
How to set up the camera
In which mode to photograph, what shutter speed, aperture and ISO sensitivity when shooting a sunset - quite frequently asked question, which is set by novice amateur photographers. The most effective settings for shooting sunsets will be:
- Aperture priority mode (AV, A). Experts advise closing the aperture down to f 22. This way you can get an artistic effect of diverging rays. The detail of the image will be slightly lower. But here you have to choose between spectacularity and details.
- Set your shutter speed to at least 1/focal length so you're less likely to get blurry if you forget your tripod. For a 50 mm lens, the shutter speed is 1/50, for others it is set according to the same principle. If the aperture priority mode is observed, the device sets the shutter speed itself. If you get an over- or under-exposed image, use the manual exposure setting.
- Set the ISO to a minimum to avoid the effect of "shake". This will slow your shutter speed, but the transitions between the shades of the sunset will be smooth and the noise level will decrease.
- Shoot in RAW if your camera allows. This way you won't lose the subtle tones and transitions that can be lost when shooting in JEPG.
- When setting the exposure, do not point the lens at the sun, you need to choose a place a little higher (the sun is not visible in the viewfinder) and press the shutter button halfway. Then point the lens at the planned scene and press the button all the way.
Artistic effects in sunset photography
We have already considered the question of how to photograph a sunset from a technical point of view, we will add a few words about the artistic side of the process.
- Include additional objects in the frame, they will make the plot more interesting.
- Use HDR mode, it will make the photo brighter and more detailed.
- Try to shoot in different weather or during the change of rain and sun. Unique lighting and color effects are virtually guaranteed.
- Do not divide the picture into two parts - earth and sky. Give the sunset 2/3 or 1/3 of a frame.
Sunset photos are in high demand on various photo stocks. You can not only improve your skills, but also earn money on it. On photo stocks, works are sold more than once, so each photo card is able to bring regular income in proportion to its demand.


In this article, you'll get some proven tips for planning and executing a sunset portrait shoot. Learn how to take photos that you and your clients will love.
Plan ahead for your sunset photo session
Many photographers feel overwhelmed when they start shooting portraits, whether professionally or for fun.
Where should I shoot? How should people pose? Which lens to choose? What settings to use? When should I move closer or move further away? What should I say to evoke strong emotions?
A plan will give you confidence and help ease the pressure of making decisions. It is not a limitation, because often the best shots are spontaneous, but rather it will give you confidence and a direction to follow when you are not feeling inspired.
Here's our rough plan for a sunset shoot, whether it's an engagement, part of a wedding, family portraits, maternity or outdoor newborn shoots. A portrait photo session is always scheduled about an hour before sunset.
This plan has a dual purpose - not only will it help you feel more confident, but it will also help you make the most of the terrain and sunset lighting.

Step One: Arrive early to scout the area
Plan to arrive 20-30 minutes early to explore the new area. You never know what amazing trails or clearings might be nearby, so it's worth taking the time to explore. It's also good to arrive before your customers so they feel like you're waiting for them and excited about their arrival.
Step second: rate location
Start estimating location using the following questions:
Where are the nice shaded areas to start from? It is worth starting from shady corners, since the sun is still bright.
Where is the highest point in the area? If you are in a hilly area, you can capture the final moments of the sunset and make the most of the golden light.
Where is the most impressive sunset spot? This is where your final scene will be - it should be at the very end of the route.
By answering these questions, you can approximately draw up a route. This means that you will always know the direction and guide your customers through the area with confidence.

Step three: shooting in the best light
To absolutely make the most of sunset lighting, you can follow the same plan on every shoot (in that order):
- Shooting in the shade
- Ambient shots
- Silhouette shots
- Sunset shots
- Pictures at dusk
Let's put this plan into practice, assuming sunset at 18:00 (in your case it will most likely be a different time, but the intervals will match):
16:40 - arrival, inspection of the area and assessment of the location.
16:00 - your client arrives and receives brief information how much fun you will have!
17:10 – Shooting in the shadows
Go directly to shooting in a beautiful shaded location that you have found in advance. We love taking regular shots like these, as clients often prefer them. Save more impressive lighting for landscape photos.


17:25 – Shooting with ambient light
You can then move to another location to include the sun in your shots, but you can diffuse it with trees. Here are the photos:


17:40 – Shooting silhouettes
About 10-20 minutes before sunset, you can try the silhouette. Since the silhouette needs to be shot at a very low angle, you won't be able to match the height of the sun to the client's feet if you wait.


17:50 - Shooting at sunset
At this point, the light will turn golden, so you need to be at the last location. Do your best to make the most of this beautiful soft light - you can even place your clients in an open space if you know how to manage the sun's glare. At this time, we try to take a lot of photos - landscape, waist-length portraits, close-up. In this way, you can create a set to decorate the walls, where the photos have the same color of the sunset.


1 8 :00 – Shooting in dusk
The sun has set, but you still have a gorgeous window of 15 minutes when you can capture the beautiful colors of dusk. As the sun no longer exudes bright light, now you can use the whole area! Areas previously lit by the bright sun are now in the soft light of twilight.


1 8 :10 – Ready!
This plan is designed to give you some structure if you lack confidence and direction in your sunset portrait shoots. It will help you get the most out of the sunlight and manage your time effectively while shooting. Of course, as photographers, we are creative, and breaking the rules is always fine if you have confidence in yourself.


Moscow Kremlin at dawn, view from the Patriarchal Bridge. ISO200 50mm f/11 10s
We have all seen sunrises and sunsets many times in our lives. Sometimes the sun timidly illuminates only a few individual clouds or a strip above the horizon. Sometimes the whole sky lights up from edge to edge, and the heart stops in amazement. Anyone who has tried to capture such moments on their camera knows how difficult it is to capture the beauty of a sunset. In this article, I tried to systematize the knowledge needed to successfully shoot sunrises and sunsets.
Phases of regime time
The sunset itself usually only lasts a few minutes, and is part of what is known as “mode time,” when the sunlight is at its softest and most conducive to shooting natural light scenes. Consider the main phases of regime time. For simplicity, I will only talk about sunsets, for sunrises everything is the same, only the regime time phases go in reverse order.
As you know, midday light is white, very hard (if we consider summer time at middle latitude). As the sun approaches the horizon, its rays pass through more and more of the atmosphere, and the light gradually becomes warmer. The moment when the light significantly changes its temperature compared to noon can be considered the beginning of regime time. As a rule, it is about an hour before sunset. This time is good for shooting scenes in which the main subject (such as a mountain peak or building) is lit from the side. The light is still bright enough that you can shoot handheld if you forgot to bring a tripod with you.
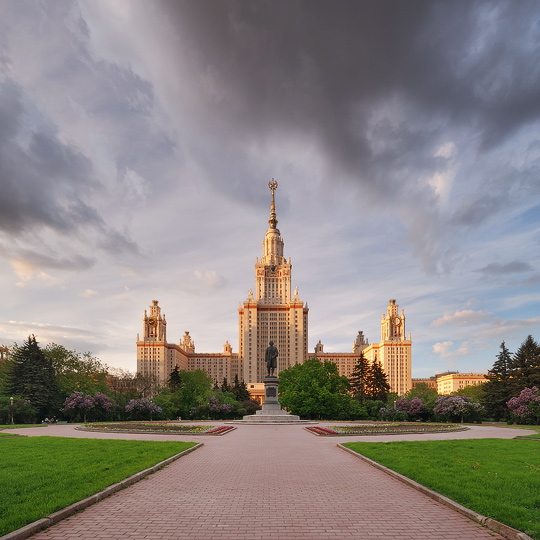 The main building of Moscow State University (Moscow), illuminated from the side by the soft light of the rising sun. ISO100 12mm f/11 1/2.5s, 2 horizontal frame panorama
 Further, the light gets warmer - first orange, then red, and then black (as the sun sets below the horizon). Having gone beyond the horizon, our luminary ceases to illuminate terrestrial objects, but it can very effectively illuminate the clouds. This is the time for shooting in backlight, when the camera is pointed approximately where the sun has set. There is already little light, you can still shoot with your hands, but it is quite difficult to get a sharp shot at the same time.
 The building of the Russian Academy of Sciences (Moscow), shooting in backlight shortly before sunset over the horizon. ISO100 11mm f/8 1/20s
 After sunset, when the clouds "go out", dusk sets in. Usually this time is unremarkable. There is very little light and exposure can reach tens of seconds (especially when using filters), which makes it impossible to shoot handheld. But do not rush to turn off your technique. Because sometimes real magic begins at dusk - the water in the lake calms down, the sky begins to smolder with purple light, and it seems that everything around is filled with extraordinary peace and harmony.
 Evening twilight on Srednemultinskoye Lake, Altai. A 30-second exposure smoothed out small ripples in the water, making the work more relaxed. The colors are real. ISO200 20mm f/8 30s, 2 horizontal frame panorama
 Features of shooting in regime time
One of the main problems when shooting in regime time is the lack of light. As a result, when shooting handheld, many frames can turn out blurry due to “shake”. The situation becomes more complicated when using light filters (for example, polarizing or gradient filters), which can increase the required shutter speed by several times. The only thing effective solution problems - use a tripod. If you don't have a tripod, you can try placing the camera on some hard surface; for example, the following panorama was shot like this (here the camera was lying on a granite slab):
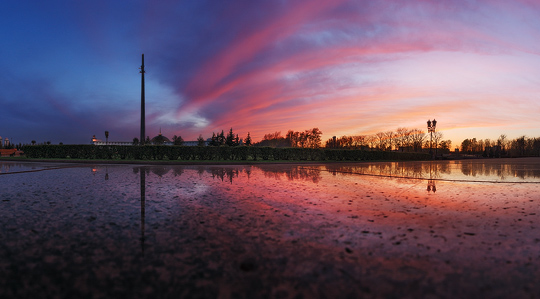 Sunset panorama in Victory Park (Moscow), reflected in a granite slab.
 The main problem when shooting sunsets and sunrises is the large dynamic range (DD) of the scene being shot. DD depends on the shooting direction: maximum in backlight (the camera is directed to the setting sun) and minimum in the opposite direction. Modern DSLRs tend to handle long distance scenes easily when shooting scenes with side lighting. But for this you need to shoot in RAW and be able to accurately set the exposure. The RAW format stores much more information (compared to JPG, for example) and allows you to "pull out" small overexposures and underexposures to some extent during processing.
An error in determining the exposure can lead to loss of information and the appearance of serious "underexposure" or "overexposure" in the picture, even when shooting in RAW. Therefore, I recommend shooting in manual mode (M) to avoid camera errors.
There is nothing difficult in this. Put the camera on a tripod; set the minimum ISO value; set the aperture so that there is enough depth of field (usually f / 5.6 ... f / 11); set the shutter speed to automatic camera. Even in manual mode, automatic metering works in SLR cameras - look into the viewfinder and you will see a strip with numbers -3,2,1,0,1,2,3+, and at risk above it - this is the exposure meter (in your camera it may look different):
If the risk is over “0”, then the shutter speed you set is the same as the one chosen by the camera automation. If the risk is shifted towards negative / positive numbers, then the camera considers that the shutter speed is too short / long, respectively. First, set the shutter speed so that the risk is above "0". Then take a test frame and look at its histogram. If the histogram is strongly shifted to the left, then increase the shutter speed, if to the right, then decrease it. Take the next test frame and look at the histogram again. And so on until you get a frame with a good histogram, without overexposure and underexposure. You can read more about the histogram, for example,.
Don't forget to keep an eye on the histogram of the individual channels! When shooting in normal time, there may be overexposure (clipping) in individual channels in the absence of overexposure in brightness. This results in color distortion. When shooting sunsets / sunrises, there is often clipping in the red channel, at dusk - in the blue channel.

An example of clipping in the red channel with a slight overall overexposure
Shooting with bracketing
In the case of backlight, the situation with dynamic range usually more difficult. It may happen that at any shutter speed there are overexposures or underexposures in the frame - the camera cannot cope with too large a dynamic range. In this case, you can shoot with exposure bracketing. As an example, here are the original frames of the sunset shown above, taken at shutter speeds of 1/80, 1/40, 1/20, 1/10 and 1/5 s:
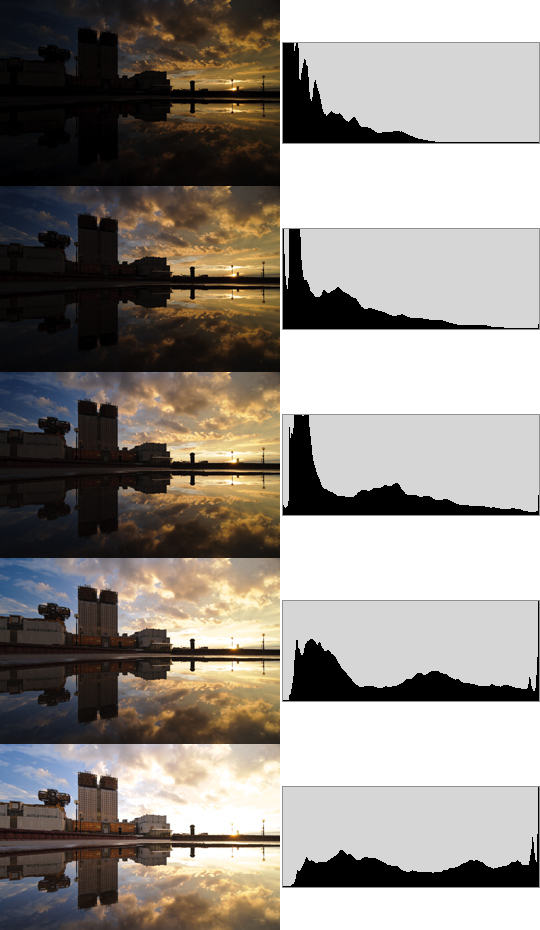
Here in the upper frames there are underexposures, and in the lower frames there are overexposures. I blended these shots by layering them with masks in Photoshop, so there are no over or under highlights in the final work (see above). This method is called "tonmapping", I will talk about it in detail in one of the future articles.
Bracketed shooting can be useful even if you don't know how to do tone mapping. If you made a slight mistake when determining the shutter speed, you can always be sure that at least one of the bracketing frames came out with the correct shutter speed. In addition, perhaps in the future you will learn how to do tone mapping, and then you can return to the sunset you shot earlier.
Shooting with Gradient Filters
In some cases, scene DD can be reduced using gradient filters.

Gradient filters Singh-ray (4×6”)
Such filters allow you to darken part of the image. For example, if the top of the image is significantly lighter than the bottom:
 When shooting without a filter, a significant part of the sky turned out to be overexposed
then with the help of a gradient filter, you can darken the upper part, so that there will be no overexposure in the picture:
 This shot was shot with a 3-stop ND filter with a soft border. Lake Svetloe, Ergaki Natural Park, Krasnoyarsk Territory. ISO100 20mm f/11 1/15s
 A gradient filter in some cases allows you to shoot a scene in one frame, without bracketing. This is the beauty of such filters: one click on the shutter button, a minimum of processing, and the result is a very natural photo. However, gradient filters are not a panacea. In the case of a more or less complex border between dark and light areas of the scene, the gradient will darken not only the light area, but also the dark one. This is clearly seen in the images presented in this section, where the gradient darkened the mountains along with the sky.
If you don't know where to start, buy one 2-stop ND gradient filter with a soft border (see left filter in the photo above). It will be useful in 90% of the scenes, and it will not be visible in the pictures (in the sense that the picture will look completely natural). 3-4 stop filters are needed much less often, and you can easily overdo it, darkening the upper part of the frame too much. 1 stop filters are generally completely useless.
The sun in the frame
A photograph of early morning or late evening can become much more interesting and dynamic if you include the sun in the composition. Here are a few simple tips to help make your shot better.
Then in Photoshop, you can overlay one frame on another with a mask, thus getting rid of highlights:
 Dawn on the river Cross Multa, Altai (in this place the river flows under the stones). Here, two frames with the same exposure (see above) are superimposed to get rid of glare. Then a frame with a lower shutter speed was superimposed to get rid of overexposure in the sky. All shots were taken at f/22 when the sun was just peeking out from behind the mountain. ISO100 20mm f/22 0.4s
 There is one difficulty here - the sun can significantly reduce the contrast of the entire frame as a whole, and therefore a simple overlay of frames will not work, because. they will vary greatly in contrast. This problem can be avoided if you shoot at the moment of sunset behind some object (for example, behind a tree, mountain or building), when most of the solar disk is covered by this object. Then the application will be painless.
Equilibrium moment
Shooting a sunset in the city has its own characteristics. A big city is full of light sources - building lights, lampposts, car headlights - and this light can be used to make the most effective shots. As the sun sets, its light gradually weakens, while the lighting in the city gradually turns on. When the intensity of sunlight and artificial light are approximately equal (30-45 minutes after sunset), there comes a moment of balance - the optimal time to shoot a sunset in the city. This balance does not last long, 5-10 minutes. At this time, the dynamic range of the scene is minimal, so you can shoot without exposure bracketing.
 Sunset, 20 minutes to balance, city lights just starting to come on. Due to the large DR, a significant part of the image turned out to be underexposed. ISO200 90mm f/11 4min
  At the moment of equilibrium, the brightness of natural and artificial illumination is equalized, the DD of the scene is minimal. Here is one frame, without bracketing. ISO200 100mm f/16 2min
 Composition
Much can be said about composition, it is an extensive topic worthy of a separate article. Shooting sunset and sunrise is not special, the usual composition rules apply here. However, it is worth considering common mistakes.
No matter how gorgeous the sunset is, you should not make the sky the main subject of the frame. main object should be earthy, and the sunset should only complement the frame, emphasizing the beauty of this object. Imagine that there is no sunset, but instead of it - a clear blue sky; the frame should remain interesting, albeit less spectacular.
A common plot among amateurs: the sea below, the sunset above. As beautiful as it is, the plot is extremely hackneyed. The advice here is simple - include in the composition the foreground, for example, stones on the shore, a pier, a boat - anything that seems personally interesting to you. Aim the camera so that the horizon is above the middle of the frame - this way you focus on the foreground, and not on the sunset.
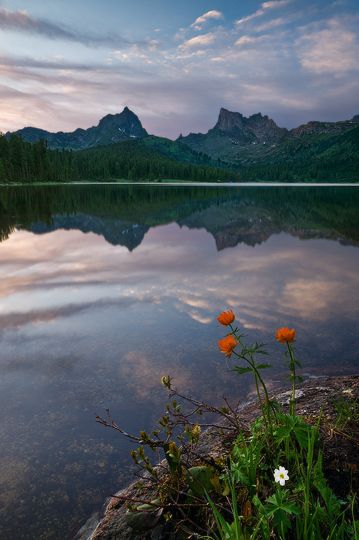 The foreground makes the photo much more expressive. Lake Svetloe, Ergaki Natural Park, Krasnoyarsk Territory. ISO100 24mm f/16 3.2s
 When shooting silhouettes in backlight, the silhouette should not dominate - its area should not exceed 30-40% of the frame. Of course, the shape of the silhouette should be interesting in itself.
 The setting sun behind three spiers: two Kremlin and one hotel Ukraine. One frame, no processing. ISO200 300mm f/8 1/4000s
 Shooting preparation
Let's take a look at how you can prepare for shooting in regime time. Let's say that it's the month of May and you want to take a picture of the Moscow Kremlin during normal hours. First you need to study the chosen object: find its photos on the Internet and / or come to the center of Moscow at any convenient time and go around it from all sides, choosing interesting angles. In the case of the Kremlin, one of the most spectacular (and popular) angles is obtained when shooting from the Patriarchal Bridge.
After we have chosen a shooting point, we open the The Photographer's Ephemeris program and see if this point is suitable for shooting during peak hours. We are looking for the Patriarchal Bridge on the map and put a marker on it. The program shows the direction of sunrise / sunset and moon:

As you can see, the direction to the sunrise roughly coincides with the direction to the Kremlin (it is located under the inscription "Moscow"), which means that the scene we have chosen can be shot at dawn. The sunset will burn in the other direction, so we will not come to this bridge at sunset. Now we look at what time the sun rises. Let's say it's May 1st. The program on the panel on the right shows the time of sunrise and sunset of our luminaries. In this case, the sun rises at 5:46.

As we already know, the picture will be most spectacular if you take it when the clouds are already illuminated by the awakening sun, and the Kremlin's illumination has not yet turned off (the moment of equilibrium), this is about 40 minutes before sunrise. It is clear that you need to come to the shooting point a little earlier, say at 4:45. It remains only to wait for good weather and find the strength to get up at 4 o'clock in the morning. Most likely, you will have to come to the chosen place several times before you can catch a beautiful sunrise, but it's worth it.
Moscow Kremlin at dawn, view from the Patriarchal Bridge. ISO200 50mm f/11 10s
It is unlikely that you want to limit yourself to one plot. It makes sense to make for yourself a list of scenes that you would like to shoot, and with each of them to do the described procedure - to determine at what time and under what weather conditions they can be removed. This list might look like this:
The Kremlin, view from the Patriarchal Bridge - an hour before dawn, clouds are needed (spring, summer)
The Kremlin, view from the Bolshaya Moskvoretsky bridge - half an hour after sunset, clouds are needed (mid-spring, late summer, early autumn)
Moscow State University, reflected in the fountain - half an hour after dawn, after rain (beginning of spring, beginning of autumn)
etc.
After compiling the list, it remains to wait for the right weather. If you are shooting outdoors, then you will have to honestly walk to selected points every day in the hope of catching the light. But in the city, your task can be greatly facilitated, since mankind has learned to more or less accurately predict the weather, at least for the day ahead. In my opinion, the most accurate and detailed weather forecast is provided by the Intellicast service. If the forecast says that during normal hours there will be 20-80% of clouds (column "Clouds"), then on this day there is a good chance of beautiful light. And if a thunderstorm is predicted a couple of hours before sunset, then you must go, because the light show can be simply grandiose, the main thing is not to forget to take an umbrella.
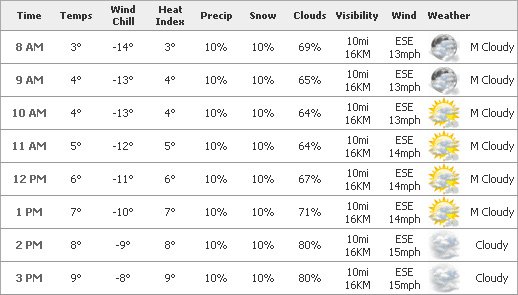
An example of a weather forecast at www.intellicast.com
If you're unlucky with the weather
Colorful sunsets don't happen every day. If you came to shoot, but there is no light, then you should not be upset. First, you can explore the area and try to find interesting places to shoot. Secondly, you can look for scenes that do not require good light. If the sky is clear, you can try shooting a scene with the sun in the frame. In dense clouds, you can look for scenes without the sky. For example, in the forest you can photograph trees, streams and streams. Let the plot be not so interesting, but then you will not return from the shooting disappointed. So next time you will have stronger motivation get up early in the morning to shoot the sunrise.
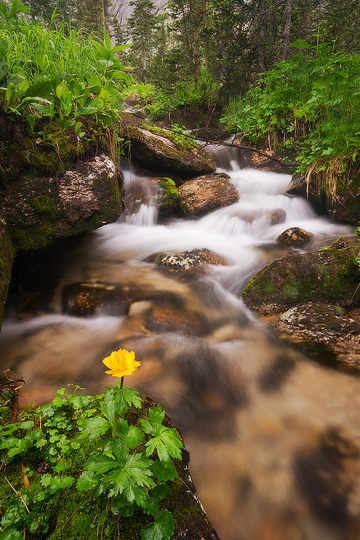 Cloudy weather, drizzling rain - excellent conditions for shooting vegetation in the forest. Ergaki Natural Park, Krasnoyarsk Territory. ISO100 24mm f/16 1.3s
 Sunset is one of those subjects from which many amateur photographers have taken and are taking their first steps in the field of artistic photography. In principle, it is not difficult to explain this - nature itself draws a beautiful picture, the task of the photographer is just to press the button and, in principle, the photo will almost certainly turn out to be interesting. However, there is a downside to this natural phenomenon. Let's remember a children's toy - a kaleidoscope. Every time you look into his eyepiece, every time you see a new picture - sometimes with an interesting pattern, sometimes "so-so". But no matter how much you shake the kaleidoscope, you will not see anything fundamentally new in it. Sunset is the same. No matter how many times you shoot, the plot is hackneyed. Yandex when querying "sunset" finds about 2.5 million (!!!) images, and most of them look like this:

Unfortunately, I can’t indicate the author, because I don’t have such information, this photo has spread all over the Russian Internet
Well, so what? Don't shoot sunsets at all? Of course not. I just recommend that you take shooting more responsibly, in this case you will have a chance to photograph the sunset in a really beautiful and original way. And it's not so easy!
Technical difficulties when shooting sunsets
The first challenge is that sunset requires good dynamic range from your camera. It is necessary to work out both the light sky and the dark earth at the same time. Alas, only DSLRs can boast of this, and not all of them. But even on a full-frame device (it is believed that they have the maximum dynamic range), it is very difficult to achieve simultaneous high-quality study of both the sky and the earth when shooting a sunset. Is it worth talking about soap dishes that confidently "paint" everything below the horizon in a "radical black color"? When shooting a sunset over water, this problem seems to disappear - the mirror of the reservoir reflects the sky and looks bright. However, the coast at the same time falls even more into blackness. The lens has a huge impact on the quality of the photo. The critical parameter in this case is the glare resistance of the lens. When the sun enters the frame inside the optical system, the number of light reflections from the lens surfaces increases significantly, due to which the picture loses contrast and "blooms" with many sunbeams.

Author's photo

As you can see, the sun took on a strange oblong shape - most likely, the glow of the clouds near the solar disk also affected. If you "turn" the levels to failure, then the color component of blooming will be clearly visible - the green edging.

The above picture, of course, is extreme, but it shows why sunset photographs are difficult to process. Nevertheless, there are plenty of fans in this way to "exaggerate" and put their creation on the Internet. Don't do this, please!
The artistic side of the landscape at sunset
Rule #1 - Don't make the sun the only key object in the frame. The sun in photography has much more value as a light source than as a subject - so use it for its intended purpose! Find a subject that would play in the sunset light and photograph it. Many people shoot a sunset over the sea or a large body of water in windy weather, focusing on the sunny path and completely forgetting that splashes from the surf in the backlight sometimes look just magical! Find a pier, a dam against which the waves break and try to shoot them - I'm sure it's much more interesting than the sunny paths that have set your teeth on edge.

Rule number 2 - the most interesting sunsets happen during a change in weather Sunsets in good weather are monotonous and boring and represent a simple picture like a white circle (sun) in a pink or yellow sky and an almost black bottom. When the weather changes, clouds can be observed in the sky, often in bizarre shapes. When the sun sets below the horizon, these clouds glow bright red for a short time - don't miss this moment!

Sorry, I couldn't find a suitable foreground...
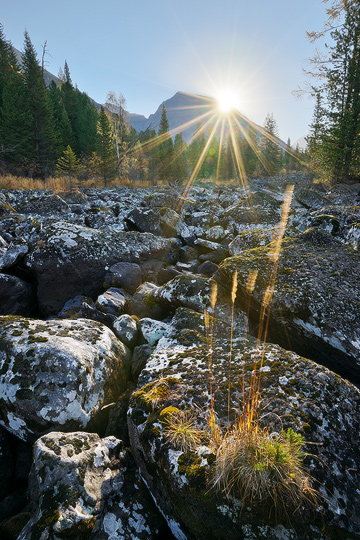
Rule number 3 - the more the aperture is clamped, the longer the rays from the sun are obtained The rays are produced due to the diffraction of light at the corners of the aperture. When the diaphragm is open, its shape is close to a circle, when closed - to a polygon (by the number of petals). On the one hand, diffraction on a heavily covered aperture slightly reduces the detail of the picture, on the other hand, it allows you to get an interesting optical effect.

And no cross filter needed!
In addition to the basic rules, I would like to add something about filters. The most valuable thing when shooting sunsets is the ND filter - it allows you to slightly darken the sky to allow the camera to work out the ground better.

A polarizer is useless when shooting sunsets. Someone advises using color filters - in my opinion, this is not very rational in terms of digital photography. Such a filter can be easily done in Photoshop or Lightroom, especially if you are used to shooting in RAW format. On the other hand, do not forget that each extra piece of glass worsens the glare resistance of the optical system. In conditions as harsh as at sunset (if the sun is in the frame), you may need to temporarily remove the protective transparent filter as well. Remember safety precautions when using a telephoto lens. If you look at the sun through the lens for a long time, damage to the retina of the eye is quite possible. To protect myself from such a nuisance, I personally press the "DOF Control" button when composing a frame (for Kenon - on the front panel, below, to the left of the lens). When the aperture is closed, the picture in the viewfinder noticeably darkens and you can look at the sun with almost no risk of spoiling your eyesight. By the way, keep in mind that when shooting a sunset over water with a telephoto lens, it is quite possible that the quality of the photo will deteriorate due to the effect of "jitter" of the atmosphere. Water evaporating from the surface of the water causes light to refract, causing straight lines in the photo to become slightly crooked.

Shutter speed, aperture, ISO sensitivity, white balance
In what mode to photograph, what shutter speed, aperture and ISO sensitivity to set when shooting a sunset is a fairly common question. I'll try to answer it. Basically, general principles exposure settings are not much different from those generally accepted in landscape photography, namely:
I recommend photographing the sunset in manual mode. There are several reasons. The most important - each lens has a certain range diaphragms on which it issues best quality pictures are usually f/5.6-f/11. Landscape (including sunset) is not a "DOF-dependent" genre (no need to separate planes with blur, as in a portrait), so you can safely clamp the aperture. When the aperture is clamped to 22 or more, the overall detail of the image is slightly reduced, but the effect of diverging rays from the sun appears, this was discussed above - perhaps this will be a reason to sacrifice technicality for the sake of artistry. It makes no sense to shoot a sunset with an open aperture - the detail is low, the depth of field will be small and not all objects will most likely fall into the depth of field (although this may be an artistic intent - these are already special cases).
excerpt we select in such a way that the exposure level of the photo approximately corresponds to what we see with our own eyes. Simply put, if the sky is bright in reality, it should also be bright in the photo. At the same time, the exposure meter can show overexposure up to + 2EV, do not pay attention - just make sure that the area around the sun is not overexposed to whiteness and that the sun disk in the photo is clearly guessed. The solar disk, by the way, is almost guaranteed to be white - there is nothing wrong with that. The exception is the final stage of sunset, when the disk has already almost touched the ground, then it may well turn out to be yellow or red.
The most convenient way to shoot sunsets is to use the LCD or electronic viewfinder, as they allow you to see the result before the shutter is released. The reflex viewfinder, for all its merits, is less convenient when shooting sunsets. Be careful when shooting the sun with a telephoto DSLR - you can ruin your eyesight if you look at the sun through the viewfinder for too long.
ISO sensitivity the minimum possible, but at the same time, ensuring the absence of "shake". A low sensitivity slows the shutter speed, but produces smoother tones and reduces noise. It is worth raising the ISO sensitivity only if the shooting is with a telephoto lens without a stabilizer and a tripod - in this case, the likelihood of blurring the picture due to hand tremor increases.
It is impossible to give an unequivocal recommendation which one to install white balance probably the best recommendation would be shoot in RAW and then set the desired white balance when converting to JPEG, depending on your "vision" of the plot - some photo will look better in cold tones, some in warm.
Everyone loves to watch and admire beautiful sunsets. Admit it, even though it's a cliché, shooting sunsets is a lot of fun. It's nice to be able to capture the last rays of the sun and the amazing landscape bathed in golden light.
Step 1: The lens must be clean
Ah, the eternal curse of the photographer! Dust, dirt, sand, water drops… you know them very well. When we go out into the countryside, equipment pollution cannot be avoided. Probably nothing attracts dirt like the front of the lens. Just take a look at it after being outside for a while. Point a dirty lens at the light and tiny bits of dust will show up and spoil the picture. This happened to me very often, so I learned from my mistakes. Of course, these spots can be removed in post-processing, but if you quickly wipe the glass before shooting, you can save a lot of time later.
While it's not related to settings in any way, a clean lens is an important first step, especially when shooting sunsets. Take special tools with you that will help you quickly clean the lens. Microfiber cloth, special wipes, LensPen and a compact air bulb will not take up much space in the bag, but will be very useful.
Step 2: Use a tripod
You must have taken many successful handheld sunset shots. However, there are several good reasons to get in the habit of taking a tripod with you. It makes the shooting process slower and this is not always a bad thing. When using a tripod, the emphasis is primarily on obtaining a competent composition. When the first goal is reached, you can focus on the correct exposure. This can be very helpful when shooting in unusual lighting conditions. Of course, you can't let the tripod take root. After you've taken the photo, change position. Try a different perspective. Raise or lower the camera. The end result is more unique shots than 50 shots that look almost the same.
Another reason to get a tripod is that as the sun goes below the horizon, the amount of light decreases. This means that it may be necessary to set a very slow shutter speed, at which it is impossible to work hand-held. With a camera mounted on a tripod, you can take longer exposures without fear of a shaky shot. However, do not forget about moving objects, such as trees swaying in the wind. Slow shutter speeds can result in unwanted blur.
Step 3: Shoot with a wide-angle lens
When shooting sunsets and landscapes in general, photographers usually try to capture wide open spaces. Focal length from 14 mm to 24 mm - good the starting point to get a composed picture that captures everything you need. Shooting with a wide angle will also allow you to focus on the sun's highlights for a more dramatic effect. Next, we'll talk more about this.
After the picture is taken, try adjusting the lens and using the zoom. Play around with different focal lengths to isolate some areas. Try to capture the silhouette of a tree or other object against the backdrop of the sun. The only limit should be your imagination. There are no specific rules regarding focal length, so feel free to experiment and enjoy the process.
Step 4: Shoot in RAW!
There are a few cases where JPEG is better, but for sunsets (and landscapes in general) it makes more sense to shoot in RAW format. The only exception is when you do not need to edit pictures on a computer. However, for me, post-processing (or editing) my shots is half the fun. It also allows me to bring out more of the creative aspects of the shots I take. Shooting in RAW file format preserves all data and provides more editing flexibility. It can be very an important factor, especially when taking a picture with such a high dynamic range. If you don't quite know what it means to shoot in RAW, more information can be found in Jim Harmer's Beginner's Course.
Step 5: Set The Mode To Aperture Priority
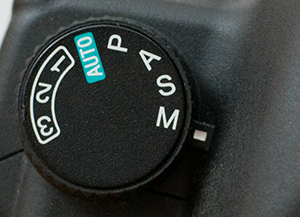
This point may cause controversy, but let's start with the fact that it is not necessary to work in manual mode to be a "real" photographer. This doesn't mean you should forget about it, or shooting with it won't improve your understanding of exposure principles and camera settings. However, Aperture Priority is a good starting point and is great for shooting sunsets.
On most cameras, Aperture Priority is set by turning the dial to A or Av. It all depends on the specific model, but the principle of operation is always the same. You only need to set the aperture value, and the camera will select the shutter speed and ISO on its own. Aperture does not change until you do it yourself. This is important, as it determines which part of the frame will be in focus, and also helps to achieve the effect of shining rays of the sun.
Step 6: Choose a Larger F-number
Aperture is responsible for the depth of field or, in simple words, areas in focus. When shooting landscapes, you want the entire frame to be in focus. This means that the f-number should be large, such as f/11, f/13, or f/16. The aperture of the lens becomes smaller as the f-number increases. Thus, the effect of radiance is obtained. Keep in mind that settings larger than f/16 may introduce diffraction and make the image less sharp. Despite this, I sometimes set it to f/18 or f/22 and don't worry too much, but it all depends on the lens used.
Step 7: Set Your ISO Low
Lower ISO settings generally reduce the amount of noise, so the picture looks cleaner. Set it to the lowest available value, 100 or 200 usually works fine. Try to choose lower values if possible. There are some exceptions here, which we'll talk about later.
Translator's note - I have previously reminded that more noise at high ISO values \u200b\u200band automatic modes (P, A / Av or S / Tv) appears due to the response of the camera to reduce shutter speed or aperture size. Increasing the value itself only amplifies the incoming signal.
Step 8: Watch Your Exposure
After correct aperture and ISO, you need to pay attention to the last vertex of the exposure triangle - shutter speed. If you shoot in Aperture Priority mode, the shutter speed will be set automatically. However, you still need to be careful not to let it get too long. You may need to shorten the exposure time to avoid blurring the movement of objects in the foreground and camera shake when shooting handheld.
To shorten the shutter speed in such a situation, one or both of the other parameters must also be affected. Since the aperture helps to achieve the desired depth of field, we will leave it alone. A higher ISO will help us shorten the shutter speed. For example, if the shutter speed is 1/15 second, increasing the ISO from 100 to 200 will make it 1/30 second. Doubling the ISO again, we get 1/60 s (assuming that the illumination of the frame does not change). The smart thing to do is to zoom in on the camera's LCD screen and make sure all the necessary areas are sharp enough.
Step 9: Use Exposure Compensation
After taking a few shots, it is worth evaluating their appearance and paying attention to the histogram. If you don't like the exposure, a quick way to fix it is to use exposure compensation. Does the photo look too dark? Apply positive compensation. If it is too bright - on the contrary, negative. Experiment and see how it works, as well as the necessary compensation force.
Some camera models have a dedicated wheel for editing exposure compensation. When working with others, you need to press the button while turning one of the command wheels. Read your model's user guide to learn how to use this feature. Note that it will work with Aperture Priority, but not with Manual. If you're shooting in manual mode, changes to exposure are made independently by editing aperture, shutter speed, and ISO.
Step 10: Use Bracketing
When shooting sunsets, especially when the sun is in the frame, you have to deal with a very high dynamic range (High Dynamic Range - HDR). In other words, the tonal values of the brightest and darkest areas are very different. Very often, the dynamic range is beyond the capabilities of the camera, and it cannot capture everything in one shot. If you expose highlights, the shadows will turn black. When trying to save the shadows, the sky will most likely become overexposed and completely white. In such a situation, multiple exposure can help.
However, bracketing can also be helpful. I believe that almost all modern DSLRs and mirrorless cameras are equipped with automatic bracketing. See the instructions for how to use this feature on your specific model. The default is usually 3 shots. One will be properly exposed, the second will be overexposed, and the third will be too dark. The number of shots can be adjusted in the settings. Some models allow you to take 5, 7 or even 9 frames, but usually three is enough. After the photos are ready, they need to be combined into one using Lightroom's Photo Merge HDR tool or any other similar software. More about this feature can be found in the article.
A more advanced technique for working with high dynamic range is Photoshop's luminosity masks.
Step 11: Use the LCD Screen to Shoot
When shooting sunsets, you often need to point the camera directly at the sun. Looking through the eye of the viewfinder is very dangerous as it can damage your eyes. So don't forget that your camera has a screen. If it can be rotated, you won't need to lie down on the ground to get great angle shots. All cameras should have this capability!
Step 12: Be Patient
This is not a camera parameter, but just as important. After the sun sets below the horizon, do not leave immediately. Observe the light and color of the sky and keep shooting. Very often the best colors appear when the sun is gone. This is especially true if there are several clouds near the horizon. I learned this from my own experience when I left too early and saw a stunning riot of flowers on the way home. Now I usually stay until dark.
Example settings for shooting sunsets

This photo was taken on the Oregon coast. The angle at which the sun is between the stones helped me achieve the glowing effect.
- Shutter Speed: 1/13s
- Aperture: f/22
- ISO: 100
- Focal length: 28mm

The photo above was taken at Monument Rocks, Kansas. Thick clouds on the horizon cover the sun, but I managed to capture how it illuminates their edges.
- Shutter Speed: 1/200s
- Aperture: f/11
- ISO: 100
- Focal Length: 12mm (18mm equivalent)

I captured this landscape last fall from my yard. The camera was set very low on a tripod so that the leaf cover was in the foreground. The picture was taken after sunset.
- Shutter speed: 1 s
- Aperture: f/22
- ISO: 200
- Focal Length: 10mm (15mm equivalent)

Don't be afraid to try new things when working with sunsets. I zoomed in and chose such an angle that the plant was against the background of the sun.
- Shutter Speed: 1/500s
- Aperture: f/8
- ISO: 400
- Focal length: 400mm
conclusions
Shooting sunsets is a lot of fun. Its advantage is that you do not even need to travel. Such a phenomenon as a sunset occurs every day and can be captured from almost anywhere. Even from your own backyard. Not every day can please you with a beautiful sunset, but in most cases you will be lucky. Grab your camera and try out some of the tips in this article. As with any other type of photography, the more work, the better the skill. Plus, if you get the hang of shooting sunsets from your backyard, you'll gain more confidence and be able to take great photos while traveling or elsewhere.


For beginners: breeding a broiler at home Boiled water for broilers
Only lovers will survive
Features of advertising aimed at children
retouching old photos in photoshop retouching old photos
What is an NPO: decoding, definition of goals, types of activities Does a non-profit organization have the right