| f/2.8 | f/4 | f/5.6 | f/8 | f/11 | f/16 |
so that the selected initial values
shutter speeds and apertures are in the same column of the new table
Each column of this new table gives us the aperture and shutter speed for the correct exposure of the frame, of course, under specific shooting conditions.
The new table is called
Equivalent shutter speed and aperture table
| 1/500 | 1/250 | 1/125 | 1/60 | 1/30 | 1/15 |
| f/2.8 | f/4 | f/5.6 | f/8 | f/11 | f/16 |
Let me remind you that in our example, the correct exposure pair was taken “from the ceiling”, since specific shutter speed and aperture values \u200b\u200bare not important to understand the essence of the issue.
Whoever doubts that adjacent aperture values change the amount of light by 2 times, but still remembers the formula for the area of a circle, can check this statement - however, don't be too strict, round the resulting area values :o)
Look - what is the shutter speed in one column with an aperture of f / 16? Correctly 1/15 of a second - we will install it!
We have selected a new exposure pair for our shooting conditions:
| 1/500 | 1/250 | 1/125 | 1/60 | 1/30 | 1/15 |
| f/2.8 | f/4 | f/5.6 | f/8 | f/11 | f/16 |
Any column in the table of standard values for shutter speed and aperture provides the same amount of light entering the matrix of a digital camera or film in specific lighting conditions.
Camera settings that are suitable for the selected shooting conditions and give the same amount of light are called equivalent,
and shutter speed-aperture pairs - equivalent exposure pairs.
You don't need to memorize this table. The table is provided for clarity - when you take pictures in manual mode, it will come in handy ... The more you take pictures, the faster you will remember the standard shutter speed and aperture values
While you are not familiar with, you can easily automate the selection of equivalent exposure pairs - to do this, just switch your camera to P mode and sort through the proposed shutter speed and aperture pairs - they will definitely be equivalent
CHOOSE THE EXPOSURE COUPLE in P mode,
by clicking the buttons below the picture
EXPOSURE COUPLES IN EXAMPLES
Selection of exposure pairs when lighting conditions change
And now, imagine that we have entered the shadow. There was less light - the conditions of photography have changed. To compensate for the change in illumination in our table of exposure parameters, we will do the following: we will shift the rows of the table by the amount of change in illumination - in this example, by one column.
We have selected an exposure pair for new shooting conditions:
| 1/500 | 1/250 | 1/125 | 1/60 | 1/30 | 1/15 | ← |
| → | f/2.8 | f/4 | f/5.6 | f/8 | f/11 | f/16 |
The expo pair has changed, but any column of the new table still suits us!
What if it gets even darker? That's right, we shift the lines one more step. In the same way, we shift the rows of the table of standard exposure parameters with an increase in illumination - only in the other direction!
Standard shutter speed and aperture property
If you take a closer look at the table of standard shutter speeds, you will notice that neighboring shutter speeds differ by about 2 times. In the same way, each subsequent aperture value reduces the amount of light entering the camera matrix by a factor of 2. And vice versa - the previous aperture value increases the amount of light that hits the pixels of the matrix, and also by 2 times. That is why these shutter speeds and apertures are called standard and oh, how they make life easier for the photographer.
At the same time, there is no need to count the amount of light or make the "dance with a tambourine" outdated :o) - everything is simplified by simple arithmetic - we count the steps of changing one exposure parameter and change the second by the same amount (but in the other direction).
One change in the standard value of shutter speed or aperture changes the amount of light that hits the matrix of a digital camera or film by 2 times.
Such a change is called a step, step or stop (from the English f-stop)
If we increase one of the exposure parameters,
then by the same number of steps we must reduce the second
The story of water in a garden hose
Imagine that you want to water a garden bed and pour water into a bucket. (if you are not a gardener, pour water to wash your car :o)
So, the bucket is our matrix. Water is light. For a normal exposure of a photograph, we need the matrix (in our bucket) to get a certain amount of light (Water). We will assume that for a normal exposure we need to collect a full bucket of water, no more, no less.
The diameter of the hose is the diaphragm. The larger the diameter, the faster you fill the bucket and close the tap. The time during which the tap was open is the shutter speed. Now imagine that you are collecting water into a bucket using hoses of different diameters: first - thick (f / 2.8), and then - thinner (f / 8).
By pouring water through a thick hose, you recorded the time and filled the bucket, for example, in 1 minute. And by pouring water through a thin hose, you kept the tap open longer - almost 3 minutes.
Thus, you have established the following pattern:
It takes longer to fill a bucket of water through a thin hose (small diaphragm opening), so the shutter speed (tap or shutter opening time) must be longer.
Got it? And what happens if, pouring water through a thin hose, you close the tap not after 3 minutes, but earlier? That's right, you won't fill the water in the bucket!
The same thing will happen if you set a faster shutter speed at the same aperture - there is too little light on the matrix and the frame will turn out to be underexposed (there is less water in the bucket required amount).
Also, you will overfill the bucket if you keep the faucet open for 2 minutes, filling the bucket through a thick hose. A complete analogy with exposure - at the same shutter speed, you opened the aperture ... oh: o) - water over the edge and overexposure of the frame!
Now imagine that the vodka that gives you water is unstable - yesterday there was a good pressure of water, and today the pressure has dropped. So, water pressure is an analogue of ISO. But more on that in the next lesson....
If you are tired of your camera's boring auto mode and want more creativity, then it's time to get acquainted with the basics of exposure. In this article, we will tell plain language what is exposure and its three whales: aperture, shutter speed, ISO (sensitivity).
Every experienced photographer knows that you need to be able to properly adjust the exposure settings. And what is it? Exposure is a parameter that shows the amount of light entering the camera's matrix at the time of shooting. When the exposure is built correctly, then its value is zero. If there is not enough light, then it goes into minus. And when the overexposure of the frame, then a plus. On SLR cameras, it is depicted as a horizontal scale, in the center of which is zero.
To achieve the optimum exposure level, the camera has three settings that can be controlled. We are talking about aperture, shutter speed and ISO sensitivity. The ISO value controls pure light, but the aperture and shutter speed also affect the artistic look of the photo. Let's talk about these values in more detail.
Aperture - first among equals
The first and most popular setting that photographers like to control is aperture or aperture. The first word is Latin and the second is English. In the Russian version, they are translated as a partition or hole. The diaphragm itself is the hole in the lens that opens and closes, thereby affecting the amount of light entering the matrix. But the most interesting thing that aperture affects is everyone's favorite background blur, the so-called bokeh.

An example of a photo on an open aperture
Aperture is denoted by the letter "F" and has values from one and above. The smaller the number, the more the aperture is opened. At an open aperture, the maximum background blur is achieved. If you want to get the sharpest possible shot, then you need to close the aperture.
Endurance is the lord of time
The next important element of exposure is exposure. This is the length of time the shutter will be open when the shutter button is pressed. If the aperture restricts light by narrowing the area through which it can pass, then shutter speed limits it in time. It would seem that everything is simple, adjust the shutter speed and aperture to get the right amount of light and that's it. But, with the same amount of light and different proportions of aperture and shutter speed, the result in the photo will be different. Shutter speed, like aperture, affects the image in the frame. It has a "freeze" effect. With a short shutter speed, the water jet will be frozen and you can see every drop, and with a long exposure, the jet will be smoothly lubricated and look more like fog than water.

Long exposure waterfall
Exposure is measured in seconds. It is denoted as follows: 1 is a second, 2 is two seconds, 1/125 is one hundred and twenty-fifth of a second, and so on. The smaller the value, the faster the shutter speed.
ISO sensitivity - less is better
The last parameter is ISO. It does not affect the artistic component of the frame in any way, it only affects its quality. The lower it is, the better. The ISO value displays the sensitivity of the camera matrix. The more we increase the matrix sensitivity, the more noise will appear in the frame.
Sensitivity is referred to as ISO. The minimum value is usually 100. The maximum value is different for all cameras.
Below is a visual table showing which parameter affects what.

To sum up: how to work with aperture and shutter speed
Depending on the task of the photographer, he can choose aperture or shutter speed as a priority. ISO is never a priority, as it is used as a forced measure when it is impossible to achieve the required amount of light using the first two parameters. This does not mean that ISO should always be minimal, just that it should not be abused.
What is aperture or shutter priority? This is when you set one parameter, and the second is already adjusted to it.
- Aperture priority - set if you need to blur the background or sharpen the frame.
- Shutter priority - set if you need to freeze the frame, or give it dynamics.
In any mirror and mirrorless camera there are two such semi-automatic modes. You set the priority parameter yourself, and the camera adjusts everything else for you. It is with them that it is recommended to begin your acquaintance with the exposition.

ISO aperture and shutter speed table

Table of shutter speed and aperture values for different weather conditions
It is not necessary to take this table as a standard, it only serves to understand the principles of the relationship of these parameters. Focus less on all sorts of tables, and practice more, experiment and enjoy your favorite pastime.
In this article, we will understand how manual camera settings affect the quality of the picture. Any novice photographer wants to understand the capabilities of their camera in order to use them to create spectacular shots and make the process of photography completely manageable.
Let's see how the following settings affect image quality:
Learning to choose a focal length
What is focal length? If you already have a camera, but have not had time to get acquainted with its numerous settings, and you are still shooting in automatic mode, then this simulator will teach you to use your technique at 100%. Let's look at what focal length is and how its choice affects the final result.
Focal length is the distance from the front lens to the photosensitive element, i.e. matrices. Measured in millimeters. The choice of focal length depends on what you want to shoot: close-up, medium or general. And the degree of background blur and perspective will depend on the choice of focal length.
Set the distance from the camera to the subject on the simulator to 2 meters, and now change the focal length. The simulator simulates a zoom lens with a focal length of 18-55mm. Experiment and you will see that the smaller the focal length, the more space fits into the frame, and increasing the focal length brings distant objects closer.
You can set the desired focal length in this camera by adjusting the optical ZOOM (ZOOM) or changing the lens.
Types of lenses
Lenses come with a fixed focal length (the so-called "fixes") and with a variable focal length (the so-called "zooms" from the word zoom, approximate). You can set the desired focal length in this camera by adjusting the optical ZOOM (ZOOM) or changing the lens.

Wide Angle Lenses
Lenses with a focal length of less than 35mm are called wide angle lenses. With their help, it is convenient to shoot nature and architecture, groups of people indoors, when there is no way to move away.
- The angle of view along the diagonal of the frame is 60 degrees or more.
- A wide-angle lens can capture a wide panorama.
- The depth of field of panoramic shots is large, i.e. all the objects in the background seem to be very well worked out.
- When shooting with a wide-angle lens at close range, distortion occurs.
Standard (standard) lenses
Standard lenses are suitable for all types of shooting. Focal length for most of these lenses is in the range of 45 to 55 mm.
Long lenses
- Lenses with a focal length of 80 or more millimeters and with an angle of view of 30 degrees.
- Brings the subject of photography as close as possible, allows you to capture it close-up well-researched.
- The proportions when shooting with a telephoto lens are undistorted.
How else does the choice of focal length affect the picture?
perspective
Close-up people and objects appear larger in the image, while distant objects appear smaller. When applied wide angle lens this effect is intensified, i.e. close objects are reproduced emphasized large, and distant objects very small.
When working with long lenses, the opposite effect is observed, that is, the distant parts of the plot are reproduced somewhat more, and the close parts are somewhat smaller than is perceived by the naked human eye.
Depth of field
Depth of field is the distance within which objects are in focus. If it is small - we get a blurry background (and foreground, if any) plan, then they talk about "small depth of field", and if this distance is large, they talk about "large depth of field".
Depth of field depends on various factors, including the focal length. With a large focal length, we get a smaller depth of field, that is, a blurry background.
Setting the shutter speed and aperture
As you know, the quality of the image depends on how much light passes through the camera lens and hits the matrix. The intensity of the light flux is regulated by two mechanisms:
- the size of the hole through which light passes (diaphragm);
- the time for which the path of passage of the light flux is open (exposure).
Aperture setting when taking photos
Diaphragm is a mechanism that sets the size of the hole in the lens through which light passes. The diaphragm must respond to light like a pupil that expands in the dark and contracts in bright light. The aperture setting is carried out according to the same principle: in dim light, the aperture has to be opened so that as much light as possible falls on the matrix. And if photography takes place on a bright sunny day, then the aperture closes. The aperture can also be compared to a window opening - the larger the window, the more light enters the room.
Common aperture value indicate the ratio of the diameter of the entrance hole of the lens to focal length and are written like this: F / 2.8, F / 5.6, F / 11, well, or like this: F 2.8, F 5.6, F 11.
Aperture values are one of the factors affecting the depth of field.
 Effect of Aperture Values on Depth of Field
Setting the shutter speed when taking photos
Excerpt is the time that the camera shutter is open. Shutter speed, like aperture, controls the amount of light that hits the photosensitive element. Imagine a room where the wallpaper is fading in the light. If you close the window with shutters, the burnout process can be stopped.
In 1826, to get the first ever photograph "View from the Window", taken on a tin plate covered with a thin layer of asphalt, required eight hours of exposure in bright sunlight.
 The first photograph in the world, "View from the Window", 1826
At the first stages of the development of photography, the shutter speed for which the photographer opened the lens cover was tens of minutes.
Nowadays, the shutter speed is usually tenths, hundredths and even thousandths of a second. A fast shutter speed allows you to take high-quality pictures without using a tripod. When shooting handheld, the shutter speed should not exceed 1/80 second - otherwise the frame may be blurred due to hand shake.
Sometimes slow shutter speeds are used to create interesting visual effects:
How shutter speed and aperture settings affect exposure
Exposure is the amount of exposure to a photosensitive element. It is formed by two parameters - shutter speed and aperture - which are also called "expocouple". In modern amateur cameras, exposure metering and exposure pair calculation are automated. In professional cameras, automatic exposure metering is disabled (completely and partially).
Try to work on the camera simulator in manual mode and set such a pair of shutter speed and aperture to get a high-quality picture.
ISO setting. How to choose an ISO for a photo
Another parameter that affects the image is ISO. How to work with ISO settings and what to use them for?
ISO is the camera's sensitivity to light. The quality of the image directly depends on how much light hits the matrix. ISO is one of the three factors that determine exposure, along with aperture and shutter speed. The choice of ISO depends on the nature of the lighting at the time of shooting.
For example, if you are photographing in low light, you can raise the ISO value, thereby reducing the shutter speed and not smearing the photo.
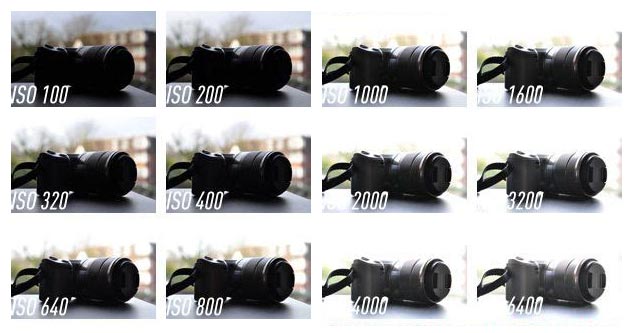 photos with different ISO,
 aperture f/5.6, shutter speed 1/200
Try adjusting the ISO settings on the machine that has lighting set up, as in the room. Increase the ISO and click on the "Take a photo" button until you see a smiling emoji.
The ISO scale usually starts at 100, and each subsequent value changes twice, up to the limit of the camera's capabilities: 100, 200, 400, 800, 1600 ....
ISO setting affects noise
By increasing the ISO, you will realize that the higher its value, the more noise is obtained in the photo.
Therefore, for best quality try to shoot always try to shoot in good light and use the lowest possible ISO. Then you will get excellent sharp photos without noise.
Conclusions. Which ISO settings to use in which cases
ISO100: Photos will turn out great. Suitable for shooting in daylight.
ISO 200 - 400: For slightly less lighting, such as in the shade, in cloudy weather, or indoors if it is brightly lit.
ISO 400 - 800: Suitable for indoor shooting, flash can be used.
ISO 800-1600: Suitable for indoor shooting when flash cannot be used or is prohibited.
ISO 1600-3200: This range is used in low light conditions where the use of a tripod is difficult. Noticeable digital noise appears in the picture.
ISO 3200+: This range is reserved for extremely low light, but it is very noisy and the image is too grainy.
Very often, when talking about the basic principles of shooting to novice photographers, one comes across the fact that a person brought up in the world of film “soap dishes” and digital cameras, it is extremely difficult to understand the basic concepts of aperture, shutter speed and ISO. In this article, we will try to explain these key concepts as simply as possible.
Very often, when talking about the basic principles of shooting to novice photographers, one comes across the fact that it is extremely difficult for a person brought up in the world of film “soap dishes” and digital cameras to understand the basic concepts of aperture, shutter speed and ISO. References to relevant articles on the Web also do not help a beginner much, since terminology very often becomes a “stumbling block” to the final understanding of what needs to be done with the camera in the end in order to get a normal quality photo. It is for this reason that in this article we will try to explain these key concepts as simply as possible.
I must say right away that in order to independently control the shutter speed and aperture in a digital camera, you should turn its mode selector to the “M” position, where we can change the exposure parameters (this word refers to the ratio of aperture and shutter speed) using the buttons, the wheel or in another way that is on the camera.
What is exposure?
Exposure is a certain period of time during which light enters the camera, on a photosensitive material (film or digital camera matrix, which is not important). In fact, this is the time for which the shutter opens - a shutter that is located between the lens and the photosensitive element. Usually this time is a fraction of a second and it is in this value that it is indicated in the menu or on the shutter speed dial (this is on all mechanical film cameras and is present on some digital cameras). The shutter speed scale is standard everywhere, and shutter speeds are indicated by the following numbers:
|
"Free" exposure by hand (the shutter opens for a while while you keep the camera shutter button pressed). |
By the way, the “full set” of shutter speeds given in this table is typical only for some digital camera models. In particular, Soviet film cameras rarely had shutter speeds shorter than 250 (1/250 of a second), which, however, was quite enough for photographers.
So, let's see what the shutter opening time gives us and why we need to adjust it. Everything is simple here - the shorter the shutter speed, the faster the movement of the object we can capture without blurring. This time. The second aspect - a short shutter speed is needed in bright light in order not to illuminate the frame with excess sunlight. And finally, the third - short shutter speeds compensate for the shaking of the photographer's hands and exclude the possibility of "shake" when photographing.
I foresee a beginner's question that if short shutter speeds are so beautiful, then why should the camera shutter speed be more authentic and when should they be used? So, we can use “long” shutter speeds in two cases:
- When shooting, the amount of light is not enough to use fast shutter speeds (the main reason),
- To obtain artistic effects when shooting (you can read about them in a separate ARTICLE).
It goes without saying that if the shutter speed is quite long (from about 1
30 fractions of a second), motion may occur when shooting handheld (slight blurring of the image in the picture). It is very easy to deal with this - just put the camera on a tripod or a flat surface and use the cable, remote control or turn on self-timer shooting to release the shutter).
How to determine the correct exposure?
Actually, it is the question of how to determine the correct shutter speed that baffles most novice photographers. I remember on the old Soviet cameras In the amateur category, the problem was solved by itself - instead of the above values, drawings were applied to the disk in the form of a cloud, a cloud with the sun and, accordingly, the sun without clouds. Such touching pictures concealed shutter speeds of 1.30, 1.60 and 1.124 fractions of a second. This is a kind of "classic" when shooting on film with a sensitivity of up to 100 ISO units. However, we will talk about the concept of sensitivity a little later.
What is a diaphragm?
Aperture is an equally interesting thing. In simple terms, these are the petals inside the camera lens, which can either fully open or close, leaving a narrow round hole for the passage of light. In fact, its task is either to let all the light that enters the lens onto the film or matrix, or to limit it stepwise.
What is the diaphragm for? It performs the following functions:
1. Limits the flow of light when it is in excess (when a very bright scene is photographed, shooting against the sun, etc.),
2. Serves to control the depth of field (the more the aperture is closed, the clearer we get a picture not only of the main object, but also of the space behind and in front of it).
To understand this principle, imagine that we are photographing the same object with different meaning diaphragm. For example, let's take the extreme values when the aperture is fully open and closed. In the first case, the background is completely blurred (by the way, the most favorite “wow effect” for those who have recently started shooting with a DSLR), and in the second, it turns out to be much more elaborate. Average values, of course, allow you to adjust the depth of space over a wide range.
Aperture adjustment is carried out differently on various models cameras. Most digital cameras aperture settings are set through the menu or by rotating a gear wheel, and on some, by a special knob on the lens. Film cameras and professional digital models most often it is the latter method that is offered as the simplest and most efficient in work.

So, you can determine the degree of aperture opening by the following numerical indicators: 1 / 0.7; 1/1; 1/1.4; 1/2; 1/2.8; 1/4; 1/5.6; 1/8; 1/11; 1/16; 1/22; 1/32; 1/45; 1/64. As you can see, the closing step in this case is twofold, the first value refers to a fully open aperture, and the extreme one is closed. In practice, most prime lenses on the market offer a starting value of 1.4 or 1.8. Faster (that is, with a greater degree of aperture opening) models are much more expensive due to the high complexity of manufacturing. In addition, with a fully open aperture, the sharpness of the lens is lost, and unwanted optical distortions - aberrations - may also appear.
WhatISO?
Another interesting point in mastering the skills of photography in manual mode is called ISO. In fact, this is a single world standard for the sensitivity of photographic material to light. Initially, there were three main standards - Soviet GOST, American ASA and German DIN. Later, film manufacturers came to a common denominator - the aforementioned ISO, which smoothly migrated to digital photography. So, what gives us a change in sensitivity? In fact, the ability to use the fastest possible shutter speeds when there is a lack of lighting, as well as great opportunities when photographing scenes where there is not enough light at all (for example, when shooting a night starry sky). Most modern cameras have the following ISO settings: 100, 200, 400, 800, 1600, 3200, 6400, 12800, 16000. The maximum ISO value can be more than this mark, but the minimum is less common, although on some cameras it may be and 50 ISO (such a reduction is usually done by software). With films, the situation is much more interesting, and here even 50ISO is not the lower limit of sensitivity.
So, based on the foregoing, it turns out that by changing the ISO, we can set a fast shutter speed even in very low light scenes. This is exactly how the automation of most cameras works, which seeks to set the shortest shutter time at any cost in order to avoid “shake”. However, one axiom must be learned: the higher the ISO, the more artifacts in the photo in the form of grain on the film or digital noise! At the same time, the extreme, “threshold” ISO values for digital cameras to a crop matrix (ordinary average amateur DSLRs) are, in most cases, a maximum of 1600 ISO. Increasing the sensitivity further will result in images being only suitable for posting on the Web. For this reason, try to make the most of small values where there is no digital noise at all.
Definition of exposure.
So, we have learned about what shutter speed, aperture and ISO are in a camera. However, separately, this knowledge gives us quite a bit, because we should learn how to determine the exposure - the total aperture and shutter speed settings in the camera.
Somehow, on one resource, I came across an interesting plate that suggested determining the shutter speed relative to the aperture value under standard conditions. She looked something like this:
|
Excerpt |
Aperture value |
In general, such a plate has the right to exist, provided that the shooting is carried out at a basic ISO value of 100 ISO. Based on it, we can easily calculate the exposure couple (shutter speed-aperture) for other values. For example, we open the aperture more by one value - we reduce the shutter speed by the same amount. However, this refers to theory, and in real shooting conditions, we need to take into account a number of factors. So, I will give the simplest example - we shoot in a room with artificial light, which is clearly not enough for high shutter speeds. However, at the same time, we want to shoot a dynamic plot (a running child, a cat or a puppy playing). So, in order to "freeze" the movement, we should set the shutter speed to at least around 1.125 seconds and at the same time use the average aperture value (let's say 1:5.6) in order to maintain sufficient depth of field. Using this aperture value at a sensitivity equal to ISO 100, we will have a shutter speed of 1.6 seconds, which is unacceptably high. Accordingly, we will be forced to increase the ISO to about the level of 3200-6400, which threatens us with noise. Here it is important to maintain a balance of characteristics, which will be achieved by varying the aperture. So, abandoning the value of 1:5.6 in the direction of smaller values, we will get a short shutter speed at lower ISO values, but we will lose in the depth of field. That is, each time we will decide on a compromise, trying to make the most of the possibilities of lighting and technology to obtain the highest quality image that will be correctly exposed. In the case of film, the situation will be even more complicated, because we simply cannot change the film sensitivity for each frame individually. However, with practice and mastering this science, you can get a really high-quality result. By the way, the “digit” in this regard allows underexposure of the frame (shooting with a faster shutter speed than the situation suggests), provided that the photograph is taken in RAW format (almost all “advanced” digital cameras have this function). Then, at the processing stage, you can "pull out" the frame you need. However, photo processing is, as they say, a separate story, which we will talk about in our publications.
Instruction
The term "diaphragm" comes from the Greek word "partition", its other name is aperture. Aperture is a special device built into the lens to regulate the diameter of the hole that transmits light to the matrix. The ratio of the aperture diameter of a lens to the focal length of aperture.
The letter F stands for f-number, which is the reciprocal of the relative aperture of the lens. By changing F by one step, we get a change in the diameter of the aperture hole by 1.4 times. And the amount of light falling on the matrix will change by 2 times.
The smaller the diaphragm opening, the greater the depth of field of the imaged space, i.e. area of sharp focus around the subject. You can set the desired aperture, depending on the camera model, manually through the camera menu by rotating the aperture ring on the lens or the control wheel on the camera body.
The smaller the F number, the larger the aperture, and , the diameter of the lens opening becomes wider and more light enters the matrix. The maximum aperture value is f1.4, f2.8, etc. For a 50mm lens, the depth of field will be maximum at f22, and at f1.8, the sharpness will be shallow. For example, when shooting in order to get a clear face and a blurry background, the aperture should be set to a small f2.8. If the diaphragm, on the contrary, is clamped, i.e. set a larger aperture value, then the predominant part of the frame will be in focus.
The length of time during which the light rays fall on the matrix is called exposure. The shutter provides it. Aperture and shutter speed together with exposure coupler. The increase in ISO is inversely proportional to exposure, i.e. if the sensitivity is increased by a factor of 2, the exposure should also be halved. To measure shutter speed, fractions of a second are used: 1/30, 1/60, 1/125 or 1/250 s.
To shoot moving objects, in order to avoid "stirring", it is worth using a fast shutter speed. To calculate the desired shutter speed, you need to know at what focal length the shooting will be done. For example, the lens is 24-105 mm, it is extended by half - about 80 mm. And since the maximum shutter speed should not be more than a value inversely proportional to the focal length, the shutter speed should be set no longer than 1/80 s. Short shutter speeds are used to "freeze" the movement: the flight of a bird, the fall of drops, the run of an athlete, etc.
For shooting at night or at dusk, a slow shutter speed is better. It will help to correctly expose the frame. When shooting with a slow shutter speed, there is a high probability of blurring the frame, in which case it is worth using optical stabilization or a tripod. Such a shutter speed will allow you to shoot interesting scenes - a “fiery trail” during the evening and night shooting moving cars.
When shooting water, the shutter speed is of great importance. With a short exposure, the water will resemble glass. When shooting slow rivers and streams, it is best to use shutter speeds from 1/30 to 1/125 s. Rushing streams or waves crashing against rocks should be shot at a fast shutter speed of 1/1000 s, because. it will allow you to work out small splashes in detail. For shooting fountains and waterfalls, a slow shutter speed is suitable - it will allow you to convey the movement of water.


For beginners: breeding a broiler at home Boiled water for broilers
Only lovers will survive
Features of advertising aimed at children
retouching old photos in photoshop retouching old photos
What is an NPO: decoding, definition of goals, types of activities Does a non-profit organization have the right