How often have you heard or read something like this:
"Exists Golden Rule photographing landscapes, and no matter how much advice you are given, without following this rule exactly, you will never achieve results comparable to the pictures of professionals. Landscape photographers can only take pictures twice a day. First, at dawn: it's best to start shooting 15-30 minutes before sunrise and 30 minutes to an hour (depending on the brightness of the light) after sunrise. Secondly, at sunset.
This idea sounds everywhere and is presented as a rule for a landscape photographer. Often, as a rule, indestructible. But is it really so? Is it really worth hiding the camera on the farthest shelf for the rest of the time and not even thinking about it until sunset?
What can be said here. These words have their own truth. The sun is hard during the day, the lighting is usually flat, the contrast of the scene is very high (it's easy to get a broken sky), the shadows are rough. Nevertheless, I would not raise them to the rank of rule. But if you really want to, then it’s worth remembering that there are exceptions to every rule, and here they are just in bulk.
Let's start with the fact that the time during which it really may not be worth shooting is just a small interval between 11-12 and 15-16 hours of the day, when the sun is almost perpendicular to the earth, i.e. at its maximum zenith. And that's only during the summer. In spring and autumn, this gap is even smaller. And in winter, they can generally be neglected.
Well, what are the exceptions to this "rule" you ask. Well, here are a few exceptions:
1. Shooting in winter. In winter, the sun does not rise high and its intensity is very low. The sky, on the contrary, begins to play in the afternoon with all the colors of blue. In winter, pictures with the sun in the frame, taken with wide-angle optics, are also very beautiful. Unfortunately, I could not find an example of a photo in my portfolio. Just total bad luck on clear winter weather - I constantly get into bad weather.
2. The next exception is shooting before and after a thunderstorm. The sunlight at this time becomes warmer, and the leaden sky, coupled with the landscape illuminated by sunlight, form scenes that are awesome in their contrast.
3. When the sky is overcast. In this case, there is no harsh light, the lighting is soft, shadowless. And the sky with beautiful clouds looks very, very interesting.

4. And the last exception on my list is shooting in cloudy weather. Only during the day you can meet a deep blue sky, with snow-white clouds floating across it. And by catching the moment when the sun partially disappears behind the clouds, you can take a shot in which the landscape below will be covered with a variety of shadow patterns. Such landscapes are sufficient reason to forget about the "rule" not to shoot in the daytime for a while.

5. Well, do not forget that in strong sunny weather you can always go into the forest and take pictures of flowers, streams or any other forest fragments in its shade.

The first thing that is advised to a novice photographer is to stick to daylight hours for taking pictures. When shooting during daylight hours, it's always easier to understand how the basic principles of photography work. At the same time, you should not break the rules that have been tested over the years, on which more than one generation of experienced photographers has grown up. One recommendation is to shoot during the "golden hour" when the sun is low on the horizon and the outgoing light provides the softest lighting and creates the most beautiful shadows possible. But there is still a time when light is amazing and unusual.
If you are overtaken by thoughts that it is time to take the next step, or you just want to try something new, we suggest taking photographs in the evening and at night. Below are some common sense tips for shooting at night to help you learn new things along the way.
- Ideally, if your arsenal appears. Today, manufacturing companies launch countless models of tripods on the market. Each is designed for its own purposes. Of course, it is preferable to buy an accessory from a reliable manufacturer that meets all the requirements.
We have already written in detail about what features when choosing a tripod, first of all, in the material: "". For a user who is just beginning to learn the tricks of photography, it is preferable to opt for a stable, but not heavy tripod model that is easy to set up and carry from place to place.
In low light conditions, the presence of a tripod will allow you to use slow shutter speeds and at the same time get a clear, not blurry image. The user will not need to “hold breath” when pressing the camera shutter. Placing the camera on a tripod will allow you to enjoy shooting even in adverse lighting conditions.
- No flash required. For shooting evening landscapes, it must be said directly that it will be completely useless. That is why feel free to turn it off. Those who already confidently use in their work and feel at the same time an advanced photographer (which, in general, is not far from the truth), can safely lighten their backpack and forget the flash at home.
Control over the final image will have to be done manually. If you are having difficulty manually adjusting your camera, use creative modes: shutter priority or aperture priority. With their help, you will have to change one of the parameters, the second one will automatically be correctly set by the system itself.


If for some reason you are still hesitant to go photographing evening landscapes, remember the famous expression that before you say no, you must first try.

Remember, especially if you are a beginner digital photography when it doesn't work the first time, try the second and third. Sweat and sweat over your evening shots, then you will achieve results. Sooner or later. Do you feel sorry for the memory cards? Train!
Shooting at night allows you to display a scene in unusual lighting - just like the "golden hour" at sunset and dawn can add an element of mood and uniqueness to a scene lit by sunlight. Just as shooting sports and landscapes is limited by the limits of the camera's shutter speed and aperture, night shooting is often limited by the technical limits of both parameters (see below).
Due to a lack of familiarity with the subject, and because night photography is often extremely technical, many photographers simply put their cameras away after sunset and "wait for the day". This chapter aims to educate photographers about the challenges they can face at night and looks at ways to overcome many of them.
Basics
Night shooting is determined by the same parameters as daylight shooting, namely aperture, shutter speed and ISO sensitivity - but at the same time, all of them often reach limit values. For this reason, the spread and diversity of night photography is closely related to the development of photographic technology. In the past, film photographers avoided shooting night scenes because, in order to get adequate depth of field they required impossibly long exposures or generated an unacceptable amount visual noise. Further, the problem with film, the so-called non-reciprocity phenomenon, means that as the exposure time increases, more and more light is required to reach the film - resulting in less recoil compared to shorter exposures. Finally, even if the appropriate exposure has been achieved, the photographer must wait until the film has been developed to evaluate whether the shot has come out - a degree of uncertainty that is often unacceptable for someone who has stayed up late and spent minutes or even hours exposing each frame.
The costs of digital night photography
Fortunately, times have changed since the first attempts at night photography. Modern digital cameras are no longer subject to non-reciprocity and provide immediate results - increasing the enjoyment of the process tremendously and reducing the risk of wasting time on bad photos at odd hours.
With all these advances, digital night photography is not without its technical limits. Pictures are inevitably a compromise between depth of field, exposure time, and visual noise. The following chart illustrates all possible combinations of these settings for a typical full moon night shot at bulb exposure:
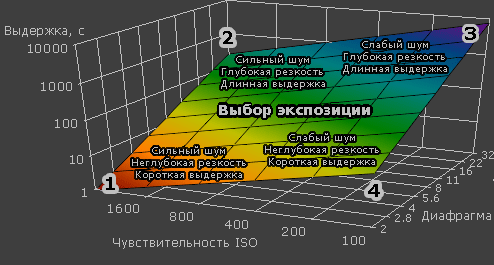
Please note that any of the four scenarios has its own problems. For most static night shots, the choice is between scenarios 2, 3, and 4. For each of these, there are often ways that minimize the disadvantages; These include image averaging, cascading and multiple focal planes(requires a separate article). Note also that the minimum possible exposure time is one second, which means that having a stable tripod is essential when shooting at night.
The diagram does not take into account additional restrictions: reduction in resolution due to diffraction and increased exposure structural noise with long exposures. In digital photography, structure noise is the only disadvantage of progressive shutter speeds (apart from their likely impracticality), much like the non-reciprocity phenomenon seen with film. Further, limiting the exposure time can limit the movement of the moon and the trails from the stars (see below).
The Importance of Moonlight
Just as daytime photography focuses on the position and angle of the sun, nighttime photography should also pay close attention to the moon. A low moon can create long shadows on objects with cross lighting, while a moon at zenith creates harder, downward shadows.
Another variable is the intensity of the moon's light, depending on its position in the 29.5 day cycle of waxing and waning. A full moon can throw you a lifeline, reducing the required exposure time and allowing you to increase the depth of field, while a moonless night increases the visibility of the stars tremendously. Further, the intensity of the moonlight can be adjusted over time to provide the perfect balance between artificial light (streetlights) and moonlight.
Calculating the duration of a full moon exposure can be tricky; use f/2.0 and 30 seconds at ISO 100 as a starting point(if the subject is distributed and lit directly), then adjust the parameters according to scenarios 1-4 respectively.
Another factor rarely seen in daylight is the movement of the light source (sun or moon). The slow shutter speeds required for shooting under moonlight often means that the moon has time to move significantly during the exposure. The movement of the moon smooths out harsh shadows, but too much movement can create the appearance of flat light.
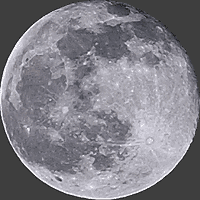
Notice how a minute exposure captures high contrast and shadows even from thin branches. while the 4 minute exposure shows less contrast and shadows only from thick branches. The choice of exposure duration can vary by more than a factor of four, greatly emphasizing the effect shown.
Pictures that include the moon in the frame are also sensitive to the movement of the moon. On fingers, the moon moves its own diameter approximately every 2 minutes. As a result, if the exposure time approaches this time, the moon in the image will become elongated.
Viewfinder brightness
Composing shots through the viewfinder can be problematic when there is little light. Even if you intend to shoot at a smaller aperture, a lens with a larger maximum aperture can significantly brighten the viewfinder when composing your shot. To evaluate the effect of different apertures, manually select the aperture value by pressing the "depth of field preview" button (usually located on the camera at the base of the lens).
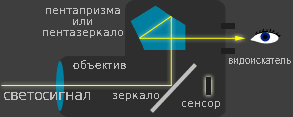
The way a DSLR redirects light from the lens to your eye can also affect brightness. Cameras with a pentaprism (as opposed to a pentamirror) provide minimal light loss, but this often increases the cost of the camera significantly. Larger format sensors also provide a brighter viewfinder image (like a full 35mm frame versus a crop factor of 1.5-1.6 or less). Finally, make sure you give your eyes time to adjust to the fading light, especially after leaving a brightly lit area or using a flash.
Effect of mirror blocking
Mirror lockup (ML) is a feature available on some SLR cameras that is designed to minimize camera shake caused by mirror movement (which creates the characteristic clicking sound of SLR cameras). It works by dividing the mirror up and the start of the exposure into separate stages. This way, any vibrations caused by the mirror can be extinguished before the exposure begins.
Mirror blocking can significantly improve sharpness for exposure times comparable to mirror positioning time (~1/30 to 2 seconds). On the other hand, mirror shake is negligible for shutter speeds that are much longer; Consequently, KB in most cases for night shooting is not critical. If you are forced to use a wobbly tripod (best avoided) or long telephoto lenses, the stabilization time can be greatly increased (up to 8 seconds).
The appearance of traces of stars
Even moderately long exposures can detect the rotation of stars in the sky. Using long focal lengths and shooting stars at a noticeable distance from the North Star increases the distance in the image that the stars overcome. This effect can create a stunning look, but sometimes these traces can hurt the artistic intent if it included a sense of permanence and calmness.
Normal focal lengths (28-50mm) usually show minimal movement of the stars if shutter speeds do not exceed 15-30 seconds. If star trails are the desired effect, using a wide aperture and increased sensitivity (ISO 200-400) can increase the brightness of each trail.
Focus and Depth of Field
Careful focusing is critical when shooting at night, as closed apertures are often nearly impossible - and therefore incorrect depth-of-field positions are unacceptable (see below). hyperfocal distance). To further complicate focusing, night scenes rarely contain enough light or contrast for autofocus to work, but the viewfinder is also not bright enough for manual focusing either.
Fortunately, there are several solutions to this focal dilemma. You can try to focus on any point light source that is at a distance similar to the distance to the subject. In the picture on the left, guaranteed autofocus can be obtained using bright light bottom of the focus target.
The central focus point on many cameras is more sensitive and accurate, so it's best to use it (instead of outer focus points) - even if its use requires subsequent recomposition.
If you want to focus on infinity, point your camera at the moon, focus, and then compose the shot. Otherwise, take a small flashlight with you that you can place on the subject, focus on it, and then remove it before starting the exposure. If all of these approaches are not practical, you can always use manual focus based on distance markers on the lens (and corresponding hyperfocal distance).
Night metering
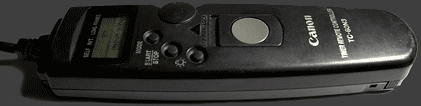
Unfortunately, most in-camera exposure meters are inaccurate or have a shutter speed limit of 30 seconds. It is usually possible to first measure at an open aperture (so that the exposure time is less than 30 seconds), then close the aperture to the desired value and increase the exposure time accordingly. Alternatively, you can get an external exposure meter to get the most accurate measurement. For exposures longer than 30 seconds, the camera must be switched to "bulb" mode and an external timer or trigger must be used:
Night scenes containing artificial light sources will almost always have histograms in low key, otherwise they will show significant flare. Metering can be tricky if the camera's auto-metering fails; a good point of reference would be to measure a distributed object that is directly illuminated by one of the sources. If none of this helps, be sure to shoot with exposure bracketing (bracketing) or adjust it by monitoring the results on the camera screen.
Which exposure is correct at night? Unlike daytime photography, where the reference is 18% gray card, there are no such generally accepted standards for exposing night photos. Some people “underexpose” the shot to preserve the darkness of the night, while others, on the contrary, will try to fill the entire tonal range with a histogram, as in daytime shooting. I generally recommend always fully exposing like you would in daylight and shooting in RAW mode. With this approach, the exposure can always be extinguished afterwards - while maintaining minimal visual noise as more light reaches the sensor.
Have you ever seen photos of a starry sky with a million stars and a milky way through the whole photo? Do you want to learn how to shoot like this? It's time to learn the basics of astrophotography. First, let's figure out what we need to get good photo. The first thing to do is to understand what we want. In astrophotography, there are many subjects and shooting options. You can shoot exclusively starry skies, get star tracks, or capture a classic landscape with a sky dotted with dot stars. In the framework of this article, we will analyze only one plot - the stars-dots.
Text and photo: Anton Agarkov
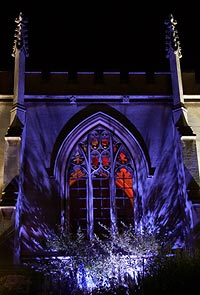
Nikon D850 AF-S NIKKOR 14-24mm f/2.8G ED f/2.8, 30 sec, ISO 6400.
The Milky Way over an abandoned chapel in the village of Nemyata in the Kenozero National Park, Arkhangelsk Region
So, what do we need to do to get a spectacular photo of the starry sky? Get ready to start. And, first of all, technically. Unfortunately, astrophotography, in contrast to the usual daytime landscape, presents high requirements to technology. So it's best to go stargazing with a full-frame DSLR like the Nikon D850. In pair with the camera you will need a fast aperture wide angle lens, such as the AF-S Nikkor 14-24 f/2.8. For me, this is the main lens for all night landscapes, and all the photos in this article were taken by him.
Why this combination. Let's figure it out. We want to capture the light of the stars. Very dim, I must say, the light. Therefore, we will adjust the camera in such a way as to capture the maximum light. Let's start with ISO. This parameter should be set to 3200 or even higher. I shot some of my night landscapes at 6400 and even higher values in order to suppress noise later in post-processing with special methods. For this we need a camera that gives an acceptable signal-to-noise ratio, it is the full-frame cameras that are best suited for this task.
The next “source” of light is the diaphragm. The wider we open it, the more stars will appear in our photo. And this is where we need a fast lens that will give excellent image quality even at the maximum open aperture.
Well, the last term is exposure. It would seem, why bother with high ISO and fast optics, if you can just set a slower shutter speed. But here a surprise awaits us - our Earth does not stand still. For us, this means that all the stars in the sky slowly revolve around the North Star. So if we put a longer shutter speed, then instead of star-dots, we get star tracks. Stretched to a sufficient length, they can give an interesting effect, but short dashes instead of dots will not look very good. So you have to limit your exposure. How much to display? To do this, you need to remember the simple rule of six hundred. Divide 600 by focal length lens. Do not look for physical meaning in this formula - it does not exist. Just take it for granted. So what do we get from this rule? Let's say we're shooting our astroscape with a 14mm lens. Then we get 600/14=42 seconds. But what if we shoot the same scene at a fast fifty dollars? 600/50=12 seconds. You will need a very fast lens to get beautiful pictures starry sky.
However, this rule is very conditional, and the further we turn away from the North Star, the more the stars will blur into tracks. Plus, working out a shutter speed of 40 seconds without a special remote control will be quite problematic. Therefore, I shoot all my night landscapes at 14 mm with a shutter speed of 30 seconds, at ISO no darker than 3200 and aperture of 2.8. Obviously, you need a stable tripod to shoot at these settings.
We figured out the settings, but this is still not enough for a good night landscape. You need to be in the right place at the right time. First, let's take a look at the place. Have you noticed that in the metropolis you can see only the brightest stars. It's all about light pollution. The city is so bright that it simply fills the pale light of the stars with its light. Therefore, in order to get a good photo, try to get as far away from big cities, towns and even villages as possible. So, in order to rent a chapel in the village of Vershinino in the Kenozero National Park, I asked the park administration to turn off the architectural lighting in the chapel, as the most powerful searchlights completely filled the starry sky. If you want to shoot a backlit object, then take a flashlight with you, which gives a narrow beam of light and use it as a light brush.
 Nikon D850 AF-S NIKKOR 14-24mm f/2.8G ED f/2.8, 30 sec, ISO 3200.
But not only cities can create unwanted light. When arranging night shooting, carefully monitor the phase of the moon. A full moon or a moon illuminated by more than half will hang in the sky almost all night and give a powerful illumination. The ideal time for night shooting is a completely moonless night. However, a phase of less than half is also suitable - the moon will illuminate the landscape with an interesting light, and you can also shoot the sunrise or sunset of the moon, when there is light and the stars are visible.
And so you armed yourself with technology, waited for a moonless and, no less important, cloudless night. What's next? Of course, reconnaissance of the place. To begin with, it is worth walking around the shooting location during the day - take a closer look, look for the foreground, think over your future frame. Doing all this at night will be extremely problematic. For example, I choose a shooting point and mark it on the map in the free MapsME program - this helps not to shy away from the bushes at night. Don't forget the Milky Way too. Ideally, if he is in the frame, because the starry sky itself can look boring. The Milky Way rotates along with all the stars, so it would be nice to predict when it will reach the right place. For this I use the PhotoPills program. The program directly on the image with the camera shows the Milky Way at a specific time. Similarly, it can show the time of sunrise and sunset of the sun and moon. The program exists for iOS and Android and I consider it one of the the best program for the photographer.
You found your future frame, returned to the spot you looked after, spread out the tripod, and set up the camera. But how to focus in such pitch darkness? Very simple. Take your phone, turn on a flashlight on it, take it about seven meters away from you and highlight some stone. The resulting bright spot can be easily focused using autofocus. Now autofocus needs to be disabled. Fully. Generally. Moreover, it is better to seal the camera's focusing ring with a piece of electrical tape so as not to accidentally move it. Now you have focus on the stars for the rest of the night. The phone can be removed from the frame. By the way, if you are not shooting alone, then you can ask your friend to move 7-8 meters away and illuminate yourself with a flashlight and focus on it. After focusing, all auxiliary illumination can be turned off.
 Nikon D850 AF-SNIKKOR 14-24 mm f/2.8G ED, f/2.8, 30 sec, ISO 3200.
The lights of the village of Vershinino illuminate the chapel in the Kenozero National Park, Arkhangelsk Region
But how to build a frame in pitch darkness? I advise you to turn off the camera so that bright service information disappears from the viewfinder - at night it will blind you a lot. After that, you need to start peering into the viewfinder, and gradually your vision will adapt to the darkness and you will begin to see individual contours, and then the whole picture. Once your vision has adjusted to the darkness, frame your shot. Now you can turn on the camera, set the desired parameters and take a test shot. It is possible that you will have to rearrange the frame a bit, correct the horizon or change the composition, but these are details. Happy night shooting! And one more friendly advice - do not forget to return the ISO back to 64 immediately after shooting. Otherwise, an enchanting dawn will happen, and you have ISO 3200.


For beginners: breeding a broiler at home Boiled water for broilers
Only lovers will survive
Features of advertising aimed at children
retouching old photos in photoshop retouching old photos
What is an NPO: decoding, definition of goals, types of activities Does a non-profit organization have the right