This year marks the 10th anniversary of Panasonic's Lumix digital camera brand which makes it an appropriate year for launching some exciting new products. One of those is the Panasonic Lumix G5, the ninth model in the G-series which introduced the world to the Micro Four Thirds standard and mirrorless system cameras in the shape of the DMC-G1 , in 2008.
With its electronic viewfinder and SLR-like form factor the G5 is arguably the most direct competitor to "traditional" entry-level SLRs in the current Lumix lineup. It sits above the simpler GF5 and below the top-of-the-line and enthusiast models GH2 and GX1 .
Under the hood, the G5"s "newly developed" 16MP Live MOS sensor is what Panasonic calls a "digital sensor" with some of the processing happening on the chip itself. In theory this translates into improved high-ISO performance which is very welcome news, the more so because the G5"s maximum ISO setting has been increased to 12,800. The continuous shooting rate has also been bumped up compared to the DMC-G3 , from 4 to 6 frames per second, but almost certainly more important to most users is the increase in resolution for the touch-sensitive rear LCD, from 460,000 to 920,000 dots . The LCD now also comes with a feature that is called "Touchpad AF". It allows you to move the AF area across the frame with your finger on the LCD while you"re framing the shot through the EVF.
Video specs have also been improved. Like the GF5 the G5 now records video in the MP4 format, as well as the now-standard (for Panasonic) AVCHD. The latter Video clips shot in the MP4 format are easier to organize because they"re not stored in a separate file structure to stills, and are far more widely compatible when it comes to playback. However, shooting in the AVCHD format allows you to capture footage at 1080 60/50p, vs 1080 60i on the G3.
With most of the competitors in the mirrorless system bracket of the market offering a variety of digital filter it was only a matter of time before Panasonic followed. The G5 boasts nine new filter options in the camera's Creative Control Mode (namely Soft Focus, Impressive Art, Cross Process, Star Filter, Miniature Effect, Dynamic Monochrome, One Point Color and Low key). As with the GF5 these filter effects can be previewed before they are applied and when the camera is set to intelligent Auto or intelligent Auto Plus mode it will suggest filter effects that it thinks might enhance your photo, based on an analysis of the scene.
All in all the G5 comes with some interesting improvements over its predecessor. We will have to see how many G3 users can be tempted into upgrading to the new model but on paper the G5 certainly looks like a compelling camera that should be attractive to a wide range of photographers. We are looking forward to putting the G5 through its paces to see what the sensor is capable of and what difference the new features make in real-life shooting. In the meantime we "ve produced a 3-page preview which should give an overview of the salient points.
Panasonic GF5 specification highlights
- 16MP Live MOS sensor
- ISO 160-12,800
- 3.0", 920k dot touch-sensitive LCD with Touchpad AF control
- 1.44 million dots electronic viewfinder with eye sensor
- Full AVCHD 1080/60p video with 1080 30p MP4 recording option
- 6 frames per second continuous shooting, 3.7 fps with AF-tracking
- 14 Creative Control filter effects options
Differences between the G5 and the G3
- 16MP "digital" Live MOS sensor (vs analog)
- Maximum ISO of 12,800 (vs 6400)
- 6 frames per second burst shooting (vs 4 fps)
- 1080/60p AVCHD and 1080/30p video recording (vs 1080/60i)
- MP4 video recording option (vs AVCHD and 720p MJPG only)
- 3 inch 920,000 dot LCD screen (vs 460,000 dots)
- Eye-sensor below the EVF
- Function lever
- Touchpad-AF control
- Aluminum front plate (vs plastic)
- Position of the shutter button
- Redesigned rubber hand grip and four-way controller
- Improved battery life (320 shots vs 270)
- 14 filter options in Creative Control Mode (vs 5)
Compared to its peers:
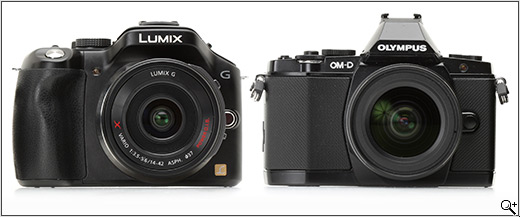 |
| The Panasonic G5 and Olympus" flagship Micro Four Thirds camera, the OM-D, have similar dimensions but the Panasonic comes with a rounded, contemporary design while the Olympus features a retro-style. The latter also comes with an all-metal body. On the G5 only the front-plate is made out of aluminium. |
|---|
 |
| Despite the different approaches to body design, the control and button layout of the two cameras is not too dissimilar, with a four-way controller and a few buttons located to the right of the screen and a screen that can be flipped out and tilted. However, the Olympus features two control dials (G5 only one). |
 |
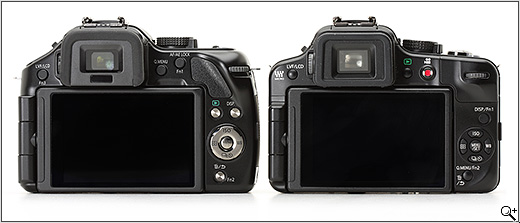
| The G5"s general size and shape are ver similar to its predecessor G3 but in this front view the larger handgrip and the changes position/angle of the shutter botton are immediately visible. The new model has also gained an aluminum front plate. |
|---|
 |
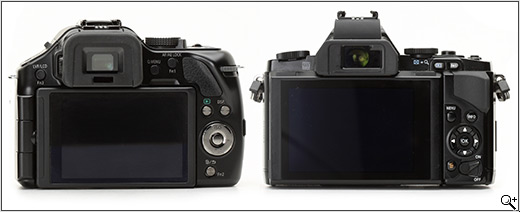
| On the back we can see the new eye-sensor below the EVF and the new design of the four-way controller which is now shiny and silver. There"s also a new thumb rest next to the control dial and a slightly changed button-layout. |
Panasonic Lumix DMC-G5X Interchangeable Lens Digital Camera - Overview
We continue the topic of digital mirrorless cameras with interchangeable lenses, which began with the Sony Alpha NEX-5N review. In principle, I liked the NEX-5N camera, but not without many reservations: this camera has serious control problems, there is no viewfinder and hot shoe, the display noticeably slows down in the sun - in general, developers have something to think about. After studying the situation with Sony mirrorless models, I bought myself a Sony Alpha NEX-6 camera: it just solved all the problems that I met with the NEX-5N, and in addition, a standard SEL1650 lens (with a focus range of 16-50) - three times smaller than the E18-55 lens included with the NEX-5N. But a review of this camera will be a little later, when I test it properly, and in this article we will talk about the Panasonic Lumix DMC-G5X camera, which came to me for a test, for which thanks to Panasonic.

Panasonic Lumix DMC-G5X
Matrix- Live MOS (17.3 x 13.0 mm), 18.3 MP (16.1 MP effective), 4608 x 3456
crop factor - 2
Picture format- JPEG, RAW (4912 x 3264)
Video- AVCHD, AVC/H.264, MPEG4, 1920x1080, 60fps
Light sensitivity- 160 - 3200 ISO, Auto ISO, ISO6400, ISO12800
excerpts- 60 - 1/4000 s
Flash- built-in, up to 10.50 m, red-eye reduction, shoe
Display- electronic, 920,000 pixels, 3", swivel, touch
Viewfinder- Live View Finder (equivalent to 1,440,000 dots)
Memory card- SD, SDHC, SDXC
Ports- USB/AV, miniHDMI, Remote
Battery- 1200 mAh
Dimensions- 120x83x71 mm, without lens
The weight- 396 g, without lens
average price- 28 thousand rubles Specifications of the lens included: Model- H-PS14042
ISO sensitivity- 160 - 3200 ISO, Auto ISO, ISO6400, ISO12800
Primary color filter- yes, 37 mm
Focal length- f = 14-42mm (28-84mm in 35mm camera equivalent)
Aperture range- F3.5 (W) - F5.6 (T)
Minimum aperture- F22
Optical Image Stabilizer- there is
Diaphragm- 7 petals / round hole
Zoom drive- motorized
Nano coating- there is
The weight- 95 g (without lids) Equipment The kit comes in this box.
 Included: camera, lens, battery charger with adapter, strap, USB cable, software CD, documentation.
  Appearance and features
The camera has a metal case, painted black (there are options for silver and white cases), equipped with comfortable rubberized inserts in places where the camera is clasped with fingers. The appearance of the camera makes a very good impression, the build quality is expectedly excellent. Camera with lens and flash raised.
Appearance and features
The camera has a metal case, painted black (there are options for silver and white cases), equipped with comfortable rubberized inserts in places where the camera is clasped with fingers. The appearance of the camera makes a very good impression, the build quality is expectedly excellent. Camera with lens and flash raised.  The lens is, of course, ultra-compact. With a range of 14-42 (equivalent to 28-84), but looks like a classic "pancake" fix. (However, the Sony NEX-6's 24-75-equivalent kit SEL1650 is almost the same size.) When turned on, part of the lens moves forward, and it becomes about twice as long. Here is the carcass without the lens.
  Pay attention to how well the ledge is made on the right under the arm: the fingers fit there just perfectly! View from above. There is a stereo microphone in front of the shoe. This is the best position: in this embodiment, the microphone cannot be accidentally covered by the hand.
  Back view.
  Under the plug on the right - a combined USB / AV port, miniHDMI (cable not included), a port for a remote control cable.
A cover with a spring latch opens at the bottom end, under it is a battery compartment and a slot for a memory card.  The memory card slot is perpendicular to the cover, so inserting and removing the card is very convenient. For comparison, in Sony NEX-6, the card is inserted parallel to the cover, and very close to it, and developers have to be killed for this: inserting the card is back and forth, but getting it out is a real torment. Considering that I like to transfer photos not through a cable, but directly from a card, this is still a pleasure.

Compartment with card and battery in Sony NEX-6
The display here is designed according to the type usually adopted for DSLRs. It can rotate to the side by 180 degrees and rotate around the central axis by 275 degrees, which greatly facilitates shooting in conditions when the camera is lowered down or, conversely, raised high up.  Camera control
 is extremely important. The Sony NEX-5N had very big problems with the controls. Here, fortunately, the thoughtfulness of the controls is simply an order of magnitude better. Arrangement of controls on the top right.
Camera control
Camera control is extremely important. The Sony NEX-5N had very big problems with the controls. Here, fortunately, the thoughtfulness of the controls is simply an order of magnitude better. Arrangement of controls on the top right.  1. Shutter button, conveniently lying under the index finger.2. Rocking lever, which controls zoom zoom and some function settings. 3. Video recording button. Perfect solution! When video recording is turned on on a rotary wheel (as on many DSLRs), this is very inconvenient: if you need to quickly shoot something on video, it takes a lot of tedious seconds (as many as three or more) until you turn on this mode. Well, here, unlike the NEX-5N, the video button is located so that, on the one hand, you cannot accidentally turn it on, but on the other hand, if you need to quickly start shooting a video, you can turn it on instantly. Also, this button can be disabled in the menu, if for some reason it bothers you.4. iA button- the inclusion of an intelligent mode, that is, a full automatic, in which the camera itself selects the optimal shooting parameters. It is very convenient that it was made a separate button - this allows you not to switch from already configured manual or user modes when you need to quickly click something automatically. . 5. Mode dial. It exhibits the following views: programmer (P), aperture priority (A), shutter priority (S), manual settings (M), user settings 1 and 2 (C1 and C2), scenes (SCN), effects (palette) . 6. Power lever. Switching on and off is performed by the lever located under the mode dial. Now about the controls located on the right side of the back cover.

1. Q.MENU- button to call quick settings. There are ten pre-installed items, but you can independently set the settings that you most often need. An excellent solution, it is very, very convenient. 2. AF/AE LOCK- focus and exposure lock, also the first function button (customizable). 3. rear disc- quick change of various parameters. Used, for example, to change the shutter speed / aperture for manual and semi-automatic modes, to set exposure compensation. Can be twisted and pressed. four. Playback- button for viewing footage. 5. DISP- switching information displayed on the display. 6. Cursors with center button- a standard element of almost any device. Often combined with a swivel wheel, but this is not the case here. Cursors are used for navigation, in shooting modes they are used to switch for: type of focus, ISO, white balance, shutter mode. The center button brings up a large settings menu and works like an "OK" button in certain situations. 7. Trash/Return/Fn2- deleting a photo clip, returning to navigation and a second functional (customizable) button. Controls on the left.

1. LVF/LCD/Fn3- forced switching between the display and the viewfinder, the third functional button. 2. Diopter adjustment wheel- adjusting the viewfinder to your vision 3. Flash- flash release button located on the top of the camera. Interestingly, the flash does not automatically open here: it will only fire if you open it yourself. And this is very correct. Well, it should be noted that a significant part of the switching of various parameters can be done directly on the touch screen, which we will now consider. Work
touch screen
By default, the display shows the necessary information for basic settings: mode, shooting type, flash, movie mode, file type, focus type, exposure metering, exposure compensation, number of exposures remaining.  Here you can turn on the mode of focusing on the object indicated by your finger on the screen, and in addition, you can turn on the mode of instantaneous shooting of the specified object: just poked at the right place, the device focused and immediately photographed. On the right you can see the chevron of the sliding toolbar: it is interactive, depends on the shooting mode, you can also configure which icons to put there.
  In certain modes, a second tab with tool icons may also appear: for example, in the "smart+" mode.
  When you press the Display button, the type of information can change - for example, in one of the modes, a shutter speed-aperture bar appears, and in manual shooting mode, ratios are marked in red on the bar, at which the exposure is clearly set incorrectly.
  In some cases, when the zoom lever and gear wheel can also make some adjustments (exposure compensation, shutter speed, aperture), a tooltip with their functions appears on the screen for a second. Moreover, you can switch between compensation, shutter speed, aperture (or their ratio - for some modes) by pressing the wheel.
  Another view is the display of the electronic level. It can also be connected with a special icon. The thing, by the way, in some cases is very, very useful.
  Many kinds of settings can be made via the quick menu button. Everything is very convenient and clear there, and the desired parameter is instantly selected with a finger on the screen. Here is the flash setting.
  Settings for the type of compression and format.
  Quality setting. Here you can also select the shooting mode in RAW in three options: simultaneously with high-quality JPEG, with standard JPEG, without JPEG at all.
  Focus mode settings.
  Shooting Type: Vivid, Natural, Monochrome, Landscape, Portrait, Custom.
  Through the settings, the quick menu can be switched to the user mode, after which you can set up to 15 settings icons out of 32 possible.
  As I wrote in the section on controls, with the help of cursors you can set the settings for important parameters: ISO, shutter release type, white balance, focus type.


 Settings menu
Now let's look at the camera settings. They are divided into five groups: recording, video, user menus, settings and playback. When you turn on the intelligent auto mode in the settings, the icon for switching from iA (automatic) to iA + (this is an automatic machine with additional adjustments) also appears in the settings.
Settings menu
Now let's look at the camera settings. They are divided into five groups: recording, video, user menus, settings and playback. When you turn on the intelligent auto mode in the settings, the icon for switching from iA (automatic) to iA + (this is an automatic machine with additional adjustments) also appears in the settings.  This camera allows you to make a wide variety of settings. It makes no sense to consider each of them, especially since many should be clear simply by name. Therefore, I will now show a list of all settings, and we will separately dwell on the most interesting ones. Bookmark "Record".
  Here is an interesting opportunity enabling HDR(Shooting with advanced dynamic range when three shots are taken at different exposures and the result is combined) and mode intelligent dynamic range control(not compatible with HDR).
  Intelligent resolution- increased definition of contours. ISO limit- also a useful setting. I usually limit to 3200.
  Noise suppression works very well when shooting in poor lighting conditions. Disabling digital zoom- useful setting. For example, in the Sony NEX-6, for some reason, digital zoom is not turned off, which is terribly annoying. electronic shutter helps when shooting in poor lighting conditions, and in addition, when using it, the camera can shoot absolutely silently. (Shutter speeds longer than one second and flash cannot be used with the electronic shutter.)
  If the lens supports such a useful thing as optical stabilization, you can turn it on - it helps a lot in situations where the camera is shaking. Curious feature - face detection. You can register the face of a friend or relative, set a name for it, and the unit will try to focus on the registered face(s) when taking group photos.
  Also here you can set profiles: children, pets, travel items. Information about the selected profile will be stored in photos.
  The "Video" tab settings refer to the video recording mode.

 User settings tab. Here you can switch the quick menu to custom mode.


 Here you can disable "Video" button.
 Set touch- enabling the finger to indicate the focus area.
  "Settings" tab. world time- You can set home time and travel time. You can also display travel date- this will then automatically select photos from the trip. Signal- camera signals and shutter sound (for electronic).
  Economy mode- Set the display to turn off and the camera to go to sleep. USB mode- the camera can be connected both to a computer and to a printer for direct printing.
  VIERA link- for remote control with a remote control. Resumable menu- remembers the location of the last selected item in all menus. Rotate LCD- automatic rotation of vertical images during viewing.
  Reset No.- reset continuous file numbering to 0001. Pixel update- correction of the matrix, in case strange bright spots appear on the image.
  Cleaning the sensor- purging the matrix from fine dust. Runs automatically when turned on. If extraneous spots remain on the pictures (check - you need to remove a sheet of white paper, holding the aperture to 22) - the matrix will have to be cleaned on your own or in a workshop. (Usually it is enough to blow the sensor with a special photographic blower.)
  Playback settings tab. Here you can edit photos and videos, set viewing modes.
 And here you can edit the list of recognized faces.
  Shooting and sample photos
Unfortunately, for various reasons, I had very little time to shoot with this camera in various conditions. In addition, I never managed to catch a completely sunny day with a blue sky - winter Moscow, sir, nothing can be done. Only one day in a couple of weeks of testing turned out to be with at least a relatively peeping sun - that's what I managed to catch. Shooting was mainly done with the H-PS14042 kit lens (f = 14-42mm or 28-84mm in 35mm camera equivalent), I also had two more lenses brought for testing, which I managed to shoot a little bit (it’s a pity that a little bit, because the lenses are very interesting). These are Leica DG Macro-Elmarit 45mm/F2.8 and Panasonic Lumix G Vario 7-14mm F4 ASPH.
Shooting and sample photos
Unfortunately, for various reasons, I had very little time to shoot with this camera in various conditions. In addition, I never managed to catch a completely sunny day with a blue sky - winter Moscow, sir, nothing can be done. Only one day in a couple of weeks of testing turned out to be with at least a relatively peeping sun - that's what I managed to catch. Shooting was mainly done with the H-PS14042 kit lens (f = 14-42mm or 28-84mm in 35mm camera equivalent), I also had two more lenses brought for testing, which I managed to shoot a little bit (it’s a pity that a little bit, because the lenses are very interesting). These are Leica DG Macro-Elmarit 45mm/F2.8 and Panasonic Lumix G Vario 7-14mm F4 ASPH.

Leica DG Macro-Elmarit 45mm/F2.8

Panasonic Lumix G Vario 7-14mm F4 ASPH
The pictures taken before uploading were not processed at all, except perhaps by the built-in tools of the camera (in this case, corresponding notes were made next to the images). Here are thumbnails of 600 pixels in size, when you click on the picture, a photo of 1980 pixels in size opens. Who is interested in viewing the full size "as is" - here in this archive (288 MB) the whole set is laid out. EXIF data (and other metadata) in all kinds of images is, of course, preserved. Let's go. Winter (Shchukinskaya area), street, cloudy weather.  Poster in the elevator. This is ISO 1600.


 Night shooting with a whale lens. Light comes only from street lamps. Full automatic iA.
 These are houses in very low light conditions. ISO 1600. There is almost no noise, but the white balance, as in the previous shots, strongly creeps into yellowness, it needs to be corrected.
  Panel in the elevator.
  This is already better weather, from time to time the sun even peeped through the haze. (Khimki-Kurkino area.) Shot with a 14mm kit lens.
  And this is from the same point with the whale at the maximum - 42 mm. The comparison shows the coverage range.
  The next series - experiments with the so-called creative mode, in which you can set various image effects. This is a normal frame.
  expressive effect. Good for shooting bright contrasting subjects.
  Retro. Faded photo effect. In general, it seems.
  Sepia. Creates a sepia tone. By the way, lousy creates, sepia has a noticeably more saturated brown color.
  Dynamic monochrome. With such an effect, shooting antique New York is the very thing.
  Expressive art. An interesting effect. It probably works well with sharply defined contrasting clouds-clouds.
  Cross process. Emphasized greens and blues. I can't think of what it could even be used for.
  Soap effect. Well, if the camera is made from an ordinary soap dish, then, probably, it will shoot like that.
  miniature effect. Leaves a sharp image in the center and smears the periphery. Suitable for macro photography when you want to focus on the image in the center.
  However, I generally think that all these preset filters in the camera itself are useless. The task of the photographer (even if it's the teapot itself) is to get a decent original image. And how then to pervert with it is a matter of the graphics editor used and its plug-in filters. The camera will never be compared with the program anyway, and then what's the point? From the same point, the frame was taken with a wide-angle Lumix G Vario 7-14mm.
  Here's another one for them.
  It's already whale.
  The sun peeked through a little, I seize the moment.
  Shooting in backlight.
  A little more sunshine - whale at 14 mm. Good angle (28 mm equivalent) - for normal tasks it will be enough.
  Now indoors with very poor lighting from the window, we check the HDR mode of the camera itself. Here is a normal frame.
  And this is with HDR enabled. The shadows, in my opinion, were drawn well. Although if you do HDR manually, it would turn out much better - there the exposure range clearly needs to be increased. But for automatic mode it will do.
  Demonstration of wide-angle capabilities. First, shooting with a 14mm kit lens.
  And now with a wide-angle (Lumix G Vario) at 7 mm.
  Fix (Leica DG Macro-Elmarit) at 45 mm. Portrait of a toy.
  Turned on the "Portrait with silky skin" mode. Indeed, the skin of the lion immediately became very silky.
  Another fix.
  And this is the same fix in portrait mode - aperture at 2.8, shot at close range.
  The same frame is even closer to completely blur the backdrop.
  Well, 14 mm whale in a room with poor natural light.
  A little more sunshine on the whale lens.
  The interior of the restaurant is 7 mm wide.
  On it is a dish in the approximation (14 mm).
  It's 7 mm.
  At 7 mm street.
  And now shooting at dusk with a 14 mm whale.
  And in the darkness with the hands of a whale in the light of ordinary street lamps. By the way, it's pretty good. Filmed on automatic.
  By the way, when Germans who know Russian see the name of the Knaker store (a good store, by the way), they begin to cry with happiness. They say that in German "knacker" is "fart" in slang. Good title. Video
The video shoots, in my opinion, very well, and the camera also has many functions for recording videos. First of all, you can choose different formats there, both AVCHD high-definition video - these are files with the MTS extension, and MP4 video format (files with the MP4 extension), suitable for viewing on smart phones and for transferring over the Internet. Here are the supported views.
By the way, when Germans who know Russian see the name of the Knaker store (a good store, by the way), they begin to cry with happiness. They say that in German "knacker" is "fart" in slang. Good title. Video
The video shoots, in my opinion, very well, and the camera also has many functions for recording videos. First of all, you can choose different formats there, both AVCHD high-definition video - these are files with the MTS extension, and MP4 video format (files with the MP4 extension), suitable for viewing on smart phones and for transferring over the Internet. Here are the supported views.  While recording a movie, you can use the zoom and take single still pictures. (Video recording is activated with a separate button, photos are taken with the regular Shutter button.) Various types of focusing are also available.
  Filmed videos in various modes. Both in AVCHD and MP4, the quality is at the level, it focuses normally even after using the zoom. Shooting in low light conditions was also a delight. However, see for yourself - here are two clips made in daylight in maximum AVCHD and MP4, two more clips in the same formats at dusk and AVCHD in the dark. Plus - a photo taken in the process of shooting a video. Video during the day in HD.
Daytime video in MP4
Photo taken during the day when shooting this video.

Twilight video in HD
Twilight video to MP4
Video in the dark HD
Additions, impressions and observations I really liked the camera. Comfortable and lightweight body, well-thought-out controls, a well-made system of settings on the touch screen, which, unlike the Sony Alpha NEX-5N display, provides a huge number of functions. The whale lens is great. In the off state - just like a pancake "five". The camera becomes literally the size of two cigarette packs pressed against each other. At the same time, the total weight of the carcass with the lens is less than 500 grams. For comparison, the weight of my (already former) Canon 60D with a kit lens is 1230 grams. 2.5 times more. Autofocus is very fast, I didn’t notice any difference with a DSLR at all. I don’t know, maybe there are differences in some hundredths of a second, but I couldn’t measure them without my “pointer oscilloscope” ©. Contrast focusing, which is used here, is more accurate than phase focusing, but requires more lens movement and time. Here, as the developers say, due to the fast processor and fast lens, the shooting speed is brought to a frequency of 0.09 s, which corresponds to the level of professional cameras and surpasses entry-level SLR cameras. So, purely visually, everything is so: autofocus is just instantaneous. Automatic switching from the display to the viewfinder works well, except that I had to change the mode from "sensitive" to "normal" because at first the device switched me to the viewfinder several times in poor lighting conditions when I used the display. For certain cases, the mode "poke your finger at an object on the display - I'll immediately take a picture by sharpening it" is very convenient. The ability to switch the device to an electronic shutter and completely turn off the sound is extremely useful for a situation where you need to get high-quality pictures without a shutter sound: in a theater, at a concert, and so on. The rate of fire of the device is absolutely wonderful. In the "hysterical shooting" ™ mode, you can throw the device in different directions and continuously press the button: it manages to focus and shoot in about half a second. In addition, burst shooting can be used in such cases, which is also impressive here. In super fast mode, it takes 20 pictures per second and a burst of 40 frames. In high-speed shooting mode, it takes 6 frames per second and the series is limited only by the free space on the memory card. Moreover, starting from the high-speed shooting mode, you can also shoot in RAW, and from the medium speed mode, direct viewing (LiveView) can also work when shooting (medium speed - 3.7 frames per second, low speed - 2 frames per second) . However, you need to keep in mind that only AFS-focusing is available for high-speed burst shooting modes - that is, on the first frame of the series. Which, in general, is not surprising. About Liveview. View mode is not easy here. The brightness of the image (in the viewfinder and on the display) corresponds to the set exposure parameters. This is very useful in cases where you need to set compensation in order, for example, to lighten an object that is too dark or darken an object that is too light. You set compensation with a gear wheel, and on the display (viewfinder) you can immediately see what the result will be in the photo. Moreover, in manual exposure mode, brightness adjustment is turned off automatically (this is very, very correct!), And the correspondence of the set parameters to the shooting conditions is shown to you on the shutter speed-aperture ruler: if the parameters are incorrect, a red zone appears there. I was very pleased with the display like a DSLR, which can be twisted as you like. At the same Sony NEX, the display leans back only 90 degrees for the bottom shooting and 45 for the top one, and turns to the side are not provided at all. The camera battery does not last very long (a common problem for mirrorless cameras and compacts), but tolerable. In normal mode, without using a flash, it is enough for about 320-350 frames - this is a little more than that of the Sony NEX-5N and NEX-6. The only thing I didn't like was that this camera can't charge the battery via the miniUSB port, as is done with the NEX-6. In this case, you can not buy a spare battery, but you can simply charge the camera on the road from external smartphone batteries, of which there are now plenty. For the same camera, you still have to buy a spare battery, because you can’t cope without it on trips. Well, now a stupid question arises in front of me: why the hell did I rush to buy the Sony NEX-6? Yes, it fixed many NEX-5N issues. However, I definitely liked this camera much more than the NEX-6. And in terms of dimensions, it is almost the same, although at first it seems larger. Compare.
 Well, I draw your attention to the fact that the Panasonic Lumix DMC-G5X with a whale lens costs about 28 thousand rubles, and the Sony NEX-6 starts somewhere from 30 thousand (I bought my kit for 46 thousand, but there is also a SEL- 55210). However, of course, you should not fuss: other manufacturers offer me and other manufacturers to test their mirrorless cameras. It is quite possible that there is something even more interesting. But I am more than satisfied with this camera. And initially I was even skeptical: I didn’t really hold the Lumix in my hands, but I generally liked the NEX-6. But the difference between them in terms of usability and functionality is obvious. Now let's answer the question of who might be interested in this model. Despite the fact that the device perfectly shoots in fully automatic mode and has many presets for the situation "I can only press one button", its capabilities, of course, are designed for advanced amateurs and professionals. Some pros, judging by their reviews on the Internet, purchase this camera for cases when they don’t want to take a DSLR with them or simply don’t have such an opportunity. Well, for example, such a camera can completely replace a DSLR for me, especially if you also buy a 25 mm fix with 1.8 and a wide-angle with 9 millimeters. The Panasonic Lumix G Vario 7-14mm F4 ASPH lens is, of course, cool, but it costs about 1000 euros ($1650 in Russia), which is slightly out of the price category I set, but, however, I will just have to try other wide-angle lenses and understand what exactly suits me. In general, I hurried with the purchase, I like this camera much more than the Sony NEX-6. However, I intended to study the Sony NEX-6 in detail in a couple of weeks, I will write a review based on the results, and there we will finally compare these two cameras.
 It began to look more like "reflex cameras" - the protrusion under the right hand was enlarged, and the material of its decoration also changed. These changes have clearly benefited, the G5 is a little more comfortable in the hand than its predecessors and practically does not slip. The build quality is at a high level. Accuracy of fitting parts and high-quality plastic of the case ensure the absence of squeaks and create a feeling of reliability.
Panasonic Lumix DMC-G5 - a new member of a vast family
Although the dimensions of the device are not too large - 119.9 x 83.2 x 70.8 mm, you can't call it pocket. But still, there is not too much space left to accommodate a rich set of controls, which at first glance somewhat harms ergonomics. The external resemblance of the G5 to SLR devices leads to the fact that many users unconsciously expect to receive control similar to SLRs. The designers of the G5 did not perform a miracle, but very successfully circumvented this problem. The menu of the device has been noticeably redesigned, which made it possible to conveniently carry out settings using the touch screen. The possibility of "traditional" management has also been preserved.
Despite the apparent crowding of the controls, working with the G5 turned out to be quite convenient even with gloves, which is very important in our latitudes. While the G5 weighs less than 500 grams with its stock lens and is easy to hold with one hand, you almost always have to use both hands for comfortable handling. A new lever has been added to the control wheel located on the back of the device, which is located on the top panel of the G5 in front of the shutter button. Its functionality is configured through the camera menu.

Panasonic Lumix DMC-G5 features thoughtful ergonomics
An additional control body is an innovation, of course, very useful. Note that in SLR cameras its presence is one of the signs that translate younger models one step up. However, many people would prefer an additional control wheel rather than a lever, since the settings of the device are too easily lost by accidental pressing. However, this is not a design fault.
Of course, in order to avoid violating the settings, the lever can simply be disabled through the menu, or reconfigured to options that are less critical to accidental changes. But do not forget that one of its main functions is motorized zoom control, which in this design is already familiar and understandable to users from many compacts. So far, only two lenses in the lineup are equipped with Power Zoom - H-PS14042 and H-PS45175. It seems that fans of shooting videos will appreciate them, but, unfortunately, we did not have such an opportunity.
The micro 4/3 system is gaining momentum not only because of the relative compactness and cheapness of interchangeable lenses, but also because of the growing fleet of compatible optics, including third-party manufacturers. However, with the change of lenses, everything turned out to be not so simple - to ensure correct collaboration, lenses that saw the light before the G5 may need to be flashed. Although photography enthusiasts are unlikely to be deterred by the firmware update, for users looking for a better alternative to the usual “soap box” in the G5, this can become a barrier not only to expanding the optics fleet, but in general to purchasing a device with interchangeable lenses. 4/3 lenses are worthy of a separate review, and we will return to our hero.

Controls Panasonic Lumix DMC-G5 - located compactly
Opponents of mirrorless systems cite the quality of the viewfinder as one of the arguments in favor of DSLRs. Indeed, a decent electronic viewfinder is perhaps the most anticipated innovation that would significantly push out the SLR competitors. The viewfinder in the G5 is high resolution and quite informative. The sighting point is far enough away, so it is convenient to use it even with glasses. A rather convenient Eye Sensor AF function has been implemented, when enabled, the device automatically starts focusing when the user brings the camera to his eyes.
But, unfortunately, you can use the viewfinder only for shooting static or inactive objects. Any movement in the frame gives rise to a long train, with intense movement in the frame or the movement of the camera itself, it becomes very difficult to make out what is happening in the frame. The touch screen saves the situation, which easily and accurately rotates on a fairly tight hinge. Good brightness and color reproduction, a large viewing angle and the absence of lags in the transmission of motion for most users make working with it no less convenient than with an optical viewfinder. Implemented the ability to directly select the focus point and release the shutter with a single tap on the screen. We found the implementation to be very convenient. It works quickly and accurately, there is protection against accidental clicks (by default, the function is turned off, it turns on in two clicks through the pop-up menu, which is called “intuitively clear”). So the G5's electronic viewfinder will only be needed in rare cases, for example, for far-sighted people, for whom the use of the display is usually not very convenient.

Battery
The combination of an electronic shutter and a swivel touch display allows for absolutely silent and, with some skill, almost imperceptible shooting. So far, the owners of DSLRs can only envy such opportunities.
It should be remembered that when using the electronic shutter, shutter speeds longer than one second and the use of flash are not available, however, neither of these will be required when shooting covertly.
The G5 has both a built-in flash and a hot shoe for connecting an external one. Despite the modest guide number, the built-in flash recycles quite slowly. Otherwise, there were no complaints about the operation of the built-in flash - the G5 correctly worked out scenes both with bright backlight and in the dark. There were no problems with external flash either.
It is worth noting that although in the dark it sometimes misses the white balance, it is not difficult to “treat” either manually setting the color temperature or shooting in RAW. So there is no urgent need for a flash when using the G5 - you can almost always get an image of acceptable quality simply by raising the ISO equivalent. In addition, without a flash, the device “lives” a little longer on one battery.

Using the flash significantly reduces the operating time
The device turns on very quickly, responds to commands clearly and without delay.
It would seem that this is the happiness of the paparazzi - small size and weight, a "power reserve" of more than three hundred frames from a single charge, silent shooting, fast operation and focusing, the ability to raise the sensitivity and work without a flash ... However, not everything is so simple. Even a novice paparazzi will quickly discover a number of features that make his job noticeably more difficult.
Autofocus works tenaciously and quite accurately, with a conscious choice of focus point, perhaps, the G5 has reached the level of SLR cameras in terms of speed and focusing accuracy, and, perhaps, even surpassed some models. But if you give the choice of focus point to automation, the device tends to give preference to distant objects, which often makes it impossible to shoot from non-standard angles without looking at the screen or viewfinder.
The buffer size is also small - only 9 frames in RAW format. Claimed maximum speed continuous shooting at full resolution (in RAW format) is 6 frames / sec. This is an excellent indicator, if not for one "BUT" - this speed is achieved only with AFS autofocus, i.e. on the first frame of the series. The image stabilizer in the device is also missing - so far there are not so many lenses with a stabilizer in the micro 4/3 system.

Settings Panasonic Lumix DMC-G5 are operated through a user-friendly menu interface
Another family flaw will be noticeable. Despite the considerable sensor resolution of 16 megapixels and an updated processor, the G5 user will be practically deprived of the opportunity to take a snapshot and easily cut out a small desired fragment from it. The Cropping function is, of course, present in the camera's menu, and with its help it is very convenient to slightly correct the composition of the frame. However, there is not enough detail to enlarge the fragment.
The updated Venus Engine has really reduced noise significantly - images from the G5 up to ISO 6400 look great on a computer screen or when printed up to A4. At ISO 12800, the pictures look decent when printed 10x15. But even when using low ISO values, the picture starts to “tear” when trying to increase it further. In part, you can remove this problem by shooting in RAW format.
test shots
 f/5.6; 1/10s; ISO-1600 |
 f/3.5; 1/13 c; ISO-8000 |
 f/3.3; 1/13 c; ISO-8000 |
 f/3.5; 1/80s; ISO-160 |
 f/3.8; 1/80s; ISO-160 |
 f/5.6; 1/80s; ISO-400 |
 f/4.5; 1/60s; ISO-200 |
 f/5.6; 1/60s; ISO-160 |
 f/5; 1/60s; ISO-400 |
 f/4.4; 1/60s; ISO-200 |
 f/5.6; 1/80s; ISO-160 |
 f/3.5; 1/80s; ISO-160 |
 f/4.5; 1/80s; ISO-160 |
 f/9; 1/640s; ISO-400 |
 f/16; 1/1300 s; ISO-400 |
 f/10; 1/800s; ISO-160 |
 f/5.6; 1/100s; ISO-160 |
 f/5.3; 1/80s; ISO-640 |
 f/5.2; 1/15 c; ISO-1000 |
 f/11; 1/500s; ISO-800 |
 f/4.9; 1/10s; ISO-1000 |
 f/9; 1/400s; ISO-160 |
 f 5.6; 1/320s; ISO-400 |
 f/5.6; 1/10s; ISO-1600 a |
 f/10; 1/500s; ISO-160 |
 f/1.7; 1/60s; ISO-1000 |
 f/1.7; 1/125 s; ISO-3200 |
 f/4; 1/30s; ISO-640 |
 f/ 5.2; 1/200s; ISO-160 |
 f/5.3; 1/100s; ISO-160 |
However, not everyone who picks up a camera considers himself a paparazzi. Yes, and now not everyone needs to enlarge pictures more than on A4 sheet. So the shortcomings listed above with a high probability will not even be noticed by many potential users. But its features, such as excellent video shooting quality with the ability to smoothly adjust the zoom, an abundance of scene programs and creative filters, will not be left without attention. For those who find the abundance of settings too much, the iA (intelligent machine) mode will be to their liking, which does its job quite well and in most cases anticipates the owner's wishes.
For owners of DSLRs looking for a second camera “for every day”, the G5 is unlikely to be of interest - as a rule, they need something more compact, and such a rich functionality will not be used, because. for "serious cases" there is already a set of equipment.

Panasonic Lumix DMC-G5 - almost professional camera for lovers
There are two main categories among people who do not use DSLRs, but are not satisfied with modern “soap dishes” - some expect to get a “one-button” camera, but with image quality that is noticeably better than that of compacts, others are looking for maximum functionality with a relatively modest budget. And for those and for others, the G5 can be a very interesting option.
The Panasonic Lumix G5 is a 16 Megapixel mirrorless compact system camera based on the Micro Four Thirds standard which Panasonic co-developed with Olympus. Panasonic now refers to mirrorless system cameras as DSLMs, or Digital Single Lens Mirrorless, but we’re sticking with the term compact system cameras for now.
Announced in July 2012, the G5 is the successor to the Lumix G3, and in case you were wondering, there was no G4, Panasonic having skipped the number for tetraphobic (reasons it’s considered unlucky in some Asian countries). Like the G3 the new model features 16 Megapixels, athough this is a newly designed sensor with improved high ISO noise performance and, paired with a redesigned Venus Engine processor, delivers a maximum ISO sensitivity of 12800 ISO.
The new sensor and processor also provide improvements in video, with a new 1080p50/60 mode. High speed burst shooting also gets a boost to 6fps at full resolution. The fully-articulated touch-screen remains, but the resolution has been doubled to 920k pixels and you can now cleverly use the screen like a track pad to set the AF area while composing with the electronic viewfinder. There’s also an eye proximity sensor to switch the viewfinder on and off, along with a new rocker switch just behind the shutter which operates powered zooms, a selection of Creative Control filters and an electronic level.
With these improvements the Lumix G5 cements value for money reputation that the G series has earned and puts it in contention with cameras costing a lot more. In my review I've compared it with the pricier Sony NEX-6. The NEX-6 offers the same 16 Megapixel resolution as the G5, but with a larger 3:2 proportioned APS-C sensor. Other refinements include a 2.3 million dot electronic viewfinder (but not a touch-screen), full HD movies at 1080p50/60, and fast 10fps full resolution continuous shooting. Like the Lumix G5 the NEX-6 also comes with the option of a small lightweight collapsible zoom.
Possibly the most exciting thing about the NEX-6, though, is that you can extend its feature set by means of built-in Wifi and downloadable apps. But when all's said and done the Lumix G5 provides a similar package to the NEX-6 albeit minus some of the bells and whistles. Does that make it a bargain that punches well beyond its weight? Read my full review to find out.
Panasonic Lumix G5 design and controls
With its molded contours and hand grip, pronounced hump and centrally located viewfinder, the Lumix G5 resembles nothing more than a miniaturised DSLR. With the G3, the ‘World’s smallest and lightest system camera’, it was all about size, but with the G5 Panasonic has relaxed a little and it’s as if the G5 has let out a breath. The dimensions tell you the size of it – 120 x 83 x 71mm weighing 396g with the battery and card. The G3’s measurements of 115 x 84 x 47 and 382g exaggerate the situation a little as most of the G5’s additional depth is due to the bigger grip and the two weigh almost the same.
On the top panel a slightly larger mode dial has the same eight positions as the earlier G3 with the PASM modes joined by two custom positions, SCN for scene modes and Creative control. As on all G series models and compacts intelligent Auto mode is activated via a dedicated illuminated button. In front of that is the movie record button, relocated from the rear panel of the G3 and forward of that is a new rocker switch which controls the motorized zoom if a PZ lens is fitted and can also be assigned to exposure compensation and aperture adjustment in manual mode.
The shutter release is positioned at the very front of the grip, a much more natural position as that’s where your index finger falls naturally and you don’t have to make an effort to extend it backwards as was the case with the G3. Generally, the G5 is a more comfortable camera to hold and operate than the G3. Round the back the thumb rest now has a more contoured ridge, providing a more stable grip and allowing more confident one-handed operation.
|

From the mode dial leftward the top of the Lumix G5 looks identical to its predecessor. An ISO standard hotshoe is mounted atop the viewfinder hump with stereo microphones located forward of it. On the left side is a switch to pop the flash and next to it the small grille for the mono speaker.
As before, there's a small button on the rear panel just to the left of the viewfinder which toggles the view between it and the LCD screen. That’s less important than it used to be thanks to the addition of a proximity sensor just below the viewfinder which automatically turns it on when you put your eye to it.
The Q.Menu button is relocated to the right side of the viewfinder and alongside it there's a new programmable AF/AE lock button that's also labeled Fn1.
The thumb-operated rear dial has been shifted rightward slightly to a new position on the rear right corner just outside the thumb rest. In Aperture and Shutter Priority, the dial naturally defaults to adjust the f-number and shutter speed respectively, but push it in and it’ll subsequently adjust the exposure compensation. Push it in again and it reverts to adjusting the f-number or shutter speed. Pushing the dial in full Manual switches between adjusting the shutter speed and aperture. In Program it can be used to shift the exposure, or again adjust the exposure compensation with a push.
The playback button is relocated to the panel on the right side of the screen next to the DISP button for toggling screen and viewfinder overlays. The four way controller has been redesigned and is now a single silver colored pad rather than the individual buttons on the G3, but the functions are the same, ISO sensitivity, White Balance, Drive mode and AF mode. Finally the delete/back button doubles up as a second programmable function button labeled Fn2.
Moving onto the ports, a flap on the right side of the body opens to reveal remote control, mini HDMI and combined AV / USB jacks, but sadly no external microphone input; since absent the G2 to differentiate it from the higher-end Lumix GH series.
 |
In a compartment under the body you'll find the battery and memory card slot. The larger grip means the G5 can accommodate the 1200mAh DMW-BLC12E battery used in the GH2 with Panasonic quoting 320 shots for a full charge. That’s an improvement on the 270 shots of the G3, but still well short of what you could have expected from the much earlier G2. Bear in mind also that these figures are quoted for the manual zoom H-FS014042 lens. While that's useful for making comparisons with older models, with the PZ 14-42mm kit lens attached, you'll see a significant drop in that figure. In terms of memory, the G3 is compatible with SD, SDHC and SDXC cards; Panasonic recommends using cards rated at Class 4 or higher when recording movies.
As mentioned above, the Lumix G5 features a popup flash, which you need to manually open by flicking a switch on the side of the head; with the flash closed, it won't popup on its own accord, which prevents any nasty surprises. The popup flash has a guide number of 8 at 100 ISO which is not as powerful as the built-in flash on an entry level DSLR like the Canon EOS T4i (GN 13), but with a little more punch than the built-in flash on the NEX-6 (GN6) or the accessory flash provided with the Olympus PEN models (GN 7). It effectively gives the G5 a range of 3 meters, or about 10 feet at 160 ISO with the aperture wide open at f3.5. The built-in flash has red eye reduction and slow sync modes, the fastest sync shutter speed is 1/160th and the G5 offers both first and second curtain sync.
The G5 is also equipped with a hotshoe which can accommodate the optional FL220 / FL360 / FL500 with TTL auto metering; but note that like the NEX-6 there's no built-in wireless flash control.
Panasonic Lumix G5 viewfinder and screen
The G5 shares the same 1.4 million dot electronic viewfinder as its predecessor. There will inevitably be some disappointment that the resolution hasn’t been increased on the new model, but, despite the fact that it trails the NEX-6, with its 2.4 million dot EVF, the G5’s viewfinder is still very good. In terms of resolution, 1.4 million dots has become more or less standard at this end of the market. You’ll find the same resolution on offer from the Olympus E-M5 and PEN VF-2 accessory EFV, the Fujifilm Finepix X100 and XS-1, and the Nikon V1 and V2.
So it looks like the NEX-7 and NEX-6, along with Fujifilm's XE-1 will continue to lead the way on EVF resolution for the time being at least. But it's all too easy to get tunnel vision, when it comes to EVF's resolution isn't the only factor, size and brightness also play a big part. I’m happy to report that the G5’s viewfinder is both big and bright and in a side by side comparison with the NEX-6 the difference wasn’t as pronounced as you might think. The Lumix G5’s viewfinder looks brighter and a little bigger than the NEX-6’s though there’s no denying the Sony’s higher resolution does provide a more detailed view with a more stable image. When panning, the lower resolution of the G5’s EVF and its field sequential display does lead to shimmering and ‘tearing’ effects. Apparently some people are more prone to this than others and though it's slightly distracting I didn't find it massively off-putting. If you're using the EVF for a protracted period though it could become quite tiring on your eyes.
As I've mentioned, there's an optical sensor below the viewfinder which automatically activates it and turns off the LCD when you put your eye to it. The G5 also retains the button on the left side of the viewfinder that allows you to do this manually. Clearly you don't need both of these systems and you need to make a choice. If you decide to use the optical sensor, the button can be assigned to another function, alternatively if you stick with the button’s original function the optical sensor can be turned off. In practice, although there’s a very fractional delay when you put your eye to the viewfinder, I found it preferably to switching manually.
You can turn the LCD screen off altogether and operate the camera with the viewfinder only, but unlike the Sony NEX-6 you can’t arrange things so that shooting information is displayed on the screen while the viewfinder is used for composing.
While the EFV resolution is unchanged, the Lumix G5’s screen is updated and now has double the resolution of its predecessor with 920k dots. As before, it’s a touch screen, but Panasonic has extended its function to include something called ‘Touch Pad AF’ Essentially this allows you to position the AF area by dragging your finger on the LCD screen while using the viewfinder to compose. I’ll talk more about how that works in practice in the AF section near the end of the review.
The screen itself is hinged at the side and so can be positioned facing in any direction including downwards for overhead shots and forwards for self-shooting, though, probably the two most often-used positions for this kind of screen are folded in for protection or reversed like a conventional fixed screen. The screen is 3:2 proportioned so when shooting 4:3 stills there are narrow bars down either side. On the right side of the screen this space is used for some touch icons which appear in a docking strip. All other information is displayed overlayed on the image though you can switch the configuration for both the EVF and LCD screen so the exposure details are displayed below a reduced image area. This makes it easier to see your settings, but harder to see what you're shooting.
The display button toggles between two overlays – with information and without, plus either of those options with a two-axis level. As I've mentioned, you can also turn the display off altogether. Additionally, there are two programmable screen function buttons labeled Fn4 and Fn5 which by default activate the level and a repositionable live histogram. Given that you can access the level this way, assigning two of the display overlays to it seems rather wasteful and I’m sure Panasonic could make much better use of it.
Panasonic Lumix G5 lens and stabilization
The Lumix G5 is available as body only or in a kit with several lens choices. I tested it with the Lumix G X Vario PZ 14-42mm F3.5-5.6 ASPH. POWER O.I.S. This powered zoom, announced in August 2011, was the first zoom for a compact system camera that was itself compact, rather than a slightly smaller version of a DSLR kit zoom. While previously you needed to attach a pancake prime to a compact system camera body to make it pocketable, you now had the same degree of portability with a standard zoom.
Aside from the micro four thirds metal mount, the lens is constructed from high quality plastic. In its collapsed power-off state it's a mere 27mm thick, but switch the camera on and it extends to 49mm. Two rocker switches on the left side of the barrel control the zoom and manual focus. Unlike the single-speed control on the Sony E PZ 16-50mm, the zoom rocker offers two speeds and there's a good couple of millimeters travel in each direction so, although it takes a little bit of use to get the feel of it, you can zoom at the slower speed without too much risk of accidentally speeding things up by pushing that little bit too far.
coverage wide | Panasonic Lumix G5 Lumix G X Vario PZ 14-42mm F3.5-5.6
 coverage tele |
|
|
||
| 14-42mm at 14mm (28mm equiv) | 14-42mm at 42mm (84mm equiv) |

The only criticism I'd make of the two-switch setup is that, despite the slightly larger size of the zoom rocker, it isn't easy to distinguish the two by feel alone and, to begin with at least, I found myself occasionally trying to zoom with the focus control. Though there's is of course a second option which is to use the new zoom control on the Lumix G5's body. Located immediately behind the shutter release this also provides dual-speed control, though it's a little harder to control than the switch on the lens.
The 14-42mm range equates to 28-84mm in 35mm equivalent terms which takes you from a respectable wide angle to a portrait telephoto. The 14-42mm PZ lacks the 24mm equivalent super-wide angle view of the Sony E PZ 16-50mm, but as I discovered in my NEX-6 review, that camera has to do a lot of processing to deal with distortion at the extreme wide angle setting. If you compare RAW and in-camera JPEGs shot on the G5 with the 14-42mm PZ, it’s much more a case of what you see is what you get.
As with the Sony E PZ 16-50mm though, with a maximum aperture of f5.6 at the telephoto end of the range, you’ll struggle to achieve sufficiently shallow depth of field to throw the background out of focus. For that, you'll need to switch to a fast prime like the Leica DG Macro-Elmarit 45mm / F2.8 or the more affordable Olympus M.Zuiko Digital 45mm 1:1.8. And that illustrates the advantage of Micro Four Thirds over rival mirrorless systems: as the most mature mirrorless standard and with both Panasonic and Olympus producing lenses along with third parties, it boasts the broadest choice of optics. Not only are almost all popular focal lengths available, but there’s generally at least two options of each depending on speed, quality and budget.
Like the NEX series, Panasonic doesn’t incorporate image stabilization into its Micro Four Thirds bodies, preferring instead to provide optical stabilization on lenses. The 14-42mm PZ features Panasonic's Power O.I.S image stabilization which it claims is twice as effective as its earlier Mega O.I.S stabilization system. Although it's lens-based, there's no control on the lens to turn stabilization on and off, instead, it's controlled from the Rec tab of the main menu. There are three modes, Normal, Panning and Off. Normal compensates for vertical and horizontal camera movement, Panning for vertical movement only, but there’s no option to correct for horizontal movement only so that you can pan with the camera held in portrait orientation.
To test the Lumix G5’s stabilization I set it to Shutter Priority exposure mode, set the lens to its maximum 42mm telephoto zoom and took a series of shots at progressively slower shutter speeds with the stabilization off and in Normal mode. Where there’s the option of a viewfinder I always use it for this test in order to minimize camera shake and provide the best possible chance for a steady shot. Using the viewfinder and with the stabilization on, the G5 was able to produce sharp results at shutter speeds as slow as a fifth of a second – four stops slower than conventional suggests would be advisable at this focal length. The crop is a tiny bit soft, where the 1/10th crop was pin sharp, so I think it’s fair to say the PZ 14-42mm lens provides three to four stops of stabilization.
Panasonic Lumix G5 Lumix G X Vario PZ 14-42mm F3.5-5.6
 Power O.I.S. Off/On |
||||
|
||||
100% crop, 14-42mm at 42mm 160 ISO 1/5th O.I.S. off. | 100% crop, 14-42mm at 42mm 160 ISO 1/5th O.I.S. On. | |||

Panasonic Lumix G5 shooting modes
In addition to the PASM modes, the Lumix G5 mode dial has two custom positions, SCN for scene modes and Creative control which provides access to an expanded range of art filters. The intelligent Auto and intelligent Auto plus modes are accessed via a dedicated button on the top plate which remains illuminated while active. It’s easy to skip quickly over these modes on a camera aimed at enthusiasts, but they provide a foolproof mode for non-expert photographers as well being handy if you’re in another mode with obscure settings but spot a spontaneous photo opportunity.
Intelligent Auto uses Scene detection to select one of seven appropriate scene modes and also uses face detection and face recognition to set the optimum focus and exposure. Pressing the thumb dial allows you to adjust background defocus with aperture settings displayed on screen as well as the more novice-friendly scale a ‘best of both worlds’ design which works for novices and experts alike. The G5 will also make suggestions if it thinks your shot might benefit from the use of one of the Creative control filters.
Intelligent Auto also automatically activates three other image enhancement features that have been an option on the Panasonic range from compacts upwards for some time. Intelligent ISO is simply an enhancement of the Auto ISO setting which raises the ISO sensitivity when moving subjects are detected in the frame in order to set a sufficiently fast shutter speed to capture the action. I.resolution has four settings – High, Standard, Low, Extended and off – each of which applies varying degrees of sharpening to the image while suppressing the artefacts that often accompany this kind of processing.
The G5 also features I.Dynamic, or Intelligent Dynamic Range control, which automatically adjusts the contrast when there’s a big difference between light and dark areas on the image. Again it's applied automatically in iA, but off by default in the PASM modes, where you can choose between Off, Low, Standard and High.
The Lumix G5 introduces a new HDR mode which shoots a fast sequence of three images and from them saves a single composite with a wider tonal range. It’s a no frills feature – you can’t change the number of exposures or the EV range, but HDR can be selected in any of the PASM modes, so you still have some control over exposure. Below is a comparison of the same scene shot in Program Auto mode at 160 ISO with, on the left a single exposure and, on the right, HDR mode enabled.
The HDR shot on the right shows a lot more detail in the shadows tonal range most clearly visible in the door on the right of the shot, the highlights in the windows on the left also show improved detail. This is backed up in the histograms below each image with the HDR histogram on the right well within the bounds of the x-axis at the highlight end and showing very much improved shadow detail.
Panasonic Lumix G5 Program mode HDR On/Off |
||||
|
|
|||
Program Auto 1600 ISO f4 1/8th | HDR Scene mode 1600 ISO f2.8 1/16 | |||
|
|
|||


For those who want the option to process HDR shots outside the camera, the G5 provides one of the best auto bracketing features you’ll find, bettering even that offered by many budget DSLRs. You can shoot automatically shoot up to seven frames up to a stop apart in 1/3EV increments. Exposure compensation is available in a similarly broad range of +/-5EV. It certainly outdoes the Sony NEX-6 which offers 3 frame auto bracketing in increments up to +/-3EV, or +/-5EV with the optional $4.99 Bracket Pro app.
The range of Creative Control filters has been expanded with the addition of new effects including Soft Focus, Dynamic Monochrome, Impressive Art, One point Color, Cross Process, Low Key, and Star Filter. All of them provide a degree of customization, whether it’s changing the effect colour, the filter strength, degree of vignette or, in the case of Dynamic Monochrome, contrast. Additionally you can use the background defocus and set exposure compensation.
If I was to make one criticism of Creative Control it would be that despite its having a position on the mode dial and touch screen controls it is absurdly difficult to change filters. The icon at the top left of the screen which displays the currently selected filter isn't touch sensitive so you have to go via the main menu.
 |
 |
 |
| Dynamic Monochrome | Cross Process | Impressive Art |
Finally, the G5 has a new Electronic Shutter option. This doesn’t enable faster continuous shooting or provide any other performance enhancements, but merely disables the mechanical shutter to enable silent shooting for those situations where the shutter noise would be distracting such as in museums, concerts and so on.
Panasonic Lumix G5 movie modes
Like the G3 before it, the G5 can capture Full HD video with continuous autofocus and stereo audio recorded from built-in mics (complete with level meters and level adjustment if you like). But where the G3 was limited to 1080i, the G5 now offers 1080p50 or 1080p60 depending on region. That puts it on a par with the GH2, though it still lacks an external microphone input and the ability to output a clean signal over the HDMI port while filming. It also lacks the GH2's manual exposure controls and the choice of adjustable frame rates. So the G5 is in no danger of encroaching on the flagship model's position among pro and advanced amateur movie makers, particularly as the new GH3 further widens the gap with timecode support, higher bit rates and a choice of compression options in addition to other pro features like weather sealing.
The other major change in the Lumix G5 video specifications is a move away from the older motion JPEG codec to the more recent and efficient H.264 for the lower resolution movie formats. As before full HD video is encoded using AVCHD. Choosing AVCD provides the option of four quality modes; 1080p50 at 28Mbps, 1080i50 at 17Mbps, 1080p25 at 17Mbps and 720p50 at 17Mbps. Switch to MP4 recording and three further options are available, all at 25fps; 1080p at 20Mbps at 10Mbps, 720p and 640×480 (VGA) at 4Mbps. In NTSC regions the 25 and 50fps rates become 30 and 60 fps respectively.
You can start recording video in any shooting mode by simply pressing the dedicated record button next to the right of the viewfinder, and the G5 can also capture still photos while recording without interrupting the video, albeit only at the video resolution. Alternatively You can set the camera to capture full resolution 16:9 stills while filming, but doing so will briefly interrupt the audio and the still is recorded in the video footage. There’s no manual control over exposure for movies though, nor the ability to adjust the exposure once you’ve started recording. In these respects it falls behind the Sony NEX-6 or Panasonic's flagship GH3.
The only caveat for maximum recording times as always concerns cameras destined for the European market, which for tax regulations are limited to 29 minutes and 59 seconds.
|
|
|---|---|
|
|
|
|
|---|---|
|
|
|
|
|---|---|
|
|
|
|
|---|---|
|
|
|
|
|---|---|
|
|
Panasonic Lumix G5
handling
The extended front grip and relocated rear dial between them make the G5 a much more comfortable camera to hold and use than its predecessor. Add in the new zoom rocker and custom buttons and the overall effect is greater than the sum of its parts; there's was nothing wrong with the G3's handling, but the G5 greatly improves on it.
One of the big problems I find with dual-speed zooms is that during movie shooting they can be difficult to control at the slower speed; it's all too easy to nudge the control a little too far and speed up unintentionally. The G5’s dual-speed zoom defaults to single speed operation in video mode and also allows you to set the speed to high medium or low independently for both stills and video shooting.
The set speed works for either of the two zoom controls and, as I mentioned earlier, the new zoom rocker just to the rear of the shutter release means you can operate the camera one-handed. On the other hand, if you're happy to use the zoom control on the lens or, with a manual zoom lens fitted, the rocker can be put into service as an additional exposure control. In manual exposure more it changes the aperture with the rear dial used for shutter speed and in all other modes it’s used for exposure compensation.
Along with Canon's Func.Set menu, Panasonic's Quick menu is one of the best designed Quick menu systems around. Press the Q.menu button and an overlay provides instant access to frequently used functions. The problem is that the Quick Menu has grown and its default contents, which, photo style, flash, movie settings, picture size and quality, focus mode, AF mode, metering mode, exposure compensation, sensitivity and white balance no longer fit on a single screen and can require a fair bit of button pressing (or screen tapping) to get to. The G5 provides a solution to this problem by allowing customization of the Q.menu. In addition to the default items you can add Quick Menu items to a total of fifteen across three screens – five on each. Perhaps more importantly you can re-arrange the quick menu items, so there's no need to scroll past photo style, flash, movie settings, picture size and quality if you rarely alter them, just to get to the Focus mode and area settings, you can put them right at the front.
Among other things you can add HDR, I.Resolution, I.Dynamic, Drive mode, auto bracket and yes, even stabilization to the Q.menu.
 |
 |
 |
 |
 |
 |
 |
 |
 |
The Lumix G5 has three physical programmable function buttons. The AF/AE Lock button doubles as Fn1, the delete/back button doubles as Fn2 and the LVF/LCD toggle doubles as Fn3. As the delete/back button is only used in playback mode or when navigating menus, it’s readily available in shooting modes, but if you want to assign the other two you obviously sacrifice their original function. This isn't too much of an issue with the screen toggle as the eye sensor renders it largely redundant. As with the earlier G3, the G5 provides two positions on the mode dial C1 and C2 which between them access for previously saved custom setups, one on C1 and three on C2.
Everything I’ve mentioned thus far is accessed via the G5’s physical buttons, but the touch screen adds a further dimension the the G5’s handling characteristics. Panasonic's approach with the touch screen is to use it as an extension to the camera's physical controls rather than to replace them, and it's sometimes easy to forget that the screen can be used to do many things that you're used to doing using the camera's physical controls, including focussing and shooting, zooming the lens and navigating menus.
As I've already mentioned, there are two screen function buttons which, like the physical buttons, are programmable. In the default mode they toggle the new electronic level gauge and the live histogram, but can be assigned to the same range of functions as the physical function buttons. Between the fixed functions on the four-way controller, the customizable Quick menu, the physical and touch function buttons and the custom positions on the mode dial the Lumix G5 provides a huge and versatile array of custom options.
Panasonic Lumix G5 Autofocus
The Lumix G5 appears to inherit the contrast detect AF system of its predecessor. Panasonic's contrast detect AF is widely regarded as one of the fastest systems around; one of the reasons for is swiftness is that Panasonic doubles the output of the sensor to 120fps, whatever the technical whys and wherefores, the result is a system which locks focus in barely no time at all – you press the shutter and the AF responds almost immediately. Compared with the NEX-6 it gets there a fraction earlier every time and performs better in low light too.
Like its predecessor, the G5 is also packed with a broad selection of AF modes and options: you can choose from Pinpoint mode along with Single area, 23-area, AF Tracking and Face Detection. These integrate beautifully with the touch-screen, simply tap the area you'd like the camera to focus on, or the face which should have priority, or touch the subject you'd like to track.
The pinpoint mode, introduced on the G3, is a highlight, temporarily magnifying the image by 5 times for a really close conformation, while also letting you swipe the enlarged target area around with your finger until you settle on the desired part of the subject. You can also opt for Manual focusing assistance with either a small window in the middle showing an enlarged view at 4x, or a full-screen view at 5x or 10x. The variety of AF modes, coupled with their touch-controls work really well, and give the G5 a big advantage in flexibility and ease of adjustment.
The G5 also adds one new trick to its array of touch focus tools. The Touch Pad feature allows you to use the LCD screen to locate the AF area while using the EVF to compose your shot. Counter-intuitive as it sounds, it actually works, up to a point. Moving your finger accurately around the screen while your face is pressed to the rear of the camera isn't as awkward as it sounds, in fact it isn't awkward at all and accurate position is no problem either as, once you see the AF area appear in the EVF is all a question of relative movement with your finger on the LCD screen. When it works, the Touch Pad features work well. The only issue I had with it was its constant determination to mistakenly interpret my nose pressing against the screen as a desire to set the AF area to the top right corner. This might be less of a problem for those who use their right eye, and with practice it’s probably something you could avoid happening, or work around. Of course you can eliminate this problem by simply flipping the screen out to the side.
While the single AF performance of the G5 is impressively quick and also accurate in low light, it’s important to note it, like all Micro Four Thirds cameras to date from Panasonic and Olympus, remains a 100% contrast-based system. Meanwhile Sony, Canon, Nikon and other mirrorless rivals have adopted a hybrid AF system for their latest models which complements contrast-based AF with phase-detect AF points on the sensor. Now in our tests these phase-detect AF points don’t necessarily make these cameras faster at focusing, but they can make them more confident with less searching or hunting back and forth. This may not be a big issue for single AF acquisition, but can help with continuous AF tracking for both stills and movies. In my tests the G5 may have focused faster than the NEX 6 for single AF acquisitions and was more accurate in low light, but the Sony generally tracked better in continuous situations and avoided visually distracting hunting in movies. It’ll be interesting to see if Panasonic or Olympus implement hybrid AF systems on future Micro Four Thirds bodies, or even if it’s technically possible on their standard.
Panasonic Lumix G5
The Panasonic Lumix G5 offers four full resolution continuous shooting speeds: Low speed shoots at 2fps, Middle speed at 3.7fps and High speed at 6fps – an improvement on the 4fps top speed of its predecessor. The Super high speed mode uses the electronic shutter to attain a speed of 20fps; but where the G3 dropped to 4 Megapixel resolution for this mode, the G5 maintains 16 Megapixel full resolution. The G5 can shoot in Super high speed mode with continuous autofocus, but the frame rate drops well below the maximum when you do this, so you might just as well be using the Middle speed.
To test the G5’s continuous shooting I fitted it with a freshly formatted 16GB Sandisk Extreme Pro UHS-1 card and set it to the 6fps Hi speed continuous shooting drive mode with image quality set to full resolution fine JPEGs. The G5 fired a burst of sixteen shots before slowing slightly and becoming a little erratic for a few frames then settling at a little over 2fps. I timed the initial sixteen frame burst at 6.6fps – slightly faster than the quoted 6fps.
Next I set the G5 to RAW mode and repeated the test. This time the G5 fired a burst of 9 frames before pausing for what seemed like forever but was in reality just under 4 seconds, then continued at slower than one frame per second. I timed the initial 9 frame burst at 6.92 frames per second, again, faster that the quoted 6fps.
The time taken to write the contents of the buffer to the card was 8.6 seconds for JPEGs and 19.5 seconds for RAW files. You can fire off another burst while the buffer is still writing. This works well with jpegs – you can get another long 6fps burst after just a few seconds wait, but RAW is less successfully with the camera only able to shoot very slow sub 1fps ‘bursts’ until the buffer is cleared. Switching the UHS-1 card for a speed class 10 Sandisk Extreme card extended the write times to 11.3 seconds for JPEGs and 24.6 seconds for RAW files, so it's worth spending a little extra on the faster UHS-1 cards if you do a lot of fast action continuous shooting.
Panasonic Lumix G5 Sensor
The Lumix G5 features a new 16.1 Megapixel CMOS sensor with a redesigned Venus engine processor which in addition to providing 1080p HD video and 6fps continuous shooting, according to Panasonic produces better image quality and lower noise than its predecessor. The highest sensitivity setting is boosted from 6400 to 12800 ISO with the base sensitivity remaining at 160 ISO.
Files are saved as JPEGs at one of two sensitivity setting and the G5 can also save RAW files in Panasonic's RW2 format. Best quality JPEG compressed files are typically around 6-8MB in size. The shutter speed range is 1/4000 to 60s plus bulb which has a limit of 120 seconds.
To see how the quality of the Panasonic Lumix G5 measures-up in practice, take a look at my Panasonic Lumix G5 quality and Panasonic Lumix G5 noise results pages, browse my Panasonic Lumix G5 sample images , or skip to the chase and head straight for my verdict.
- ,
- ,
2 years ago
Convenient swivel screen; - optical stabilization in a whale lens; - low pre-crisis price (bought for 12500, for its current price you can buy a much better device).
2 years ago
Great viewfinder! High quality swivel screen. Excellent ergonomics. Silent shutter. Ability to specify focus points. RAW. Video quality. Sound capture quality (for the built-in microphone), the presence of noise reduction. Photo quality. Wide range. Working iso up to 1600. Speed, responsiveness. Instant focus, almost no misses. Tracking focus, manual, face detection. Story photos. Long battery life (600 photos per charge). Deep jpeg processing (HDR, range extension, sharpening, scenes). Five customizable keys.
2 years ago
Fast autofocus. Great shots! Shoots great video. Light weight. Makes a series of 6 shots per second. Folding viewfinder with multi-touch. Blinozum is very nimble with good angles and great for shooting video
2 years ago
Electronic shutter (you can time-lapse without fear of killing the shutter resource) +1080 50p/60p (you can make a smooth layer of motion video) + Good colors, good video quality (but there are drawbacks)
2 years ago
2 years ago
On a whale lens, it makes less noise and is sharper than my XZ-1 Olympus (actually not surprising).
2 years ago
2 years ago
Best Camcorder of all used. Lightweight, quiet operation. Management is convenient.
2 years ago
Just a GREAT CAMERA!!!
2 years ago
light, fast, excellent photo quality
2 years ago
Native batteries are expensive (Non-native batteries are not suitable for this particular model, digital protection is protected and the camera sees that the battery is not native, writes this and turns off.
2 years ago
Mediocre photo and video quality: noise in low light, poor sharpness;
- resistive touch screen - an outdated technology that requires significant pressure on the screen;
- the lack of the ability to charge via USB, you need to pull the battery out of the device to charge it;
- The build quality of the device leaves much to be desired.
2 years ago
jpeg lathers, although its formation settings are very good. There is no external microphone, although the built-in one is often enough. Do not point the built-in flash at the ceiling. At dusk, the focus misses 1 out of 4-5 times, much less often in the light. Sometimes, with a long series of photos, the recording freezes for 5-10 seconds, even on a high-speed card. Video recording machine.
2 years ago
I have not found it yet, except for the price of course
2 years ago
Panasonic produces carcasses for different regions with different firmware, there is a version of PAL video 25/50, and there is NTSC 30/60 and there is no possibility to switch PAL / NTSC in the camera menu ... this is bad.
There are two bugs that Panas is in no hurry to fix!:
1) in AVCHD FPH video mode (according to the instructions), the output should be 25p / 30p (progressive) video, but it turns out 25i / 30i (interlaced), the picture in this mode is less clear than in PSH (60p) mode. It turns out that the Panasonic G5 cannot shoot AVC video in 1080 25p/30p, and if you want the most clear video, you will only have to shoot in 50/60p.
2) in AVCHD PSH 50p/60p video mode with flicker reduction=50, you get video with double frames (1 frame=2, 3=4, 59=60), which can be seen in any video editor .. it's tough
2 years ago
It takes a lot of finger pointing. In winter conditions on the street - unsuitable. There was no declared Macro function in the usual sense! There is only Intelligent Macro, and that, sorry, is nothing! Fotik himself decides what he will make sharp in the bud and what not! So those who like to take pictures of pistils, petals, bugs and spiders - you can not consider this model in principle !!!
2 years ago
Video can only be shot in a stationary position, if it slows down with wiring, low resolution is stronger, at high resolution it is smaller, but unacceptable.
2 years ago
The 14-42 electronic lens, which is under the video, is expensive. And it's hard to find a filter.
2 years ago
For us fans, they simply do not exist. Well, the pros still have their say
2 years ago


For beginners: breeding a broiler at home Boiled water for broilers
Only lovers will survive
Features of advertising aimed at children
retouching old photos in photoshop retouching old photos
What is an NPO: decoding, definition of goals, types of activities Does a non-profit organization have the right