I wanted to show what happened on the scanned paper, but it is so filthy and shameful that it’s a horror in general (((In general, I’ll tell you how, after long ordeals and choosing various programs, Google Sketchup won.
The program turned out to be so simple and flexible that you can draw almost anything in it. You can download it completely free. The site provides a lot of usefulness in the form of a library of three-dimensional shapes and lessons. From useful I will pay attention to video tutorials. They are in English, but it's not scary.
The translation is of course clumsy in places, but in general you can understand. there would be a desire.
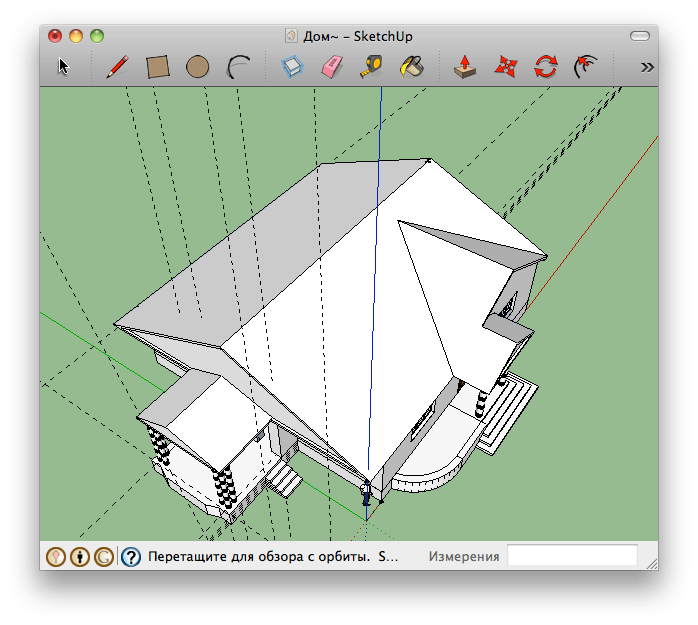
So what happened to me. House from several angles.
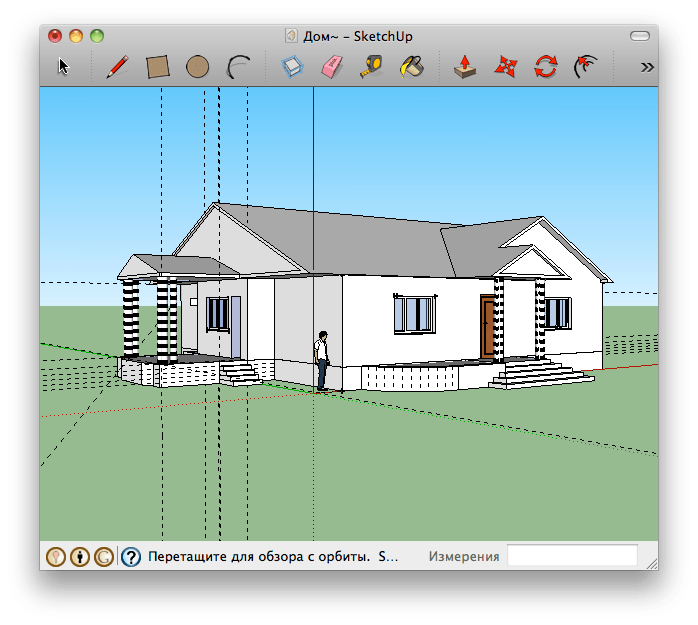

In sketchup, you can make a very convenient cut at home, for this there is a special tool. On the cut you can see the location of the rooms. Clockwise starting from the boiler room (the smallest dead-end room with a separate entrance from the street), then two bedrooms, a bathroom just below, even lower a living room in which it will later be decided to make an additional window, to the left of the vestibule to isolate the house from winter drafts, even more to the left is the third a bedroom and where a staircase is drawn - a kitchen with a separate, summer exit not a veranda. The staircase is just drawn on the project, in real life it will not be, as well as the second floor.
Google SketchUp Pro - A professional version of the program that allows you to create 3D models, demonstrate them as a presentation, share them. The program will be useful wherever there is a need to use 3D models, whether it is designing an extension for a house, teaching geometry to schoolchildren, or creating a model for Google Earth. Lots of simple tools and the use of an intelligent drawing system make it easy to create and edit models, export them, create a video or print the results of your work. Instead of entering coordinate values, you can use a multifunctional object location management system using marks, text prompts, and lines of various colors. Using tools as close as possible to real life, because it is much easier to learn and, most importantly, remember how to use them.
Using SketchUp, you can do the following:
Draw, modify, measure, rotate, scale and move geometric shapes.
Use exact dimensions and indicate them using text.
Set section planes for viewing and working inside models.
Use prepared textures in models, such as brick, wood, tiles, glass, or create new textures.
Add pre-made components such as trees, cars, doors and windows, and people, or create new components.
Smooth surfaces.
Model shadows in real time for any area on Earth.
Simulate the location of the camera in space.
Create passages.
Create presentations.
Use organic modeling (using the Sandbox).
Import 2D images in the following formats:
JPEG image (.jpg)
Tagged Image File (.tif)
Targa File (*.tga)
Windows Picture (.bmp)
Import the following 3D models and information.
SketchUp (.skp).
Relief Google Earth. Note. It is possible to get the current image (black and white image) of the area that is displayed in Google Earth using the Get current view button. Two versions of terrain images are imported: 2D and 3D, and you can switch between them using the Switch terrain button. Terrain images are used for reference only and are not included in the model when it is located in Google Earth. The image includes links to the model's latitude and longitude in Google Earth, so they can also be used to study shadows. Google Earth does not export native 3D building models (the buildings that appear when you select the Buildings layer in Google Earth). This information is protected and may not be distributed without the permission of the copyright holder, therefore, such buildings cannot be imported into SketchUp.
3DS (.3ds). Note. To create an importable 3DS file with textures, you need to save the texture files in the same folder where the 3DS file itself will be created.
DEM (.dem, .ddf)
Exporting 2D images of models.
JPEG image (.jpg)
Portable Network Graphics (.png)
Tagged Image File (.tif)
Windows picture (.bmp).
Export animations and passes to MOV or AVI files.
Placing models on Google Earth. Placing SketchUp models in Google Earth is done using the Place Model command. SketchUp will automatically detect which version of Google Earth you are using (3 or 4) and create the appropriate KMZ file. (Newer versions of SketchUp and Google Earth currently support mapping textures and images to Google Earth.)
Exporting a Google Earth file directly to KMZ format (Google Earth 3 or 4). Google Earth 3 files can be viewed in both versions of Google Earth, but textures are only displayed in Google Earth 4. Google Earth 4 files will not be displayed in Google Earth 3.
Sharing models in 3D Model Service. Submitting models hosted on Google Earth will generate SketchUp (.skp) and Google Earth 3 (.kmz) files. If a newer version of SketchUp is installed, the upload will also generate a Google Earth 4 (.kmz) file.
You can print the part of the model displayed in the drawing area of SketchUp.
Print and export bitmaps at the selected resolution.
Create additional programs using the Ruby programming language.
sketchup pro is a 3D modeling tool for professional design. The professional version of SketchUp allows design professionals to analyze and connect complex design ideas. In addition to all the features provided by SketchUp, the following features are also available when using SketchUp Pro:
Export to the following additional 2D formats.
Portable Document Format (.pdf)
Encapsulated PostScript Format (.eps)
Epix (.epx)
AutoCAD (.dwg, .dxf)
Export 3D models to the following additional formats.
3DS (.3ds)
AutoCAD DWG (.dwg)
AutoCAD DXF (.dxf)
fbx (.fbx)
OBJ (.obj)
XSI (.xsi)
VRML (.vrml)
OS: Windows XP, Windows Vista, Windows 7
Interface language: English
Activation: Available
Archive size: 50.74MB
You, dear readers, have learned that the Google SketchUp program is designed for quick 3D design of architectural objects, landscape design, interiors, etc. What exactly can be created with Google SketchUp 8.0, and where can it be used at home? Consider one of the examples of using the program to create a project for the reconstruction of the roof of a residential building. The project provides for the replacement of asbestos-cement sheets with metal tiles with the addition of additional structural elements roofs.
The changes were caused by the expansion of the living space due to the construction of another attic-type room in the attic, and for better illumination of the room, it is necessary to make dormer windows in the roof. At the same time, it should be taken into account that the location and design of the dormer windows should not disturb the overall harmony of the existing building.
In this case, the Google SketchUp program is simply indispensable, because. allows you to quickly implement the author's ideas without long training and make the necessary adjustments to the built-in elements of the roof, choose a combination of colors for the walls and roof. But, before you begin to perform all the tasks, you first need to have a 3D project of an existing house.

Consider, using this example, in what sequence the 3D model of the house was built, on which the conceived ideas will subsequently be implemented.

To begin with, the construction of the foundation on which the house will stand was carried out with tools Rectangle and Pull/Push. The dimensions of the rectangle were entered from the keyboard in the lower right window Dimension indicators.

Tool Roulette marking lines were laid off from the edges of the base.

Along the contour of marking lines with a tool Rectangle a rectangle was built with sides equal to the length and width of the house, and with a tool Pull/Push he pulled up. Please note that during model building, the dimensions are reflected in the window Dimension indicators and can always be corrected by entering the desired numbers from the keyboard.

Then Roulette the ridge marking line and the marking line of the transition from the roof of the house to the roof of the fence were postponed. Tool Line two lines were drawn along the marking parallel to the green axis, after which the instrument Move the ridge line rose up, and the extreme line of the roof slope of the fence fell down.

The transition from the closed porch to the garage and the roof overhangs were done with tools Roulette, Line and pushed - Pull/Push.

The same tools were used to display the buildings adjacent to the opposite side of the house.

On the facade of the building, the design of the porch was carried out. The contours were drawn with tools Rectangle, Line and Arc, and unnecessary segments were removed Eraser. The entrance was pressed with a tool Pull/Push, and the upper lines of inclined surfaces - with a tool moving.

Then Roulette marking lines were laid aside for building windows on the facade. Tool Rectangle the contour of the window was performed, and the tool Bias- Frame outline.

The marking lines marked the bindings of the frames, and the tool Rectangle six rectangles were built inside the contours of the marking lines. These rectangles depicted the contours of the glass in the frame.

Tool Pull/Push the window casing stretched outward, and the contours of the glass were slightly pressed inwards. The finished window image was selected with the tool Choose. With this tool, when the mouse button is pressed, the window is enclosed in a rectangle. After releasing the mouse button, all window outlines turn blue. Next, holding down the button on the keyboard ctrl, the mouse pointer captures the selected window and moves a copy of the window to the space allotted to it. As you can see, everything is simple, and you do not need to draw repeated elements repeatedly.

Similarly, the construction of windows on the side wall of the house and the attic was carried out.
In one of the next issues on the site http: // site, the story of the creation of the first project on Google SketchUp will be continued.
Post Views:
1 611
3D models of projects Karkas Info. © CC BY Vladimir Pustokhod, 2016
Many of our customers and site visitors want to delve into the design of their future home in detail, but at the same time, few people work in CAD programs - for the average user they are too cumbersome, complex and inconvenient ... and often require powerful workstations.
Therefore, the KARKAS INFO team offers additional service— translation of the frame model of your house in SketchUp.
By downloading this free program to your computer, or a program for viewing these files on a tablet or phone, you can view the frame model and its nodes in detail from all sides, in any convenient place.
A full-fledged frame model will allow you to specify the dimensions, interface nodes on the spot, and, if desired, try to make small changes yourself.
 Isolate model layers. © CC BY Vladimir Pustokhod, 2016
 Our 3D model is not just a three-dimensional model of the frame - it is a model broken into layers: strapping, bottom floor, top floor, rafters, etc. which, if necessary, this moment Layers can be turned on or off, leaving only what you are currently working on, such as the outer walls of the ground floor, allowing you to see them in great detail.
 Frame wall elements. © CC BY Vladimir Pustokhod, 2016
 Having a model of the house and having mastered the basic skills of working in SketchUp, you can try to design yourself, for example, a ventilation system, or create an electrical diagram for the rooms of the house.
 Bottom cover. © CC BY Vladimir Pustokhod, 2016
 Even if you are not the original customer of the project, we can prepare for you a 3D model of the load-bearing frame of any of the projects presented on the site (subject to a number of conditions).


For beginners: breeding a broiler at home Boiled water for broilers
Only lovers will survive
Features of advertising aimed at children
retouching old photos in photoshop retouching old photos
What is an NPO: decoding, definition of goals, types of activities Does a non-profit organization have the right