Hello, dear readers of the blog site. In today's article on the topic (remember that the best option will legalize its entrepreneurial activity via ) we will talk about the system of contextual advertising from Google.
For beginner webmasters earnings on adsense has one indisputable advantage over making money on Yandex contextual advertising - you do not need to have 500 unique visitors per day in order to be accepted into this system (in the Yandex advertising network this is the main condition for joining).
It is this limitation that is a stumbling block for those who wish. The context system from Google is more democratic in this regard and almost any site, even those located on .
True, Google is very sensitive to and quite often bans accounts where sites with plagiarism of one kind or another have been added (even describing the possibilities of plagiarism is prohibited - for example, I was warned a couple of times, after which I had to remove several articles from the site). Read very carefully Rules for placing ads in Google AdSense or watch the old, but useful webinar " How to post ads without violations"(Created by and).
Registering and creating an account in Google Adsense
What is noteworthy, if you have already registered your main site in the Google contextual advertising system (and it has passed moderation), then on your other sites you will be able to place AdSense advertisements without their preliminary moderation. This is very convenient and greatly simplifies the process, and also makes it possible for young sites to earn money (with practically no traffic).
But for all its democratic nature, Adsense is very serious about cheating and fake clicks(an action performed by a person or a program that imitates a real visitor's click on a contextual advertising ad). The punishment will be very harsh and immediate. If you notice that your CTP has increased dramatically and there are suspicions of clicks, then use the Invalid Clicks Contact Form to avoid problems.
To get started and make money on this contextual advertising, you will need registration in google adsense system. You can create your account by going to the Google.com/AdSense page and clicking on the "Sign up" button (now their main page is a typical one):

You will be met by a registration wizard who will offer you the first step, if any (left blue button at the bottom of the screenshot):

If an account in this search engine If you don't have it, you'll have to get it. How exactly this is done, I have already described in some detail in an article about, so it will be unnecessary to repeat. We will assume that you already have an account and you will only need to enter it by clicking the appropriate button.
After successfully logging into your Google account, you will be redirected to second step of registration in adsense, where you will need to enter the URL address of your main site (if it is not there, that is) and specify its language:

At the third step of the Adsense registration wizard, you will need to carefully fill in all the proposed fields:

Personal data (full name, city and address) used to have to be entered in Latin letters (read about, as well as about the use for these purposes), but now I don’t know for sure. And, of course, they must be true, otherwise you will not be able to receive the money you have earned (cash a check, although now there are alternative options for receiving money - Rapida and bank transfer).
After that, specified by you during registration the site will be sent for moderation and in about a couple of days you will receive a letter (by e-mail) stating that your project has passed moderation and you are accepted into the context system google ads.
Creating and setting up ads in Google Adsense

Well, boom to increase the number of ads per page or let it remain as it is?
If you want to do without plugins and not lose in functionality, then I dare to offer several solutions I use (not entirely mine, but borrowed).
Probably, I will not open America by saying that WordPress is a wonderful engine that is developed by professionals in their field. Thanks to the wonderful , it's quite easy to find the file that would allow you to insert the Google AdSense block in the right place in the template. I myself in WordPress when inserting the Adsense code, I prefer to do without plugins, because they unnecessarily load the engine that is already quite heavy for hosting (although, of course, I can’t do it completely).
- Want to insert ads inside articles? No problem. Short codes will help you. To do this, go to the folder with the theme files (by, of course), which is currently used on your blog (/wp-content/themes/Folder_name_with_your_theme_of_theme), find the file there, and if it is not there, then create it.
True, I did all this a year and a half ago, but I hope that nothing has changed since then.

This is the version of the code I used (blocks of the most appropriate sizes will be shown on different devices). True, I inserted the code through function.php and at first I forgot to remove all the spaces in the code, which led to some distortions. But you won't repeat mine?
Setting up payments and withdrawing money from Google AdSense
In short, in addition to receiving a check from Google, now Russians have the opportunity to receive cash through Rapida (it allows, for example, to receive money in the mail, transfer their hard-earned money to the system, to a bank or card account, etc. using own service.
In the settings of your account in Google Adsense ("gear" - "Payments" - "Payment settings") you can choose one of three types of payments (for Russia) by clicking on the "add payment method" button:

In the opened window Russians will be offered three ways withdrawal of funds earned in Adsense by overwork -, account or Rapida:

When the amount of money you earned on the context over $10, in your account you will see a notification that you will need to confirm the address specified during registration (I do not have more recent screenshots, unfortunately, but the essence of this does not change).

This is done using entering a PIN code (pin) which will be mailed to you. When you enter the PIN code, you will be able to receive your first payment from Google AdSense:

Quite often there is a problem with the fact that Pin code is not coming to the address specified during registration. In the Google help on this matter, it says that if you have requested a PIN code three times and a month has passed since the last request, then you will have home page Adsense will display a link to a form where you can upload, for example, a scan of your passport to verify your address.
Withdrawal of earned funds through Rapida Online
It is clear that a withdrawal through Rapida will be much more preferable, because further money can be sent manually or automatically to real in dozens various ways. In theory, in this case, you have several ways withdrawal of money from Google AdSense to Rapido Online:
In any of the cases described above, your money will have to get into rapid online. A few years ago, AdSense made changes to the rules for withdrawing funds through Rapida, which you can read more about.
Previously, you could simply register with Rapida Online and receive funds coming from Google by mail (not electronic, of course). Now must be identified in Rapid(show them your passport at their office or choose one of the anonymous methods), as well as create a withdrawal template, the ID of which will then need to be entered in the payment settings in Adsense.
Now let's see how we can create a template in Rapid, for example, to automatically redirect money from Adsense to your WebMoney wallet. To do this, you will need to go to the tabs "Payment" - "Payment systems" and select the desired payee:

Rapida Online has certain commissions that the payment system may charge you. In the case of a withdrawal to a WebMoney wallet, it will be 1.4 percent of the transfer amount:

Next, indicate your login (cell number), the number of the ruble wallet in WebMoney and the maximum amount to be withdrawn (15000). After you click on the button "Save as template", you will receive an SMS with a code (session PIN) on your cell phone, which you will need to enter in the next step of creating a template in Rapida.
Well, at the last step you will be asked to come up with a name for the template (no more than 8 latin numerals and letters, and you can’t start the name with a number) and a description (you can also in Russian).
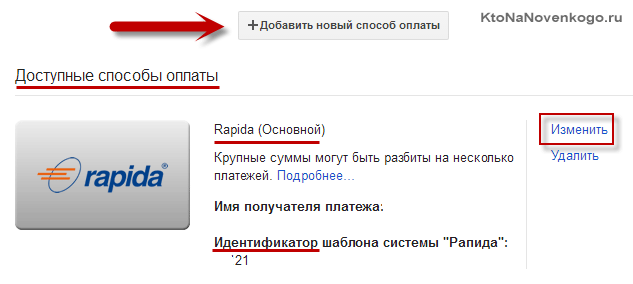
After you click "Save template", it will be saved to the database and available from the menu item " Templates». After reviewing the data of this template, you will see its unique number, which will be needed to link it to your Google Adsense account:

Everything, it remains only now to score this number in the Adsense account and save the changes made. As a result, you will receive the next payment through Rapida.
Recently I have been withdrawing from Rapida immediately to the current account individual entrepreneur(I set up a payment template for free details in Rapida) and they charge less commission (only 0.9 percent). True, the last few payments in Rapid got stuck quite stubbornly and they had to be pushed through through polite communication with the technical support of the service. Before that, everything worked like clockwork. By the way, this thread may be useful in this regard, where you can get a lot of useful information.
Officially, there are two most powerful platforms for making money on contextual advertising - and Yandex. Both sites are good and convenient, but a novice webmaster should give preference to the first option. Let's discuss how to register in Google adsense.
Advantages and disadvantages of google adsense
Google adsense has its advantages and disadvantages.
The main advantage of this system is the ability to start earning with any number of visitors. On Yandex, for example, you can apply for earnings only if you have 300 unique visitors per day.
The main disadvantage of google adsense registration can be considered harsh measures to violate the rules. Google bans sites where copyright or Adsense rules are violated. Cheat and fake clicks on contextual advertising are also strictly punished. However, this is a minor disadvantage. Just do not break the rules and create quality content, then there will be no problems.
Sign up for google adsense
Use the page translator - it's very convenient and easy.
Signing up for google adsense takes three steps. Follow the link to the main page of this service google.com/adsense. At the top right, find the "Sign in" button.
If you are not yet registered with Adsense, a pop-up window will appear indicating this.
You will be asked if you want to create a new account to connect to Adsense or use your old Google account. If you don't have an account at all, select "Register". I advise the rest to enter through a valid account - why the extra gestures?
Step 1. It's called "Choose a Google Account". This is where you enter your username and password. On some computers, identification occurs - the data is entered by themselves, you just need to press "Enter".
Step 2. "Tell about the content of the site." This tab indicates the URL of the site where you are going to earn money, and the language of the content. If you have several sites, indicate the main one (with more traffic).
Step 3. "Submit an application." This is the most responsible and difficult step. There are a few more fields to fill out. This must be done in Latin letters. Select your country, account type and region. Write your name, address, zip code, phone number. Next, choose from the list how you found out about this service. And click "Submit Application".
If you translated the page, you may get an error with the area. Translate the page back to the original and press "Enter" again. Next, you will receive a code on your phone, write it in the appropriate field and press "Enter". Adsense registration completed and application submitted for review.
Important nuances
- When choosing an account type, be careful - it affects the requirement tax service and the form of payment available for your country. Then the account type cannot be changed.
- Write the full name of the owner of the account to which the payment will be made. If you are going to withdraw money from WebMoney to your husband's salary card, indicate his data. You can't change your name later.
- Registering in adsense through youtube is a rather complicated process. If you want to monetize video content on YouTube hosting, please contact affiliate program this hosting. If you already have the right to monetize, look for the “Apply for AdSense” button in the YouTube interface.
The application is considered from one day to a week. Check your email for negative or positive responses.
In the latter case, you will be able to log into your Google AdSense account. Adding contextual advertising to your site takes place without moderation.
Following actions
After registration, you can start earning on contextual advertising. To do this, log into your account, access to which you received with a positive response from the moderator, and carefully review all the tabs.
Go to the tab "My ads" - "Content" - "Ad units". Here you can create and configure ad units for the site. You can choose their type, location on the site, size, font and color.
After setting up the ad, you will receive its code, which must be placed in the most clickable place. by the most the best places for advertising, places in the header or at the end of the article, as well as in the text itself are considered. Sidebar (sides of the site) bring less profit.
It seems that we figured out how to register in adsense. I wish you successful earnings!
Hello colleagues!
Google Adsense - login, registration, creation of ad units in Google Adsense, inserting code on the site. Google Adsense is contextual advertising from Google, by installing it on your site, you will earn. In a previous article, we looked at . In this article, I will tell you how to connect Google ads to your site, namely: how to register on Google Adsense, how to create ad units, how to insert a code on a site, how to withdraw money.
1. Google AdSense - registration
A clear advantage of making money on Google adsense over making money on advertising from Yandex is the fact that you do NOT need to have 500 unique visitors per day. For Yandex, this is the main requirement. Plus, it is difficult for Yandex to pass site moderation to connect advertising. And if the site has not passed moderation, the next time you can apply only after a month.
Google Adsense, on the other hand, is more democratic and you can connect Google ads to earn money by displaying contextual advertising on almost any site, even the youngest, even hosted on free hosting. But it is not recommended to connect advertising if your site has less than 50 visitors per day (you won’t be able to earn a lot with such traffic, and advertising on such a young site can scare off potential readers).
However, it must be remembered that Google Adsense is strict about copyright, so it's important that text and pictures are unique. Otherwise, Google may ban the site. Also Google Adsense does not tolerate cheating and fake clicks. Before adding ads to your site, please read AdSense Program Policies and Rules for placing ads in Google AdSense. Briefly and succinctly, these rules are set out in this presentation from Google.
So let's get started with registration.
If you have several sites, then after registering with Google AdSense it is enough to pass moderation of only one site and you can place AdSense ads on all your sites.
To register, go to the official website of the Google Contextual Advertising Program:
Google Adsense Registration >>>
Click on the "Register" button:
In the next screen: if you have an account in the Google search engine(if you have mail on gmail.com), then click the "Login" button. Otherwise, you need to create a Google account. To do this, click on the "Create an account" button.

So, let's assume that you already have a Google account. Click on the "Login" button. At the 2nd step of registration, you will need to enter information about the site:

Their personal data must be entered in Latin letters(name and surname must be indicated as on your payment card or in the bank agreement). Data must be specified correctly, because You will receive money from them.(cash check, Rapida or bank transfer). The address must also be indicated in Latin letters, you can do transliteration. You can learn more about how to CORRECTLY fill in the name and address in Google Adsense from the AdSense help.
After following these simple steps, your the site will be sent for moderation. The confirmation email usually arrives email very quickly.
2. Creation of advertising blocks.
Now you can start creating ad blocks (advertisements) Google AdSense in your account. To do this, log into your account with your login (address Email and password) by clicking on the LOGIN button in the upper right corner of the screen:
Google adsense LOGIN >>>
You will be taken to the main page, it will display your income. 
In the menu on the left you need to select the tab My ads - Ad units. You need to click on the New ad unit button and all available ad units will appear on the screen:

Let's make a small digression: how to choose the right size of ad units and where to place them on the site?
At the very beginning, you need to decide on the size of your ads. Among experienced webmasters, it is generally accepted that the most ads sized 728x90 and 336x228 bring a lot of income. But everything is individual, you need to experiment, try different sizes of ads. Often shot ad units sized 300x600 or 240x400 placed in the sidebar. It will be necessary to conduct experiments (testing ad units different sizes in different places on the site).
3. How do I embed the Google AdSense code on my site?
To paste sidebar ad code, you need to go to the admin panel in Appearance- Widgets. Select the Text widget and drag it to the sidebar, for example, below the Categories widget or below the Featured Articles widget. Paste the following code into the text box:

I think in the process of reading the article "Google adsense - login, registration, creating ad blocks in Google Adsense, inserting code on the site", you have successfully installed ads on your site and Google ads are already showing on it! And you already see your earned money in your account on the main page. Everything turned out to be very simple! Now you will need to track income from ads located in different parts of the site or blog in the Reports menu. If necessary, disable or make changes to ineffective ads and create new ones.
I wish you all confidence for the successful promotion of your project!
If you liked the article, click on the social buttons under the article, subscribe only to useful articles (you will find the subscription form below).
Ask questions in the comments.
If you want to start making money on contextual advertising in Google AdSense, then you need to go through simple registration in this service. Today I will show you how register a new adsense account. To begin with, it is worth noting that if you have registered with any of the Google services, then your account will be valid for all services, including.
Create a new AdSense account
To register go to adsense page

As you can see, the start page is a Landing Page. If you already have an AdSense account, then click the "Login" button, if not, the " Register»
At the second step, you will be met by the new account registration wizard

At the first stage, he will prompt you to either sign in to your Google account or create a new one. If you have previously registered with Google, then simply click on the " To come in» and proceed with registration in AdSense.
The next step in registering with AdSense is to enter the URL of your site in the " My site” and the language of your site content. Then press the button " Save and Continue».

The next page of the AdSense account creation wizard will be filling in your personal details.

The highlighted fields are required and important. Because it depends on the payment of earned money. AdSense pays out money via traveler's check postage and bank transfer. And if the personal data is not true, then you will not receive money. Or it will take a long time to prove to the Adsense administration that you are really you. I went through this procedure, I will say - not very pleasant. I had to send copies of my passport with the place of residence and various other documents to confirm my identity.
You can fill in the fields in Russian. Previously, the fields were filled only with Latin characters, using transliteration. The phone number is required, it will receive an SMS message with a confirmation code when logging into your Adsense account, if the system suspects that you are not trying to log in.
Next, click " Submit an application". Within a week, your application is being considered and you will receive a letter in the mail with a notification of approval of your application for creating a Google Adsense account.
After that, you become a full member of the AdSense contextual advertising system and can start earning money on your site. As you can see create adsense account is not difficult. How to earn? We will talk about this in future articles.
Hello dear friends. Today there will be the first article on website monetization using Google AdSense contextual advertising. In this article, we will analyze the process of registering with Adsense, creating and configuring ad units, and installing an advertising code on the site.
It's no secret that every site owner can earn on his resource. There are many ways, one of which is contextual advertising. Perhaps everyone dreams of such a passive income. The main thing is to develop your site and think first of all about the benefits for visitors, and the more visitors you have on your site, the higher your income from contextual advertising.
So, Google AdSense offers to make money on your own websites, YouTube channels and AdMob mobile applications. Moreover, unlike other advertising networks, Adsense does not have an entry threshold for visiting your site. You can start earning on the site from the first day of its existence. Of course, if your site is made for people and does not contain prohibited content (terror, incitement to violence, copyright infringement, etc.).
Signing up for Google Adsense
In general, as such, registration in AdSense is not needed, since Google allows you to use a single account for all of its services. It is enough to create once mailbox to Gmail and then use this mailbox (as a login) and password to enter any Google service.
I'm sure you already have a Google account. If not, then in my article about there is a detailed scheme for registering an account.
Apply you can on the main page Google adsense. To do this, follow the link and click on the button « Getstartednow".
Don't worry everything is in English. In the next step, you will have the option to select a language.

Here, at this step, you will be asked to log in under your single account or register a new one. Since we already have an account, click on the button "Yes, sign in to your Google account".

By clicking on the button, you will be prompted to enter a password for your account (this is the password for your Gmail mailbox). Enter a password.

Next, in the second step, you need to specify the url of your site and select the main language. Even if you have several sites, now you specify one of them. The rest can be added after confirmation of your application. Language, you also choose the main one, even if you have translated versions as well.
Read the rules and click on the button "Proceed".

The next step is to fill contact information. The data you can select from the dropdown list will be in Russian. But the fields that you will fill in yourself (name and surname, address) must be entered only in Latin letters. Fill in everything correctly, as in the future a PIN code will be sent to this address, which is required to confirm the address and.
As soon as the data is filled in, click on the button "Apply".

Now it remains to wait. Your site has been submitted for moderation. After about a couple of days, you will receive an email confirming the application and your next steps. By the way, I got a letter the very next day.

Create an AdSense ad unit
After receiving the letter, you need to proceed to the next step - creating an ad unit. Until you create this block and place it on the site, your account will not be verified.
To do this, you need to go to the Google Adsense account, you can do this by clicking on the button "To begin" in a letter or link http://www.google.com/adsense/.
By going to the office, you will automatically find yourself in the section "My announcements". Where, to create a new ad, you need to click on the button "New ad block".

First you need to name the ad unit, select the size and define the type. The name can be assigned by the size of the block or by the place where it will be located. This will make it easier to analyze later. The block size, perhaps, is the only correct one - adaptive. Since if you are your site for mobile users, then the ads should also harmoniously fit into the design. Next to the block sizes that are adapted for mobile devices, there is a phone icon. Select only such blocks, their size will adapt itself depending on the size of the parent container.
Select ad type "Text and display ads", since the system's help itself indicates that this type is the most profitable.

Text ads can be styled so that these ads fit neatly into the design of your site. To do this, you can choose one of the proposed options, you can copy it and edit or create your own style.
All the necessary tinctures are available in the subparagraph.

The next important point is setting up client channels. That will allow you to group ad units by size, title, location on the page. Best of all, by specifying a custom channel as the ad placement, advertisers will be able to target ad units on your site. That contributes to an increase in cost per click.
To configure, click on the tab - "Create a new customer channel".

After that, you need to fill in several fields and check the checkbox in the paragraph "Targeting".

And the final step in setting up an ad unit is setting up a fallback ad. By default, this is an empty area. But you can make a single-color fill or connect a graphic screensaver from the site. For example, a banner. Just make sure it matches the size of the ad unit.
And after you deal with this item, click on the button "Save and get code".


Note: By default, all ad serving categories on your site are enabled. But, you can make the necessary changes in the section "Allow/Block Ads".
Inserting AdSense Promotional Code into Sitebar and Articles of WordPress Sites
So, open the WordPress admin panel - "Appearance" – "Widgets"- widget type "Text" and place the ad code in it.


And on the mailbox, you will receive a letter confirming the full activation of your Google AdSense account.

From now on, ads from the Google ad network will be shown on your site.
To do this, in the theme function file, at the very end, before closing ?> paste this code here:
function block1() ( return " Adsense Promotional Code"; ) add_shortcode("adsense1 ", "block1 ");
If you intend to insert several ad units in the article, then paste this code into the file again and change adsense1 and block1 on the adsense2 and block2.
In the article itself, in the place where you want to display the ad block, paste this code:
And soon I will prepare an article about the methods on the site both by manual and automatic methods. Trust me, it makes life a lot easier.
I also recommend watching the video version of the article.
Well, friends, that's all for me today. Try, register and monetize your sites. If you have any questions, ask them in the comments, I will be happy to help. I wish you all good luck and see you in new articles and video tutorials.
P.S. By the way, you can also install mobile app AdSense on your smartphone and you will always have all the statistics at your fingertips.

And in conclusion, I want to congratulate all of you, friends, on Victory Day! War is grief. And the day it ends is truly a holiday! My grandparents went through the entire war. Grandmother is still alive, she is already 93 years old. The horror that they and millions of people had to endure will never be forgotten. It is hard for her to look at what is happening in the world, how angry people have become. They forgot what our ancestors fought for.
I wish you and your families good health, a peaceful sky over your head! And so that the mistakes of the past will never be repeated again. Let there be no war!


For beginners: breeding a broiler at home Boiled water for broilers
Only lovers will survive
Features of advertising aimed at children
retouching old photos in photoshop retouching old photos
What is an NPO: decoding, definition of goals, types of activities Does a non-profit organization have the right