One of the most famous manufacturers of home appliances is a company from the Netherlands Philips. Smart TV buyers associate this company with quality and reliability. On Philips television devices, Smart TV technology has become commonplace. For users, “smart” technology is preferable, so the manufacturer has introduced additional functionality that opens up great opportunities.
Modern models are equipped with a built-in Wi-Fi module or LAN port, which allow you to access the Internet directly from the TV. But some owners do not know how to connect a Philips TV to the Internet. In addition, it is important to know the principle of downloading and installing the operating system and applications.
Peculiarities
Depending on the model, the following operating systems are used:
- android;
- webOS.
Multifunctional operating systems work with streaming and analog TV, as well as servers with media files local network. The ability to connect to the network allows you to:
- work in the network, displaying the image on the TV screen;
- use compatible applications that significantly expand the functionality of the device;
- communicate with other people via Skype or other messengers.
An intuitive interface and proprietary recommendation technology make it easy to use your TV device.
Connection order
A user of any level will be able to connect the Internet to a Philips TV. There are 2 ways to do this. For the most stable and fast connection, you can plug the Ethernet cable into a dedicated LAN port, which should be located on the back or side of the TV.

But this option is not very practical, because the presence of wires stretching throughout the apartment is not always convenient. But if there is no other way out, then follow the step-by-step instructions:
- Connect the dedicated cable to the port labeled "LAN" on the TV. In other models, it may be referred to as "Network".
- Plug the other end of the cord into the connector on the router, it is usually yellow.
- Find the Home button on your remote control and press it.
- In the menu that opens, go to the "Settings" section.
- Then select the item "Wired and wireless networks", determine the type of connection. In your case it is wired.

- Click on the button indicating the network connection, select the same type of connection again and click "Finish".
After a simple procedure, the Philips TV has Internet access. Now you can use all the functions of "smart" technology.
About connecting toWi-Fi and setting up Smart TV, see here:
But more commonly used wireless connection to the web via Wi-Fi. Before connecting your Philips TV to the Internet, check that the router is turned on and working properly. Then do the following:
- In order not to enter a username and password, go through the Smart TV menu to the "Network connection settings" section, then click on the Wi-Fi item. Select the connection method via WPS. While connecting to desired network, press the WPS button on the router. This will allow you not to enter data on the TV device.
- If such a button is not provided, then the login and password will have to be entered manually using the remote control. Click scan. A list of networks that are available will open. Enter the SSID (or search in the list) and network key (password) and connect.
- A menu will appear on the screen where you need to click "Easy Access" and confirm the action by clicking on the OK button.
Now you just have to agree to the agreement that you will see after connecting to the Network.
Before turning on Wi-Fi on the Philips TV, check the settings of the router, due to incorrect settings, there are connection problems. First of all, in the router settings, make sure that the DHCP server is active.
In the event that the connection to the Internet was already made, but the connection was interrupted, a software update or flashing of the device may be required.

In the second option, it is better to contact service center rather than self-medicate. Otherwise, there is a chance to cause irreparable damage to Smart TV.
Solution of problems
If you can't connect your Philips TV to Wi-Fi, try the following:
- Restart your router and try connecting again.
- Check that you have entered the security key for the wireless network correctly.
- Check network settings on TV:
- Press the "Home" button on the remote control, select "Install", then "Network settings" and "View network settings";
- "Network mode" - should be "DHCP / auto IP";
- "IP Address" - must be filled;
- "Signal strength" - not less than 80%.
- Unplug the receiver from the mains and disconnect all cables. Wait a while and try reconnecting your Philips TV to your router via Wi-Fi.
- If Philips TV does not see wifi network check your router settings. The network may be hidden.

Registration in the corporate club
To fully use Philips Smart TV, you will have to register with the official club. Once the TV is connected to Wi-Fi, a window will appear on the screen to create a new account. Registration is carried out quickly, for this, follow the proposed step-by-step instructions:

- In the first window, click on the button to register a new user.
- Then fill in all the fields with your personal details and click on "Create an account".
- Click on the login button Personal Area Philips, then enter your name and passcode.
- Select the "Register Product" button.
- Through Search, find your device model and select it. Specify the date of purchase of Smart TV and click on the "Register" button.
After the procedure is completed, all programs and services on the TV will work correctly. In order to avoid software failures, it is necessary to register with the club.
Setting
Setting up channels is easy, even for those users who have never dealt with a smart TV before. To set up Smart TV, you need to connect Philips to Wi-Fi and follow a few simple steps:
- Call the main menu on the TV screen using the "Home" button with the house icon, then go to the "Configuration" section.
- Launch Channel Search and select Reinstall Channels.
- From the list of proposed countries, select the one in which you live.
- Then you will be asked to determine the source of the signal: cable or satellite TV.
- A window will open where you need to click on the "Settings" button. Activate automatic search, as manually searching for TV channels is inconvenient.
- Click the "Quick Scan" tab.
If television will be broadcast through a conventional antenna, then activate the "Digital TV channels" column and start the search. It usually takes no more than ten minutes.
Applications online

The operating system allows you to download various applications for the comfortable use of a smart TV. The main advantage of the new generation Philips TV is that the proprietary SongBird technology is built into the OS, which requires an Internet connection. There she looks for all the codecs that the system needs to work correctly. After installing them, even the rarest TV formats will be able to "read".
Thanks to another proprietary innovation - the Net TV browser, the user will be able to watch videos from the well-known video hosting YouTube, use social networks, watch movies and TV shows in Full HD quality, or listen to music. You can watch TV channels through a browser, there are special services with online TV.
We have shown you how to connect your Philips TV to the Internet using both wired and wireless methods. Which option is right for you depends on your capabilities and preferences. But both of them are easy for users of any level. In addition, built-in apps and technologies from Philips make it easy to set up and use your TV.
Do I need to buy a special WI-FI adapter for my Philips TV? It is necessary if the device model of this brand is equipped with the ability to activate Smart TV, but does not have a built-in device for connecting to a wireless network. In fact, the situation when a television receiver has Smart TV technology in the list of additional features, but is not equipped with a built-in Wi-Fi signal converter, occurs quite often.
In this case, you will either have to connect the device to the Internet via a cable, which is not very convenient, or purchase a special adapter that will allow you to connect the TV to a WI-FI network. But first things first.
What is a WI-FI adapter
A WI-FI adapter is a special device that allows you to connect a wireless Internet connection to the device. It acts as an intermediary that receives the signal, converts it, and then transmits it to the device to which it is connected.
In addition to receiving and transmitting a WI-FI signal, such devices can significantly expand the functions of devices, in this case a TV, by activating smart TV capabilities.
The advantages of using removable Wi-Fi converters for television receivers are as follows:
- fast connection;
- no need for additional cable laying;
- high speed signal reception / transmission;
- ease of operation;
- compact dimensions.
The disadvantages include the waste Money for the purchase of additional equipment. Often, devices such as removable USB converters for TVs are quite expensive. And the main inconvenience is that television receivers are not able to recognize the usual universal devices that are used for computers, tablets or laptops. For each device - a representative of the brand of a particular manufacturer, only an adapter of the same brand is suitable and no more. So, for Philips TVs, there are two models of network converters, the characteristics and capabilities of which will be discussed below.
Phillips Wi-Fi Receiver Models
For Phillips television receivers, the manufacturer provides two models of adapters - PTA128/00, PTA01/00. Wi-Fi adapter for Philips TV is installed via the USB port on the side of the device. An important point is that these converters are not suitable for all Phillips TV models. You can get acquainted with the list of device models that are able to recognize and support PTA01 and PTA128 connection on the official website of the manufacturer.
Model PTA128/00 is:
- high connection speed;
- the ability to install a special plug and play program;
- extended range due to dual antenna.
Model PTA01/00 is another representative of converters from Phillips. The model has become widespread among users, although it is more expensive than the previous representative. Using PTA01, the user gets:
- high speed connection;
- data protection with WPA2 encryption;
- plug and play installation.
Among the possibilities of Smart TV with WiFi connection converters include:
- control TV and Smart TV using a tablet, phone or keyboard;
- viewing photos, films;
- audio playback;
- watching programs at a convenient time even after the broadcast;
- a large number of Internet applications.

Connecting and configuring Phillips adapters
The procedure for connecting the PTA128 and PTA01 network receivers and their configuration is quite simple thanks to the clear interface of this brand of television receivers. Consider the sequence of actions when connecting the converter to the device:
- Find the USB connector on the device panel. Most often, this connector is located on the side of the TV case.
- Insert the adapter into the socket. If necessary, you can additionally use a USB cable.
- After the device is connected, the program for installing and configuring the wireless network for the device will start.
- After starting the program, the screen will display step-by-step instruction on the wireless connection setup you need to follow.
- You can use WPS for setup if your router has one.
- If there is no WPS, the WPA password is used, after entering which the device will connect to the network.
Thus, the process of connecting and configuring the network converter is simple and within the power of any user. Before buying this type of Wi-Fi signal receiver, you need to make sure that your TV model is capable of supporting a wireless network connection. Usually you can find such information in the instructions that came with the device. For such devices, a special type of marking on the packaging is also provided. The Wi-Fi Ready label indicates that the device does not have a built-in Wi-Fi signal receiver, but it is possible to connect additional devices to establish a wireless connection.
Any modern TV can be independently connected to both wired and wireless Internet. To connect the TV to a wireless network, you need to stock up on a router and a wireless USB adapter (specially designed for this TV model).
How to connect your Philips TV: basic steps
- You need to make sure the router is turned on. The Internet should be actively "distributed".
- You also need to turn on the TV and connect the Philips USB adapter to the corresponding socket on the TV panel.
- Next, a message will appear on the TV screen asking you to select. If the TV has previously connected to the network, select "No". In this case, the previously selected settings will remain. If the connection is being made for the first time, you need to select "Yes".
- Now you need to make sure that the router supports the WPS protocol.
- If the connection was successful (which will be notified by an information message), then you need to select "OK" and enjoy surfing the network using the TV.
Router settings
How to connect your Philips TV to your home network if your router supports WPS protocol:
- On the screen, select the “WPS” key, then “Connect”, press “OK”.
- The connection itself may take several minutes.
How to connect your Philips TV to your home network if your router does not support WPS:
- You need to select "Scan".
- After searching, the screen may display several active this moment routers (for example, routers of neighbors). Find your name in the list and select it.
- Sometimes you need to enter the password that is set on the router. If the network is not secure, everything will automatically connect.
- Next, select "Enter key" and click "OK". This procedure is carried out once, then the TV automatically uses the saved password.
- Using the remote control, you must enter the appropriate password. Next, select "OK".
- If the key is successfully accepted, select the "Next" button.
- Again, you have to wait, because connecting to the network may take some time.
Connecting the TV to a wired network
If not Wi-Fi distribution, the TV can also be connected to a wired network.
- Wired Internet connects to the TV using a standard network cable or Ethernet cable.
- On the TV remote control, press the button with the "house" icon. This is the entrance to the main menu.
- Next, you need to select an item called "Configurations" or "Setup".
- The next step is to select "Connect to a network" or "Connect to network".
- After that, from the list, you must select the item "Wired connection", i.e. "wired".
- Next, a network search will begin, which may take a certain amount of time.
- If the connection was successful, then click the "OK" button.
You can find even more tips on connecting TVs to the Internet in our article.
Hello! I got a Philips TV, which has a Smart TV system built on Android TV. And in this article, I'll show you how to connect your Philips Android TV to a Wi-Fi network to access the Internet, watch online movies, YouTube videos and watch movies from your computer. There are a lot of opportunities for a TV on Android TV. We will definitely consider everything in separate articles. Well, first, you need to connect the TV to the Internet, and preferably without wires - via Wi-Fi. Without an Internet connection, most of the functions of such a TV are simply not available. You basically bought TVs with Smart TV for what to watch online movies, install some applications and games, have access to different movies and photos that are on your computer, etc.
When I chose a TV, I immediately looked towards LG with Web OS (which we connected to the Internet in the article). But, it so happened that I bought a Philips 43PUS7150/12 (2015 model). Now we will connect it to the Internet. If you have a different model, then it's okay, almost everything is the same there.
Of course, you must have a Wi-Fi network configured. That is, the router that distributes it. Well, the Internet via Wi-Fi should work. And the TV must be within range of your home Wi-Fi network. Also, the TV must have a built-in Wi-Fi receiver. Or, a proprietary, external adapter PTA128/00 is connected.
Connecting Philips (Android TV) to Wi-Fi
If during setup (when first turned on) If you are not connected to the Internet, then this can be done from the Android TV settings themselves. Turn on the TV, and press the button on the remote control with the image of the house.
Scroll to the very bottom of the menu, there will be settings. Select wired and wireless networks.

Choose an item Wired or WiFi, and press the right arrow on the remote control.
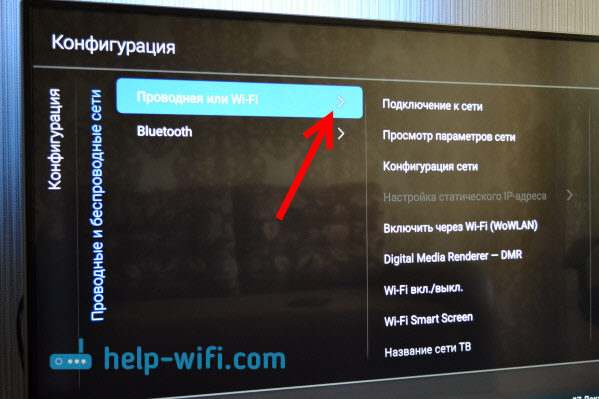
Choose an item Network connection.

Please note that Philips TV can be connected to Wi-Fi without entering a password, but through WPS, or WPS with pin code.
It works like this: select the WPS item, and activate the WPS function on the router with a special button, which is usually located on the device case. The TV will connect to the router. By selecting the WPS item with a pin code, you will need to specify the pin code set on your router. If you have not changed it, then it can be indicated on a sticker on the bottom of the router.

Select a Wi-Fi network to connect to.

Using the keyboard on the screen or on the remote, enter the password to connect to your wireless network, and press the green button (on screen keyboard) to continue.

The TV will connect to the network. Click To complete.

That's all, you can use Android TV. Open in the TV browser:

In the future, the TV will automatically connect to this Wi-Fi network.
If your Philips TV does not connect to Wi-Fi
First of all, try restarting your router. (simply unplug and power on).
Also, be sure to make sure that you enter the correct password to connect to the wireless network. If you forgot your password, you can try. If you enter the password incorrectly, then at first the inscription will "hang" for a very long time Connection...

And then, most likely, the inscription will appear Can't find network.

What else you can try to do: change the password to a new one of 8 digits, reset the router settings, and configure it again. If the TV does not want to connect to a wireless network in any way, then you can try connecting it to another network, if possible.
Advanced wireless network settings
After selecting the wired and wireless network settings in Android system TV, you can also set static data (IP address, DNS) to connect to the network. Just go to the tab Network configuration, and choose Static IP address. And then, on the tab Setting a static IP address set the required parameters.
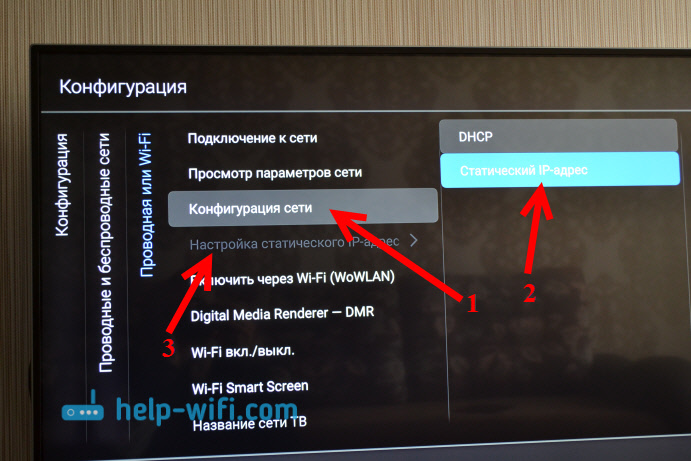
But, it is better not to climb into these settings unnecessarily. If it doesn't connect, then set DHCP back. This is the automatic acquisition of an IP address from the router.
You can also view the parameters of the network to which you are currently connected. To do this, select the tab in the settings View network settings.

Also, you can completely turn off Wi-Fi on the Philips TV, and turn it back on. For this, there is an item WiFi on/off.

Works wireless Internet stable. When you turn on the TV, the network is automatically connected. I think you did the same thing, and everything works.
The Dutch company Philips is one of the most popular TV manufacturers. Consumers quite often give preference to this brand, because its equipment is associated with reliability and durability. Refer to the Philips Smart TV manual for a step-by-step connection procedure. However, few users know how to download programs, update the operating system.
The instructions for the Philips TV cover the main functionality devices. Some owners of such equipment do not fully understand why certain functions are needed, so they do not use them. Now we will carefully analyze the functionality, and also consider how to prepare the TV for viewing.
The Smart TV platform on Philips has long become commonplace. Absolutely all manufacturers are trying to implement "smart" functionality, since users prefer this particular technique. TV from Philips operate under the operating systems webOS and Android, depending on which model is in question. These are multifunctional "OSes" that allow you to use traditional analog broadcast sources, local media servers and streaming television.
Key features of Philips Smart TVs:
- Internet surfing;
- Installation and use of applications, programs, widgets, add-ons;
- Watching video content online;
- Access to Google services and services;
- Communication through communication applications: Skype, WhatsApp, Viber;
- Connecting additional devices via USB, HDMI interfaces;
- Built-in recommendation system (assistant);
- Synchronization with a smartphone, laptop, tablet, PC via Wi-Fi.
In the process of using Philips Smart TV, you will not have any difficulties. The intuitively simple interface of the operating system, combined with the presence of a recommendation system, will help the user quickly figure out how to activate all the functions.
Let's look at a few of the most important functions, which are often used by absolutely all Smart TV owners from Philips. The SimplyShare option is a way to sync your TV and computer, laptop, tablet, smartphone. Connection is via Wi-Fi. Once the devices are paired, you can play video content, play songs, or open any other files stored on the connected device.
What is the likelihood of problems with reading rare formats? This is the main advantage of Philips TVs. Thanks to the implementation of SongBird technology, TV independently searches the Internet and installs the missing codecs. Therefore, problems with the reproduction of content will not arise.
Control is another very interesting feature that deserves special attention. The presence of this option allows you to control the TV from a smartphone, laptop or tablet. This is very useful opportunity especially if the remote control is out of order. You just need to install the application My Remote.
Installing the appropriate application allows you not only to switch the channel, but also to carry out a full TV setup. Install the program on your smartphone My Remote to experience all the benefits.
Owners of a Philips Smart TV will be able to watch not only TV channels, but also movies, shows, series and other content on the web. To do this, you need to use the Net TV function. This is a proprietary browser with which you can access YouTube, Zoomby, Tunin, Vimeo, etc.
Video game fans will appreciate the FunSpot option. Here are collected a variety of flash-games. Users don't have to configure Net TV and FunSpot as they are ready to use by default.
Quite a lot is displayed in the Net TV browser useful information: last news, currency quotes, weather forecast, traffic jams.
USB recording is another simple but very useful feature that absolutely all Smart TV owners use. For example, if you do not have time for the start of the match of your favorite football club, then you can burn it to a USB flash drive or external hard drive, and then watch it from the very beginning. Connect the media to the TV, and then activate the recording option.
Connection order
Each user will be able to connect the Philips TV to the Internet. Of course, you can insert an Ethernet cable into the LAN connector to achieve top speed and stable connection. However, this is not the most practical option. It makes more sense to turn on Wi-Fi to set up a wireless connection to your home network.
How to connect TV to the World Wide Web? To access the Internet, follow a simple step-by-step instruction:
- Make sure your Wi-Fi router is turned on and working properly.
- To quickly connect to the Internet without entering a login and password, open "Network connection settings", select Wifi, and then open the list of available networks.
- Connect to your home network, at this point on the router, press the WPS button to avoid entering a login and password.
- In the menu that appears on the TV screen, select « Easy Access» and then click on "OK".
- If the router does not have a WPS button, then you will have to use the remote control to enter your login and password to connect to your home wireless network.
How to use the Internet on a Philips TV if a cable connection is used? There is nothing complicated about this either. It is enough to act in accordance with this algorithm:
- Plug the Ethernet cable into the TV port labeled LAN.
- On some models, the desired jack is labeled Network.
- The other end of the cable can be connected to the router (yellow port).
- Press the house icon on the TV remote control.
- Go to section "Settings", select "Wired and Wireless Networks".
- Select a connection type. In our case - "Wired".
- Click on the button "Connecting to the network".
- Choosing again "Wired".
- Click on "To complete".
- The TV is connected to the Internet via cable.
When the connection is completed, an agreement will appear on the TV screen, which the user must read and agree to.
User registration in Philips club
To fully enjoy your Philips Smart TV, you need to register with the club. The window for creating a new account appears after connecting the device to the Internet. To register a new account, follow these simple instructions:
- In the proposed menu, you need to select the command "Create Now".
- Fill in the required fields with your personal information and then click on "Create an account".
- Select "Login to My Philips". Enter your club name and access code, then select "Register Product".
- In the search menu, find the TV model you are using.
- Specify the day, month and year of TV purchase, and then click on the button "Registration".
This completes the registration. On the Philips TV absolutely all services will work correctly. Be sure to register with the club to avoid software failures during further operation.
Channel setup
The manufacturer has done everything in its power to simplify the setup process as much as possible. Therefore, even users who have never used Smart TV before should not have any particular difficulties.
Before setting up channels on a Philips Smart TV, experts strongly recommend updating software. Installing the latest firmware version will prevent errors and software failures when using the TV in the future. A little later we will return to this issue and consider how to update the software.
Smart TV is already set up on your Philips TV, which means it's time to start searching for TV channels:
- Take the remote control and press the button with the icon "House".
- Go to section "Configuration".
- Activate the team "Search for channels".
- After that you need to choose "Reinstall channels".
- Select the state in which you live.
- If your country is not in the list, you can choose another.
- Select the signal source, for example, "Cable" or "Satellite".
- The command will appear in the window that opens. "Start Channel Search", select "Settings".
- Manually searching for channels is inconvenient and long, so choose "Auto search".
- Switch to tab "Quick Scan".
If you plan to set up digital TV from a conventional antenna, then you need to move the slider "On" in the appropriate position opposite the column "Digital TV channels". Make sure the antenna is connected to the TV correctly and the coaxial cable is not damaged. When all settings are set, click on the button "Ready". The automatic channel search will start.
On average, the process of automatically searching for TV channels takes no more than 10 minutes.
If you do not plan to connect an antenna or cable TV from the appropriate provider, then immediately after connecting the TV to the Internet, you need to use Net TV to play the content online.
Online Applications
Smart TV on Philips gives you the flexibility to choose different apps. Therefore, the user will be able to download and install all kinds of programs, ranging from browsers to social networking applications. The TV is fully customizable to the user's preferences.
Users are available best apps, opening access to watching new movies, TV series and music videos. There is the possibility of installing software on TV for communication with other users. We are talking about Skype, Viber, WhatsApp. Separately, it is worth noting useful news widgets, weather forecasts, exchange rates, etc.
You can also download Odnoklassniki, Vkontakte, Facebook and other applications to enjoy all the benefits of social networks on the big screen. How to install Zoomby or any other application? To do this, follow a simple step-by-step instruction:
- Select from the main menu "App Store".
- Enter the name of the program you want to download in the search bar.
- Install the app on your TV.
- Ready. You can use the program at any time.
What are the most popular applications used on Smart TV TV? To answer this question, let's look at a few specific examples. Many users download and install the program Stream Interactive. This software is designed to watch movies, TV shows and other video content online. To get quick access to Yandex services, many install the application of the same name on their TV.
Applications "VideoMore" and "Ivi" will be useful. Their library contains a huge number of music videos, films, series, as well as children's cartoons.
Software update instructions
How to update the software on the TV? It should be noted that there are two ways to install the update package - via the Internet or from external media. Let's consider both options. To install the latest firmware via the Internet, you need to follow a simple instruction:
- Open Smart TV and go to the section "Settings".
- Use the team "Update Software".
- Select "Search for Updates".
- Choose as a source "Internet".
- When updates are found, click on
- After the download is complete operating system will prompt you to start the update, click "OK".
- When the software is updated, the TV will automatically reboot to optimize workflows.
All program changes are automatically accepted. Additional user intervention in this process is not required. The main thing is not to turn off the TV during the installation of updates. Therefore, if you use a timer for automatic shutdown or sleep mode, then deactivate these options before installing a new firmware version. In the menu, you can configure the automatic installation of updates.
Instructions for installing updates for Philips TV from a USB drive:
- Format your flash drive or external drive to FAT32. To do this, insert the drive into the USB port of your computer or laptop, and then right-click on it. In the context menu, select "Format" and install the system.
- Make sure there is enough free space on the media. Updates for Android TVs can be up to 1 GB in size.
- Open a web browser, go to Philips official website. Enter your TV model name in the search bar. Go to the support panel for your device.
- Choose a section "Software Update". A list of firmware for your TV and version numbers will appear.
- Determine which TV firmware you have currently installed. Update the software if a new version is available. Click on the file and then accept the terms of the license agreement. Save the firmware on a PC or laptop.
- Unzip the update package to a USB stick. Right-click on the downloaded archive, and then select "Extract to" and provide the appropriate path.
- Turn on the TV and insert a USB flash drive, external hard drive into the USB connector. Go to the menu and select "Search for Updates". Specify a USB drive as the source.
- Wait approximately 5-10 minutes until the update installation is complete. All applications will automatically close and the screen will turn off.
The corresponding scale will report on the progress of the installation. The duration of the update installation depends on the size of the firmware file. When the updates are installed, the TV will reboot. Then the Philips logo will appear. The device can be used.
Note.


For beginners: breeding a broiler at home Boiled water for broilers
Only lovers will survive
Features of advertising aimed at children
retouching old photos in photoshop retouching old photos
What is an NPO: decoding, definition of goals, types of activities Does a non-profit organization have the right