If you broke a vase or plate that is dear to your heart, then solving the problem will be quite simple. Modern universal adhesives practically do not leave a visible seam. In addition, using special putties, you can repair cracks and chips on the dishes and thus extend their life.
And we are talking not only about faience, good ceramics are just as well glued.
For work, we use epoxy glue, or super glue. The same Super-Moment glue will do.
Just pay attention to two things:
Glue fixing time, five minutes may not be enough, it is better to select epoxy glue, with a setting time of 10 minutes.
The color of the glue, in most cases they prefer colorless, but for the repair of painted ceramics, it makes sense to select a shade according to the pattern.
First you need to prepare the surfaces to be glued. If the dishes are cracked along the old gluing, then you must carefully remove the old glue, otherwise nothing will work.
We take a stick with cotton wool at the end, moisten the cotton wool with a solvent or nail polish remover and clean the chips.
We wash the fragments with a dishwashing detergent, rinse well and leave to dry completely.
We disassemble in advance where which fragment fits and lay out the parts in front of us.
You need to work quickly, when gluing you will not have time to pick up parts.
With a thin brush, stick or toothpick, apply glue to the edge of one of the fragments.
The adhesive must be applied in a thin layer and evenly, without gaps.
We connect the parts, trying to exactly match the chip and squeeze, while excess glue should squeeze out. It is necessary to hold the product until the glue sets.

Sometimes there are several fragments and it is impossible to hold them with your hands. In such cases, the fragments are fixed with the help of ornamental clay, plasticine, or at least adhesive tape.
When repairing ceramics with sharp edges, wear gloves to protect you from cuts and abrasions. Use tweezers to glue small fragments.
If the seam is still visible on expensive dishes, then, if necessary, use dyes for ceramics of the desired shades and liquid glass.

After the glue dries, the excess that comes out is carefully cut off with a thin blade.
All adhesives contain substances harmful to health. Especially quickly they begin to stand out if you put sour or salty food in the dishes.
That's why general rule, use repaired ceramics only for inert products at room temperature.
(Visited 183 times, 1 visits today)
Unbelievable, but it is a fact. Cottage cheese and ammonia.
In short, this marvelous mixture firmly stuck together the broken part of the lid of my Emile Henry tagine.
If you dance from the stove itself, with feeling, with sense, with arrangement - I ask for a cut, but the story is long.
Quite a long time ago I bought ceramic and tajines from Emile Henry. The saucepan is used successfully, it is stewed in its own juice, perfectly, even on glass ceramics, although it would be more convenient on gas. But the tagine was unlucky. At first, the whole box was unlucky:
But the insides were not damaged. The orange baking dish was laid out just like that. But, thu-thu-thu, it passed.

Here are the boxes and catalogue: 
The tagine turned out to be very unsuccessfully packaged, it practically stood on the pimpka of the lid without a backing with pimples - the usual store packaging, not reinforced by anything. This pimpochka and tuknulo. Therefore, if you buy online, it makes sense to ask for additional packaging of the cover.


And then my suffering began. On the one hand, this did not affect the properties of the lid. On the other hand, aesthetics suffered, ugly, in short. It would be necessary to glue it, but with what: Adhesives that can take ceramics are chemical, the lid heats up, so that these adhesives will be released into the air - it’s better not to sniff. You need heat-resistant and non-hazardous glue, does this happen? If it is also moisture resistant, then everything is in chocolate. Something unreal. But we don't just give up! I googled a strange recipe for glue from cottage cheese and ammonia, which can perfectly glue porcelain ... Well, I still need ammonia, cottage cheese is constantly found in the house, why not try it on ceramics? It won't get any worse. I bought fat-free cottage cheese, fat is useless there. And in ammonia, it turns out, there is no alcohol, one name, but I didn’t know :)
I mixed this mixture. The stink is incredible! Ammonium chloride! Interfered at the window. But still, the brains invigorated very much.

In the process, she dropped a fragment on the floor, and received two fragments already. Was upset. Two will definitely not fit. But the pieces somehow stood up, and even froze. It is no longer possible to put it inconspicuously due to small chips along the edges, and an additional amount of gluing, but nothing can be done.

She put the fragments in place and sat for a long time, pressing them with her hands. It could have been wrapped in something. Today, crossing herself, I tried to lift the lid (and it weighs about 1 kg) by the fragment part. Didn't fall off! Raised the lid. Hold on! I don’t know how it is when heated in the oven, and how it will withstand water (hardly, of course), but the very fact of successful gluing is obvious!
So far I have only tried to cook on the stove - I used the design as a steam bath for an omelette in a cup. The lid was hot and nothing fell off. As I cook something in the oven and wash the lid, I will add the results of the experiment.
But to be honest, I'm shocked. Cottage cheese and ammonia!
Well, to the heap. This is what the bottom of the tank looks like.

The tagine is 32 cm wide. Now you can look at it almost without tears. A fool won't notice, a smart one won't tell :))

Emile Henri's strange pottery. Some kind of porous, liquidish, on a chip like sand. And the dishes are expensive. So I shattered a Konakovo faience bowl for 10 rubles. - that's faience! White, dense. I already beat her, beat her about everything, broke it only after 8 years. True, faience is a bit different.
Bought on the site Culinarus.eu. The site is in 9 languages, but there is no Russian. Sent by regular mail or EMC - as the card falls. The more expensive the purchase, the cheaper the shipping. I don’t remember exactly, but it seems to be about 35 euros by default to Russia, regardless of weight. I bought recently for 420 euros, delivery - 18 euros. They broke it into two parcels of 12 kg each - in total, I paid 18 euros for the delivery of 24 kg! The dishes are heavy, huh. This time I asked for better packaging, but we'll see... If you register, the prices are shown without VAT, you can create Wish lists. They answer letters. But they do not collect the parcel quickly, they can poke around for a week. Tracking is sent by yourself, do not be afraid that the DHL website is still regular mail or EMC.
Every home has a product made of ceramics or porcelain. How often does it happen that dishes break. It can be a crystal glass, a porcelain cup, a ceramic plate, or an ordinary ceramic figurine. And, despite the fact that ceramic dishes are strong, they still beat. If expensive dishes were broken, then after repair, the bonding points should be treated with special dyes, or some experts advise using liquid glass. After drying, carefully cut off the remains, so as not to hurt the part where the repair was made.
The better to glue ceramics and porcelain
I want to extend the life of ceramics. It is not only used for its intended purpose, but also decorates the interior with its originality and originality. It is difficult to say which is better ceramics or porcelain in terms of quality and durability, it all depends on various factors.
How to glue porcelain and ceramics? What glue for porcelain and ceramics to choose? Or maybe throw away a broken product? Throw away a broken vase or not? If not, how to glue a ceramic vase?
Don't rush to throw it away. You can always throw it away. First you need to try to glue the product, and if nothing happens, then you can throw it away. Throwing away is the last thing left to do.
How to glue ceramics
Various adhesives are used to repair ceramics. On the market they offer a huge variety of tools for repairing ceramic dishes.
Cyanocryalate-based universal super glue is the optimal adhesive for ceramics, which can be easily found in any specialty store.
The following adhesives are available for sale Russian production for the repair of ceramic dishes - "Second", "Super-moment" "Cyanopan", "Glue", "Strength", "Monolith", "Elephant". There are also imported adhesives for gluing. The best waterproof adhesive for ceramics is MARS.

For ceramics that are used to store food, PVA glue can be used for gluing. But, it is recommended that after gluing the ceramic cup be covered with a layer of varnish. Epoxy glue, adhesives F-2 and BF-4 can be used for gluing ceramic products.
How to glue porcelain
The following range of porcelain adhesives is offered for sale - STANGE, "cosmofen ca-12", you can also use RAPID. Among Russian-made adhesives, carbinol adhesive should be noted. Also, instead of glue for porcelain repair, you can use epoxy resin EPOXY GLUE produced by BONDO, BIZON or similar glues.

For gluing porcelain, you can use cement made on the basis of gypsum. To do this, add the protein of 1 egg to the gypsum powder and mix very well. The resulting glue can be used to glue porcelain. Moreover, the gluing procedure should be carried out very quickly, because this glue hardens quickly.
For gluing, you can make other glue at home. To do this, mix 1 protein and soda. Beat belov into foam, without adding soda. For one day, the whipped protein should settle, and only then add soda to the settled protein and mix. Soda should be added so much that a mass would be obtained in consistency similar to a regular dough.
For this you should:
- Take 1 liter of water. Add to water 100 gr. Sugar, 100 gr. lime (necessarily slaked). Put the resulting mixture on fire and believe on low heat for about 3-3.5 hours. The main thing when "cooking" is that it does not boil.
- Cool the resulting broth and let stand for a few more hours.
- The water that remains after settling must be drained.
- Add 0.5 kg to the mixture. tile adhesive. Mix well and leave again for 10-15 hours to settle.
- If there is excess water, then it must be drained. Boil the resulting mass 1 more time.
- Cool down. Porcelain glue is ready.
This glue for food utensils is perfect.
Universal adhesives for both materials
There are a huge number of universal adhesives. These are adhesives that can be used to glue both porcelain and ceramics - casein glue, epoxy glues. The most popular is Porcelan Potch glue. Food grade glue is very often suitable for gluing both ceramics and porcelain. For example, the recipe described above can be used as an adhesive for ceramics and porcelain.

How to glue porcelain
Gluing porcelain at home with glue is quite simple; for this, you can use food-grade porcelain glue. If you use one of the following adhesives for gluing - "Rapid", "AGO", "Kittyfix" and "Mekol", then you should perform the following steps:
- Surfaces to be bonded should be washed and dried;
- Wipe with acetone;
- Apply glue to the gluing points in one layer and immediately glue the parts, pressing firmly.
- It can be fastened with a tourniquet for strength.

Cups break very often. And I want to give a second life to my favorite cup. The following shows how to glue a porcelain cup. Since the gluing algorithm is similar to the previous algorithm, but there are some differences:
- For gluing, the masters advise taking super glue.
- Prepare surfaces for bonding - wash, dry and wipe with acetone. If the part is broken in the same place, remove the remaining glue.
- Gather details ahead of time.
- The glue application process is the same. Glued in two layers.
- Then the glued product should be placed if they are not large, they should be placed in a saucepan or cauldron, pour warm water and put on fire. Boil water on low heat for 2-3 hours. The product is placed to cool in water. And only then, when the water has cooled, they extract it.
- If it is not possible to “boil the product”, then it can be “warmed up” in the oven, or held over an electric stove (but in this case, the “warming up” procedure must be performed very carefully so as not to overheat the product and not burn yourself).
It may happen that a crack has formed in a vase or a cup, or a fragment has flown off, and a small hole has broken off.
Then the gluing algorithm is as follows:
- Preparation for gluing is the same.
- First you need to cut out a patch, the size of which should be 0.5 - 1.5 cm larger. You can take super-glue for ceramics, natural glue for gluing the patch is also suitable.
- Be sure to take waterproof for repairs.
- Pour water into the product, but start the patch, but so that the water does not come into contact with the patch.
- Then boil water for 2-3 hours.
- Cool everything down. And pour out the water.
- If necessary, treat the bonding area with paint.
Porcelain figurines are repaired in the same way. But after the figurine has dried, it is recommended to cover it with several layers of varnish for greater durability. Each next layer of varnish can be applied only when the previous layer of varnish has already dried well. After varnishing, the figurine will be a little heavier and not be as fragile.
How to glue ceramics

Gluing ceramics at home is quite simple. You just need to follow the following rules:
- We start by assembling all the parts that need to be glued together. If you need to glue a previously repaired cup or vase, then remove the remaining glue with a knife. And when everything is removed from the surface, you can proceed to the next step.
- Wash all assembled parts thoroughly in warm water. For washing, you can use dishwashing detergent. Then rinse and put to drain. Wiping is not recommended, so as not to cut yourself with sharp edges or break something from the edges of the part.
- We hide all the details before gluing, in order to know in advance what to glue where.
- We process the places of gluing with acetone.
- Apply a thin layer of adhesive evenly to the gluing points. To apply the glue, you can use either a thin brush or an ear cleaning stick.
- Leave the first coat of glue to dry.
- Then apply a second layer of glue. And press the parts that need to be glued. Let's keep the details for a few minutes. Then wipe off the residue with a rag.
- It is advisable to glue another part after a while so that the previous parts stick well.
- After the product is glued, it is desirable to fix it. And in this way everything will grab not only correctly, but also well.
- A part is well considered repaired if it has stood for 1-3 days (depending on the repair performed).
Since broken parts are still glass, it is recommended to wear rubber gloves when repairing in order to protect your hands from minor cuts and wounds in advance.
When gluing, if necessary, you can and should use tweezers, for example, to work with small parts.
Repair of porcelain and ceramics is very easy to perform according to the algorithm described above.
Do not forget that all repaired products are no longer desirable to use for food. Because, if, by placing sour or salty food in such a product, they begin to stand out harmful substances contained in the adhesive. And this is very unhealthy.
As a result, you know how to glue ceramics, how to glue ceramic dishes and how to glue porcelain. Which glue to choose or make your own glue.
Of all the gifts of the world, only a good name remains, and unfortunate is he who does not leave even this
Ya crooked fool - she dropped the lid from her clay teapot and it split into 2 pieces. I wondered if it could be glued together (so that it could be used for its intended purpose), or goodbye, beloved teapot?

Found this:
How to glue pottery
How to glue broken pottery? Take quicklime, grind it finely and mix with cottage cheese to make a thick and viscous mass. After smearing the edges of the broken dishes with this mass, fold them, let them stand for a while so that the mass is completely dry.
Cement for porcelain and faience
For this purpose, we recommend the following composition. Take 125 g fresh, good quality cottage cheese and washed with water, squeezing strongly until the flowing water becomes light. Then the cottage cheese, washed in this way and well squeezed, is placed in a porcelain mortar, whites from 3 eggs and juice squeezed from 7-8 heads of garlic are added there. All this is well ground in a mortar, after which a little finely crushed burnt lime is mixed in until the whole mixture turns into a steep solid mass. In this form, the resulting composition is ready for use and stored in a well-corked jar with a wide mouth. To glue some broken porcelain or faience object with it, a small amount of it is slightly moistened with water, evenly covers the fracture surfaces with it and, quickly fastening the broken parts, allow the composition to dry completely in the dark. According to testimonies, objects made of porcelain or earthenware glued with this composition withstand fire and boiling water well.
How to glue porcelain?
Extended answer:
To glue broken porcelain, you can use the following composition of homemade glue: 1 part crushed glass, 2 parts sifted river sand and 6 parts silicate glue (liquid glass). This adhesive is very strong, but the bonding point is very noticeable. To avoid visibility, you can use a different composition of the glue: 1 part of quicklime, 10 parts of chalk and 2.5 parts of liquid glass. This glue must be prepared in advance, because after mixing it hardens very quickly. A pre-prepared glue consisting of 1 part of turpentine and 2 parts of shellac (by weight) may come in handy. It is necessary to melt over low heat, for example, 50 g of turpentine and 100 g of light shellac, cool the resulting mixture and divide into small pieces. The glue in a frozen form can be stored for a long time, and to use it, you just need to warm up a piece, apply a thin layer of glue on the surfaces to be glued and squeeze it firmly. Remove any excess that comes out at the seam immediately. Glue on plaster allows you to glue broken porcelain products well. To prepare it, you need to put the burnt sculptural or medical gypsum into a saturated solution of ordinary alum and keep it for 24 hours. Then dry it, ignite it again and grind it. For gluing, dilute the powder with water to the consistency of thick sour cream.
How to glue broken ceramics?
Extended answer:
Glue for ceramics is usually made in one of the following ways: 1) casein is dissolved in liquid glass or silicate glue; 2) knead gypsum on egg white; 3) gypsum is soaked for a day in a saturated solution of aluminum alum, dried, washed out and kneaded in water; 4) dry chalk is ground to a very fine state, almost tooth powder, then dissolved in liquid glass in a ratio by weight of 1:4. The third option seems to be the best for bonding ceramics. Usually the glue hardens in 2-3 hours. When preparing glue, you need to remember that all formulations must have the consistency of sour cream. Ceramic and faience objects after gluing should preferably be heated in the oven to a temperature not exceeding 100°C.
How can you glue porcelain dishes?
The first thing I would like to point out not it is worth gluing porcelain products with cyanide-based chemical adhesives. It's poison! And if you glue a cup or saucer with such glue, then in no case will you be able to use this product! Cyanide will actively destroy your body. It is better to throw away the porcelain product than to glue it with glue like "Moment", "Elephant" ...
H can it be glued? Glue can be prepared by yourself and we need alabaster (gypsum) and an egg, or rather, only the protein from the egg. So, pour the protein into the dishes, add a little gypsum so much that we get a thick mixture. Attention: the mixture (glue) will harden very quickly, so it is not prepared in advance. We stir the alabaster in the protein, apply this mass to the places of the chips and connect the halves of the broken dishes tightly.
Let the homemade glue dry and glue the broken parts. That is, you should not touch the dishes and try for strength for two to three hours. We wipe the glued dishes, wash them and put them on the shelf. Cracks will not be visible.
How to glue porcelain
Every housewife has broken a porcelain cup or plate at least once. Of course, broken dishes are best thrown away and not used again. However, items that are very dear to you, of particular value, you can try to glue.
To glue porcelain, prepare gypsum-based cement. Add egg white to the gypsum powder, mix thoroughly, apply to the chip and quickly connect the broken parts (such cement hardens very quickly).
Porcelain is well glued with a composition of egg whites and baking soda. Whip the egg whites into a thick foam and put in a cool place for a day. Then separate the settled protein and carefully rub it with soda, adding it to the consistency of the dough. Apply the mixture in a thin layer on the chip, connect the broken parts.
A good glue for porcelain can be prepared on the basis of gelatin. Mix a 25% solution of gelatin with vinegar essence in a ratio of 1: 1, apply on a chip, connect the broken parts.
I suggest a little distraction and make a light master class. Let's create a decorative item for your home or garden. In addition to decoration, you will have to glue a broken flower pot. Not everyone knows how to do this, but there is a special glue for ceramic dishes.
Prepare the necessary materials:
1. A broken pot that needs to be glued together;
2. Adhesive for ceramics;
3. a rope for hanging a flower in a pot;
4. Wooden balls for decoration.
This is what my content looks like.

In addition to everything you need to prepare auxiliary things:
Rubber gloves so as not to get dirty;
- Wooden sticks to smear glue;
- Gold glitter to decorate the breakpoint.

From the very beginning we will glue the broken vessel. Mix glue and gold glitter. We do it carefully, and most importantly quickly.

We spread glue over the entire surface of the fault, and on top, with the help of a stick, we apply an additional golden sheen. Thus, on the contrary, we will highlight the crack and give it an elegant look.

We also smear gold ointment on top of the crack.

Prepare the rope, it will need to be woven and we will hang the pot on it.

Take wooden balls, thread two ends of the rope through the hole, leaving a small loop.

We pass three balls for beauty.

We tie the edges of the rope so that it turns out into which we put it, and then we hang it glued with a flower.

Here we have such an unusual leisure. When there is nothing to do, fix broken things and come up with new crafts.


Washing with warm soapy water 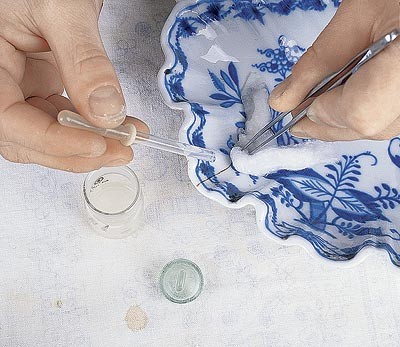 Whitening a crack with a compress
  Warming up with boiling water and dismantling the old gluing
 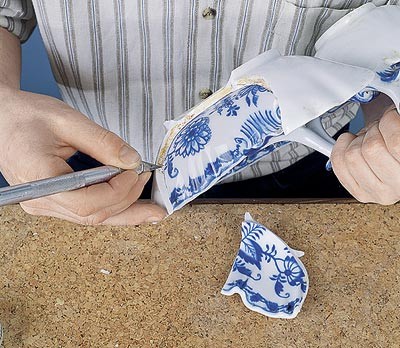 Removing traces of previous gluing
 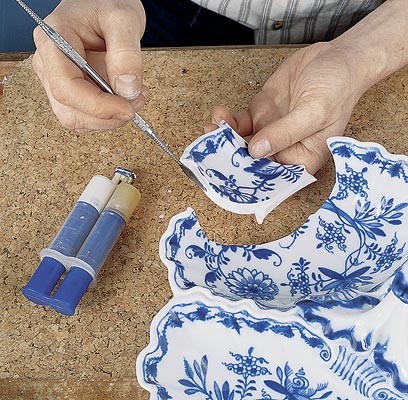 Applying glue to the surface of the chip
  Fixing the glued fragment
 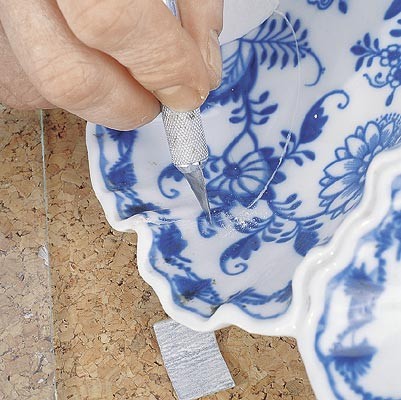 Removing exposed adhesive
  Waxing for mold making
  Removal of the finished, frozen wax mold
  Filling the mold with porcelain-like mass
  Sanding the cast piece with sandpaper
  Restored tinting
wrought product 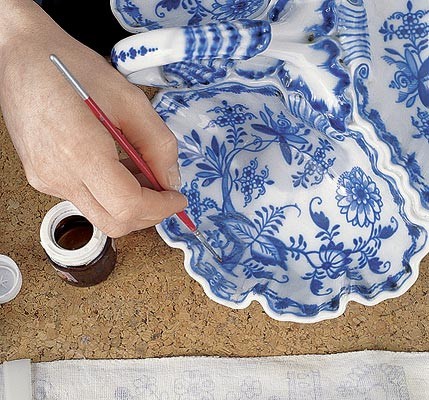 Preservation of new fragments with varnish
  Mastication of small chips along the edges
  Sanding a fragment with a needle file
"... The fragments lay on the floor illuminated by the setting sun, it seemed that a playful breeze scattered them at a distance from each other, and I did not want to believe that what was my mother's favorite cup last night, even this morning, turned into blue porcelain petals. .." - who does not remember the sad story about the blue cup, told by Arkady Gaidar. The feeling of a hopeless, irreparable loss mingled in my memory with a childish fear of broken dishes. This story, of course, would have ended quite differently if it happened today and if its heroes had the latest issue of our magazine.
Mom's favorite blue cup would no doubt be restored, so much so that mom would hardly notice anything special. Dishes break at all times - their fragments are either hastily thrown away or clumsily glued together with BF glue.
Now we will talk about the restoration of porcelain according to all its classical rules.
First of all, let's preempt restoration extremists - if you are a happy owner of Meissen or Gardner porcelain, moderate your restorative ardor and reassure yourself that you really have a museum exhibit at your disposal, which can only be entrusted to a highly qualified specialist.
Our advice applies specifically to " blue cups", i.e. To those vases, figurines, teapots and cups dear to the heart and memory, which, nevertheless, have no museum and collection value. Our teacher in such a responsible matter as the restoration of porcelain was Sergey Bobrov, the most famous Moscow restorer. Mine professional experience he received while working at the All-Russian Art Research and Restoration Center. I. Grabar and the museum-estate of Tsaritsyno.
Relating to a narrow, select circle of elite restorers in Russia, the master has a high professional reputation among colleagues, collectors and antique dealers. His works adorn private and state museum collections, they were also presented at the largest exhibition "250 Years of Russian Porcelain" in the State Tretyakov Gallery.
The restorer's workplace should have natural daylight, which is especially important when tinting and reconstructing porcelain. It would be nice to protect the table with cork or any other elastic coating, which, in the event of an object falling, will weaken the blow. You should pay attention to the fact that all the actions that you perform, and their consequences, must be correctable, that is, what professionals call the reversibility of the process. In no case, even with the best of intentions, you can not drill, grind, scratch the original.
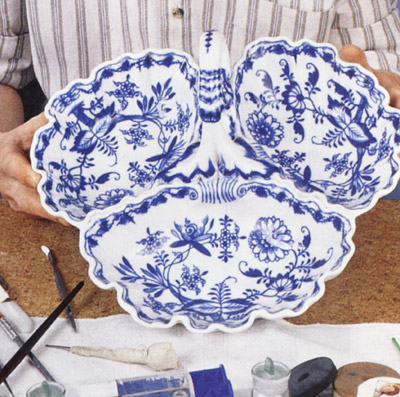
Let us consider the restoration process in detail using the example of the restoration of a broken porcelain cabinet. First of all, the object is carefully examined; cracks, chips, places of old gluing come to light. Then, depending on the nature and extent of damage, a restoration plan is determined, i.e. the order and priority restoration work. If the product is broken, you need to try to combine its pieces without gluing, find out the possibility of their coincidence, identifying the most difficult places.
Next, you need to wash the product in hot (50-600 water), using any soap with a low alkali content, this can be, for example, ordinary baby soap. Dishwashing detergents, soda are not suitable for this, as they can contribute to the leaching or peeling of the glaze. Washing should be quite gentle - instead of a brush, it is better to use a bristle brush or shaving brush. To remove contaminants in cracks, a compress is used - in this case it is a cotton cord moistened with a 10% solution of citric acid or a 3% solution of hydrogen peroxide - applied to a darkened crack. The compress is aged until it is completely whitened. To prevent the solution from evaporating too quickly, the compress should be covered with cellophane or placed in plastic bag all product. If the product has been glued before, it must be dismantled after washing.
With a stream of boiling water directed at the place of the previous gluing, heat up the seam. After sufficient warming up, without applying great mechanical effort, try to separate the glued fragment. If this does not bring success, pour boiling water over the product and leave for a while. You can do this several times until the fragments easily separate from each other. Dismantling is carried out over a plastic basin with water, so that in case of an accidental fall, the product or its fragment does not break.
The fragments obtained after dismantling must be cleaned of old glue with a scalpel or a sharp knife. The glue heated with boiling water softens and should easily separate from the chips. If the adhesive is difficult to remove, you can use acetone or alcohol. To avoid damage to the glaze, it is best not to use numbered thinners, thinners, or strong acids. When the old glue is completely removed, stack the cleaned fragments to determine the order of the new gluing - small fragments are glued together first.
After degreasing the surfaces of the chips with alcohol or acetone, carefully coat the chip of a smaller fragment with glue.
The adhesive can be EPOXY GLUE, a two-component epoxy resin from BONDO, BIZON, or similar, in the worst case, a commonly available superglue can be used, the disadvantage of which is too fast "setting".
For a more accurate match of the fracture relief, the adhesive should be applied in a uniform, extremely thin layer. When the fragments are smeared with glue and tightly pressed against each other, fix the place of gluing with adhesive tape, plasticine, adhesive tape. In any case, even if it seems that the product is firmly glued, it should be left for a day to dry completely, since the "seizure" and complete polymerization of the glue are not the same thing. After you make sure that the gluing is completed, the fragments are held firmly, remove the glue that has come out along the seam with sliding movements of the scalpel.
If the fragments of the product are irretrievably lost, they can be made by yourself, but only if the thing is symmetrical or is a figure of rotation. Then, with a part similar to the lost fragment, first remove the mold with the help of base wax produced by the Kharkov plant dental materials"STOMA" in the form of plates 170
The plate heated in hot (50-60 water) is applied to the preserved surface and pressed tightly. The plate should be larger than the fragment being restored, and go beyond its edges by about 10 mm. Carefully remove the cooled, hardened wax form and apply to the lost area. Now, first fixing it around the edges with plasticine, proceed to casting the desired fragment.
Remove grease from the chipped surface, prepare a mass that consists of epoxy resin (binder) and dry white titanium or zinc pigment. Rub them until a porcelain-like viscous mass is formed. When pouring the form, you must first try to cover the entire surface of the form with this mass, and then gradually increase its thickness, accelerating from the center to the edges. It should be noted that pigments containing lime (for example, chalk) are not suitable for the preparation of a mass imitating porcelain. When the lost fragment is completely restored, process it with sandpaper, gradually moving from coarse grain to "zero". Sand the surface, taking care that the abrasive does not touch the edges of the original product. Now that the surface of the fragment is almost the same as the original, let's start toning the background.
For tinting, use acrylic white, clarifying the shades of white by adding watercolors. When choosing a shade, one should keep in mind the further preservation of the product with varnish, so the color should be half a tone lighter than the original. Ornaments or drawings on the lost fragments are also reproduced in watercolor and whitewash, since pure watercolor is too bright. At this stage of restoration, patience and good daylight are the main helpers, because the accuracy of color matching determines the quality of the restoration. It is not recommended to use oil paints for tinting, which can change color in the future. The process is completed by conservation, i.e. coating with dammar or acrylic lacquer from MAIMERI or similar, in one or more layers so that the gloss character of the coating completely coincides with the gloss of the original.
If small chips are found during inspection of the product, it is necessary to carry out mastic, i.e. filling their volumes with an epoxy mass imitating porcelain, the recipe for which you learned above. In the same sequence, carry out grinding, tinting and preservation. Now the restored product can again decorate a sideboard, a slide or a home showcase. However, drinking tea from your mother's cup is still not worth it, now it belongs to family history. Food use for restored dishes is excluded - this can negate all your efforts and adversely affect your health.
| If, turning the product over, you see such signs on its bottom, be sure that you are really holding porcelain in your hands. | ||||
|---|---|---|---|---|
 Vienna, Austria) Vienna, Austria) |
 Maison (Germany) Maison (Germany) |
 Imperial Porcelain Factory Imperial Porcelain Factory |
 Gardner (Russia) Gardner (Russia) |
 Royal Manufactory (France) Royal Manufactory (France) |
 Kuznetsov's plant (Russia) Kuznetsov's plant (Russia) |
||||

Food, water, heat and light are the main components of the life of any novice downshifter. Moreover, it is desirable that the food be simple, but tasty and healthy, cooked in a suitable dish. I will not mention different steel branded products, because I have so far settled on the simplest option - clay products. I decided that it was cheap and cheerful for a poor beginner downshifter :)
That's why... At the Chernihiv market, I bought a pot and makitra at the beginning of winter - each product with a capacity of 3 liters cost 20 UAH. I also bought a lid for each one - 5 UAH / piece. I will add that the products are made in Oleshnya, a very famous pottery village in the Chernihiv region. And going to New Year in my hut, I carried out specific tests with a pot and makitra.
Everything went perfectly. Borscht, porridge, soup cooked in my oven in them by 20.00 remained hot for 14 (!) hours. Taste is amazing. Therefore, let all modern multicookers rest for now. What is interesting: clay lids do not heat up in the oven - they could be removed with bare hands. This was my discovery! The seller warned me to cook food in fully filled containers - otherwise they might crack. Which is what I did right. Nothing cracked. Dishes worked great!
In the near future I am going to visit this merchant again, ask him who makes these products, buy new ones, find out more information. And in warm weather, if it develops, be sure to go there. For supporters of tasty and healthy food, I found several useful tips about clay products. I share, I'm not greedy :).
* Clay products last longer if they are placed in cold water for several hours before use, and then rinsed in hot water. Even better, earthenware, filled to the brim with cold water, put on fire and after heating, slowly cool. Fragile glaze is thus strengthened.
* Earthenware can be given a high degree strength in the following way. A clay pot or other utensil with a brush is smeared several times with non-toxic glue. After the last layer has dried, they are also smeared with vegetable oil in the same way. If there are cracks or seams on the dishes, then to prevent leakage, these places should be smeared with a “dough” of crushed sifted bricks, ordinary clay with paint varnish.
* Pour a crack in pottery in a simple way. Several lumps of sugar are melted into syrup, then poured into a cracked dish, heated over a fire. Flowing into all the cracks, the syrup gradually dries up, darkens, forming a mass as solid as the vessel itself. A vessel filled with such a mass is suitable for use for a long time.
* Glazed earthenware has a certain value and beauty. It is used both for interior decoration and for household purposes in the kitchen. Before use, glazed dishes should be boiled for half an hour in water, adding 1 glass of vinegar and 2 tablespoons of salt to it.
* earthenware should always be kept open. Covered with a lid, it acquires an unpleasant smell. Remove it by repeated rinsing with cold water.
Every home has a product made of ceramics or porcelain. How often does it happen that dishes break. It can be a crystal glass, a porcelain cup, a ceramic plate, or an ordinary ceramic figurine. And, despite the fact that ceramic dishes are strong, they still beat. If expensive dishes were broken, then after repair, the bonding points should be treated with special dyes, or some experts advise using liquid glass. After drying, carefully cut off the remains, so as not to hurt the part where the repair was made.
The better to glue ceramics and porcelain
I want to extend the life of ceramics. It is not only used for its intended purpose, but also decorates the interior with its originality and originality. It is difficult to say which is better ceramics or porcelain in terms of quality and durability, it all depends on various factors.
How to glue porcelain and ceramics? What glue for porcelain and ceramics to choose? Or maybe throw away a broken product? Throw away a broken vase or not? If not, how to glue a ceramic vase?
Don't rush to throw it away. You can always throw it away. First you need to try to glue the product, and if nothing happens, then you can throw it away. Throwing away is the last thing left to do.
How to glue ceramics
Various adhesives are used to repair ceramics. On the market they offer a huge variety of tools for repairing ceramic dishes.
Cyanocryalate-based universal super glue is the optimal adhesive for ceramics, which can be easily found in any specialty store.
The following Russian-made adhesives for the repair of ceramic dishes are on sale - Sekunda, Super Moment, Cyanopan, Glue, Strength, Monolith, Elephant. There are also imported adhesives for gluing. The best waterproof adhesive for ceramics is MARS.
For ceramics that are used to store food, PVA glue can be used for gluing. But, it is recommended that after gluing the ceramic cup be covered with a layer of varnish. Epoxy glue, adhesives F-2 and BF-4 can be used for gluing ceramic products.
How to glue porcelain
The following range of porcelain adhesives is offered for sale - STANGE, "cosmofen ca-12", you can also use RAPID. Among Russian-made adhesives, carbinol adhesive should be noted. Also, instead of glue for porcelain repair, you can use epoxy resin EPOXY GLUE produced by BONDO, BIZON or similar glues.

For gluing porcelain, you can use cement made on the basis of gypsum. To do this, add the protein of 1 egg to the gypsum powder and mix very well. The resulting glue can be used to glue porcelain. Moreover, the gluing procedure should be carried out very quickly, because this glue hardens quickly.
For gluing, you can make other glue at home. To do this, mix 1 protein and soda. Beat belov into foam, without adding soda. For one day, the whipped protein should settle, and only then add soda to the settled protein and mix. Soda should be added so much that a mass would be obtained in consistency similar to a regular dough.
For this you should:
- Take 1 liter of water. Add to water 100 gr. Sugar, 100 gr. lime (necessarily slaked). Put the resulting mixture on fire and believe on low heat for about 3-3.5 hours. The main thing when "cooking" is that it does not boil.
- Cool the resulting broth and let stand for a few more hours.
- The water that remains after settling must be drained.
- Add 0.5 kg to the mixture. tile adhesive. Mix well and leave again for 10-15 hours to settle.
- If there is excess water, then it must be drained. Boil the resulting mass 1 more time.
- Cool down. Porcelain glue is ready.
This glue for food utensils is perfect.
Universal adhesives for both materials
There are a huge number of universal adhesives. These are adhesives that can be used to glue both porcelain and ceramics - casein glue, epoxy glues. The most popular is Porcelan Potch glue. Food grade glue is very often suitable for gluing both ceramics and porcelain. For example, the recipe described above can be used as an adhesive for ceramics and porcelain.

How to glue porcelain
Gluing porcelain at home with glue is quite simple; for this, you can use food-grade porcelain glue. If you use one of the following adhesives for gluing - Rapid, AGO, Kittyfix and Mekol, then follow these steps:
- Surfaces to be bonded should be washed and dried;
- Wipe with acetone;
- Apply glue to the gluing points in one layer and immediately glue the parts, pressing firmly.
- It can be fastened with a tourniquet for strength.

Cups break very often. And I want to give a second life to my favorite cup. The following shows how to glue a porcelain cup. Since the gluing algorithm is similar to the previous algorithm, but there are some differences:
- For gluing, the masters advise taking super glue.
- Prepare surfaces for bonding - wash, dry and wipe with acetone. If the part is broken in the same place, remove the remaining glue.
- Gather details ahead of time.
- The glue application process is the same. Glued in two layers.
- Then the glued product should be placed if they are not large, they should be placed in a saucepan or cauldron, pour warm water and put on fire. Boil water on low heat for 2-3 hours. The product is placed to cool in water. And only then, when the water has cooled, they extract it.
- If it is not possible to “boil the product”, then it can be “warmed up” in the oven, or held over an electric stove (but in this case, the “warming up” procedure must be performed very carefully so as not to overheat the product and not burn yourself).
It may happen that a crack has formed in a vase or a cup, or a fragment has flown off, and a small hole has broken off.
Then the gluing algorithm is as follows:
- Preparation for gluing is the same.
- First you need to cut out a patch, the size of which should be 0.5 - 1.5 cm larger. You can take super-glue for ceramics, natural glue for gluing the patch is also suitable.
- Be sure to take waterproof for repairs.
- Pour water into the product, but start the patch, but so that the water does not come into contact with the patch.
- Then boil water for 2-3 hours.
- Cool everything down. And pour out the water.
- If necessary, treat the bonding area with paint.
Porcelain figurines are repaired in the same way. But after the figurine has dried, it is recommended to cover it with several layers of varnish for greater durability. Each next layer of varnish can be applied only when the previous layer of varnish has already dried well. After varnishing, the figurine will be a little heavier and not be as fragile.
How to glue ceramics

Gluing ceramics at home is quite simple. You just need to follow the following rules:
- We start by assembling all the parts that need to be glued together. If you need to glue a previously repaired cup or vase, then remove the remaining glue with a knife. And when everything is removed from the surface, you can proceed to the next step.
- Wash all assembled parts thoroughly in warm water. For washing, you can use dishwashing detergent. Then rinse and put to drain. Wiping is not recommended, so as not to cut yourself with sharp edges or break something from the edges of the part.
- We hide all the details before gluing, in order to know in advance what to glue where.
- We process the places of gluing with acetone.
- Apply a thin layer of adhesive evenly to the gluing points. To apply the glue, you can use either a thin brush or an ear cleaning stick.
- Leave the first coat of glue to dry.
- Then apply a second layer of glue. And press the parts that need to be glued. Let's keep the details for a few minutes. Then wipe off the residue with a rag.
- It is advisable to glue another part after a while so that the previous parts stick well.
- After the product is glued, it is desirable to fix it. And in this way everything will grab not only correctly, but also well.
- A part is well considered repaired if it has stood for 1-3 days (depending on the repair performed).
Since broken parts are still glass, it is recommended to wear rubber gloves when repairing in order to protect your hands from minor cuts and wounds in advance.
When gluing, if necessary, you can and should use tweezers, for example, to work with small parts.
Repair of porcelain and ceramics is very easy to perform according to the algorithm described above.
Do not forget that all repaired products are no longer desirable to use for food. Because, if, by placing sour or salty food in such a product, harmful substances that are contained in the glue begin to be released. And this is very unhealthy.
As a result, you know how to glue ceramics, how to glue ceramic dishes and how to glue porcelain. Which glue to choose or make your own glue.
Today it is very easy to repair chips and glue broken porcelain or ceramics with epoxy glue and putty. You can repair a crack in your favorite vase or restore your grandmother's old tea set and put it back in the sideboard without anyone knowing it was damaged.
When it comes to fixing broken pottery or pottery, gluing with superglue won't give you enough time to accurately expose the pieces. Therefore, it is preferable to use epoxy glue for gluing.
As with any project, the most important step in repairing broken pottery or pottery is surface preparation.
If the fragments were previously glued, remove the old glue with a cotton swab soaked in acetone (nail polish remover).

Clean the adhesive parts with a mixture of mild dishwashing liquid and warm water. Rinse the parts and let them dry completely.
Using a toothpick or paperclip, apply epoxy to the edge of one of the broken pieces.
Use enough glue to spread the edge of the fin of the shard, applying too little glue will leave empty gaps on the surface of the fin resulting in poor bonding, and applying too much glue will make it hard to bond and look aesthetically pleasing.
 GOOD TO KNOW
Wear gloves when handling sharp pieces to protect your hands from sharp edges.
Work quickly, attaching the pieces together with light pressure to squeeze out excess glue.
Avoid moving parts, small particles may fall out, destroy the repair. Use tweezers when gluing small fragments.
If you have crockery or pottery that is broken into more than two pieces, you need to plan how to attach each piece so you don't end up with a final piece that can't be easily put back into place.

Remove dried adhesive later with a sharp blade.
If the adhesive line is visible and this is not acceptable to you, then glass paints are required.
Glass paints or ceramic paints come in a variety of colors, but you may need to mix the paints a bit to get the exact color match.
NOTE: Epoxy contains toxic materials that can be ingested especially when there are salts and acids in the food. Unfortunately, any utensils or ceramics that have been glued together are not suitable as food utensils, they are not safe.
Apr 12, 2015 tigress…s


For beginners: breeding a broiler at home Boiled water for broilers
Only lovers will survive
Features of advertising aimed at children
retouching old photos in photoshop retouching old photos
What is an NPO: decoding, definition of goals, types of activities Does a non-profit organization have the right