SHARE
Facebook Pixel offers advanced options for tracking events and fine-tuning the conversion of your Facebook ads.
However, to take advantage of advanced functionality, you need to know how to configure and use it.
In this article, I offer you a comprehensive pixel setting guide and event tracking conversions on your site:
What is a Facebook Pixel
The Facebook pixel is used for 3 functions:
- to create custom audiences,
- to optimize Facebook ad conversions,
- to track conversions on your site.
Creating Audiences: A pixel allows you to create an audience of people who take certain actions or visit certain pages on your website.
Optimization for Conversions: The pixel allows you to optimize your ads for more conversions (for example, Facebook can use it to show ads to people who are more likely to go to the checkout page on your website).
Conversion Tracking: The pixel allows you to track the performance of your ads by logging conversion events on your website (such as signups or checkouts) that occurred as a result of your ads. You can view this information in reports.
Attention: The conversion tracking pixel (version 2015 and earlier) will not be supported after October 15, 2016. This pixel will be completely phased out by February 2017.
Features of the Facebook Pixel
The Facebook Pixel includes several improvements and new features:
Pixel merging: There is no longer a need to create multiple pixels for different purposes.
Download speed increased 3 times: What will benefit the SEO of your site.
Pixels can be shared: If you are working with advertising agencies, this functionality will be useful to you.
Tracking multiple events: The new pixel allows you to track 9 events according to the specified parameters.
Let's take a closer look at each of these possibilities.
1. One Pixel for audience building, ad optimization and statistics reports
The Facebook pixel combines the capabilities of the conversion pixel and the custom audience pixel into one pixel.
Now you can use Facebook pixel to evaluate, optimize and create audiences for your advertising campaigns, while you install only one code on your site.
2. Pixel loading speed increased
The new Facebook Pixel loads 3 times faster, which will benefit any site, especially when tracking multiple events at the same time.
My test showed an increase in speed, but not in the 3 times declared by Facebook:

Why is it important?
A pixel is a 1x1 pixel image that is loaded by the browser when a visitor visits the site.
If several pixels are set on the page, the page loading speed increases several times. But that's not the worst.)
Once the pixel is loaded, the pixel transmits information to the Facebook servers.
The more pixels are set, the more information is transmitted. At what at the same time. And this causes conflicts.
The new pixel is not only loaded Once, he and facebook information sends only once.
3. Pixels can be shared
For example, your product review is hosted on a third-party site, and you want to retarget the audience interested in your product.
This can only be done in Business Manager(3rd Facebook advertising tool):
- Go to Business Manager, select Company Settings - Pixel.
- Select the desired pixel and click Transfer to Agency or Transfer to Company.

Please note that when you share a pixel, a third party will see your pixel code and your ad account ID.
I’ll add on my own: if you have never heard of Business Manager, you don’t need to try to connect it ...
Its functionality will be useful to large online stores. small business Facebook pages don't need it.
4. Tracking events and their parameters
The previous conversion pixel allowed tracking 5 types of user actions:
- Order processing
- Registrations
- Key Page Views
- Add to Cart
- Other Website Conversions
Moreover, the old tracking code took into account only 3 parameters: the number of conversions, the cost of conversions, and the payment currency.
The new Facebook Pixel lets you track 9 types of user actions, so called standard events.
Each of the events includes certain parameters that you can customize to suit your business goals.
New standard pixel events:
- Key Page View
- Search
- Add to cart
- Add to Wishlist
- Start of the purchase
- Adding payment information
- Making a purchase
- Completion of registration
Decoding standard pixel events

List of available options(indicating the event):
- Conversion Value
- Currency
- Content title (page or product title)
- Content category (for online store product categories)
- Content ID (for online stores)
- Content type (download, physical item, etc.)
- Number of goods
- Search queries (if the user is looking for specific titles on the site)
- Status (to check whether the registration process is completed or not)
As you can see, this structure allows you to set up more effective conversion tracking.
How to create, install and test the Facebook pixel
To set up a new Facebook Pixel, you need to follow 3 steps:
- Create a Facebook Pixel.
- Install a pixel on the pages of your site.
- Customize the pixel code based on 9 standard events.
Activate the plugin. It does not require additional settings.
STEP 2. Go to editing a post or page and paste the code into the window:

Attention A: If you have an OptimizePress 2.0 theme or plugin, I also recommend installing the Facebook Conversion Pixel plugin.
When embedding the conversion event tracking code into the native functionality of Optimize, this code is located ABOVE the base code and Does not work.
STEP 3. And the most urgent: what code to put ...
To track a LEAD event:
Fbq.push(["track","Lead")]);

To track the MAKE A PURCHASE event:
Fbq.push(["track","Purchase")]);

You can replace Lead and Purchase with any standard event from 9 available user actions.
You can track multiple events on one page.
How to set cost or change currency for conversion tracking
You can extend some events with parameters.
For example, specify the currency and cost of the conversion for the event Making a purchase, as well as the Content Name.

Change the cost from "0.00" to the actual cost of your product.
Change the currency with a different currency code. For rubles, this is RUB.
And then you will get the following embed code:
Fbq.push(["track","Lead",( content_name: "NAME-CONVERSION", value: 0.00, currency: "RUB")]);
To track the MAKE A PURCHASE event:
Fbq.push(["track","Purchase",( content_name: "NAME-CONVERSION", value: 1750.00, currency: "RUB")]);
Important things about the Facebook Pixel:
Not as difficult as it might seem at first glance
If you are not familiar with the Facebook Pixel and do not code every day, then you will probably find this topic intimidating. But, it's okay, it can really look quite complicated at first. But, firstly, it's worth it - the cost of a conversion can be reduced significantly! Secondly, a novice programmer can also implement the Facebook pixel, which is not so expensive, and for many CMS there are ready-made plugins, so you can do it yourself.
Basic concepts
- What is the Facebook Pixel? It's just a piece of code that will allow Facebook to track what visitors do on your site.
- Which pages should I add the Facebook Pixel code to? The new Facebook Pixel code needs to be added to all pages of your site. This is one of the differences between the old conversion pixel and the new code.
- I already have a Facebook Conversion Pixel on my site. Do I need to use a new code? Yes need. The old code will be retired at the end of 2016. Therefore, you should replace it with a new one as soon as possible.
- I already have a Facebook Remarketing Pixel on my site. Do I need to use the new Facebook Pixel? Yes need. It will also be removed, as well as the conversion pixel.
- What can I do with the Facebook Pixel? You can use Pixel for 3 main purposes: [ Optimize conversions for your Facebook campaigns (using Events) ] [ Create custom audiences, but more importantly similar audiences or in English lookalike ] [ Create dynamic ad campaigns for your online store ]
- Can I use more than one Pixel on my site? You should only have one Pixel code per site, but you can keep the old version of the conversion pixel if you need it.
- What are Events? Events are parts of the Facebook Pixel code. They fire when something significant happens on your site (for example, when someone visits a key page)
- What are Dynamic Events? These are events that are triggered when an action has taken place on your site, such as when a user clicks on an important link or button. The key difference between a regular event and a dynamic event is that a dynamic event is not triggered by a simple page load, but by a desired action on it.
- What are the Event options? Parameters are additional pieces of code that send important information about the event. Here are a few common options that Facebook typically uses: content_name- Content title content_type- Content type content_category- Content category content_ids- Content ID value - Value (to be used in campaign reports to track cost per conversion) currency- Currency
- What are the standard Events? Facebook has 9 standard Events:
- What are Individual Events? You are not limited to 9 Standard Events. You can set Individual Events and pull up any type of data you need as parameters. Custom Events can only be used to build Custom Audiences. You cannot use them for campaign optimization.
- Can I use parameters when creating custom audiences? yes you can. This is the purpose of the parameters. You can sort your audiences using them. For example, you can create a custom audience of customers who have purchased products worth more than $50. To do this you need to go to Custom Audiences > Website Traffic > Custom Combination, select the Purchase Event, then select the price option and add => 50 as a rule.
- Can I optimize ads using Event parameters? No you can not. You can only optimize ads for Standard Event, but in this case you won't be able to choose parameters.
- What about Dynamic Ads and Pixel settings? As you may know, Facebook Dynamic Ads allows you to automatically advertise products from your website on any device. This is a permanent retargeting campaign for online stores. In order for Dynamic Ads to work, you need to configure 3 Events on key pages or actions on your site: [ Product View Event– for each product on your site. ][ Add to cart event – for the shopping cart page or for clicks on the Add to Cart button ] [ Event “Purchase”- for the "Thank you" page on your site, the page that the client goes to after the transaction is completed. ] Required parameters for Events with Dynamic Ads: [ content_type– this must be “product” or “product_group” content_ids – the id of the product associated with the Event. It must be the same one you use for the Product Catalog. ]
- What's the difference between Event Pixel and Custom Conversions? These are two different things. You can just add some basic code to your site rather than setting different custom conversions directly on Facebook, or you can go more advanced and add Events to your code. You can also set custom conversions based on Events if you like. When you use Events in your Pixel code, you don't need to use Custom Conversions.
- Which is better: Event Pixel or Custom Conversions? The Event Pixel will give you more room for optimization and will allow you to use dynamic parameters (which will be automatically pulled from your site). Events can be fired dynamically (Dynamic Events) when someone performs a desired action on your site (clicks on links or buttons). This helps a lot because you can optimize your ads for these actions that are not available in individual conversions.
- Is it important to indicate the value of each Event? Yes, it is important. Facebook strongly encourages you to enter a value and currency for each Event because it helps them (and you) optimize your ad campaign. It also allows you to calculate cost per action and ROAS.
- How to determine the value of an Event? You must calculate how much value for each Event in your business. For example, if a product costs $100 and you know that your conversion rate is about 10%, then the value should be $10. This value can be changed in the future when you accumulate more statistics.
- How to determine the value of an Event for an online store? On an ecommerce site, you usually have 4 special Events. Each one fires when a visitor completes a specific step in the shopping process (downloads a product page, adds to cart, initiates an order, and completes a purchase). Because of this, each Event will have a different value for you and for your business. “View content”, for example, is triggered on the product page. It is obvious that not every visitor to this page will make a purchase, so it doesn't make sense to use the price of the item as a value at this stage. You'll want to use a percentage of the price as well as the percentage of people who made a purchase after viewing the product. You can easily get this data using Google Analytics. Here's how you can use data from Google Analytics Ecommerce to determine the cost of Events: [ “View materials” (triggered on the product page): Google Analytics > Conversions > Product Performance > Purchase Rate ] [ “Add to Cart” (triggered by clicking on the “Add to Cart” button)Go to Google Analytics > Conversions > User Experience and view the session with the Add to Cart column. You will see the percentage of users who completed the transaction. ][ “Checkout Start” (on the payment page): Google Analytics > Conversions > User Experience > Checkout Behavior and view the transaction data session. This is the percentage of people who went to the payment page and completed the transaction. ][ “Making a Purchase” (on the Thank You Page) A: You can use the transaction cost. This Event only fires when the transaction is completed, so you know the exact value in this case. ]
- What is Advanced Matching in Facebook Pixel
Pixel Events and Options
You can also add your own parameters and track them according to your needs.
| View content | When a key page was visited, such as a product page, such as going to a product detail page |
| Search | When a search was made, for example, a query for one of the products |
| Add to cart | When a product has been added to the cart, such as clicking on the "add to cart" button |
| Add to Wishlist | When a product has been added to a wishlist, such as clicking on the "add to wishlist" button |
| Start of ordering | When a person goes to the checkout page to fill out the order form (clicking on the "Checkout" / "Buy" button) |
| Adding payment information | When payment information has been added to the order form, for example, clicking on a button with saving payment method data |
| Making a purchase | When a purchase is made or the order is completed, for example, a transition to the “Thank you” / order confirmation page is made |
| Lead | When a contact form has been filled out, e.g. a link to a pricing page has been completed, a form has been submitted, a trial has been registered |
| Completion of registration | When the registration form is completed, for example, subscribed to a newsletter, registration for the service |
You can use Standard Events to: [ Optimizing your ads for conversions: Facebook will let you select an event if your campaign objective is "Increase conversions on your site". Ads will be optimized to get the best results for your desired event. This is very useful for ecommerce sites (optimizing the “Purchase Event”), affiliate sites (usually using the “Lead Event”) or collecting emails of potential customers ] [ Creating Custom Audiences: You can set up very powerful Custom Audiences: Go to Custom Audience > Website Traffic > Custom Combination ] Code example Events with different parameters: fbq('track', 'Purchase', ( content_type: 'product', content_ids: '', content_name: 'Shoes Woman 37', category_name: 'Shoes Woman', num_items: '1', value: '28.00', currency : 'USD', town: 'Khrakov', country: 'UA', payment: 'Cash on Delivery', coupon_used: 'yes', coupon_name: 'promo', )); This is an example of a Purchase Made Event with various useful parameters. This is a Dynamic ad because it pulls up content_type and content_ids and has value and currency to track conversions. In addition, it tracks useful parameters that you can use for Custom Audiences, such as address, type of payment or coupon usage, product name and product category name, or number of products purchased.
Event Pixel or Custom Conversions
Value through Event Pixel
After installing Pixel
Useful material
Conclusion
The new Facebook Pixel is a very powerful tool that will really help improve the performance of your ads. The results will pleasantly surprise you. If you are busy developing your business and you have no time to deal with the technical implementation of this process, you can always contact us for help.
We have released a new book, "Social Media Content Marketing: How to get into the head of subscribers and make them fall in love with your brand."

talking plain language, this script collects a database of users who visited your page, added a product to the cart, placed an order, sent a brief, etc. All actions of page visitors are subject to detailed tracking and logging. Then the program finds these users in the social. networks and launches advertising mailings directly on their pages.
The entire operation of this mechanism can be reduced to three functions:
- Creating an audience. It will include users who have taken any action, or simply visited your page;
- User behavior optimization. Advertising will be shown only to those users who are most likely to visit the site to place an order;
- Conversion tracking. The system allows you to record all the events leading to the target action that occur on the site after the advertising campaign. This will allow you to evaluate the effectiveness of advertising.
Tool Features
The new version has the following features:
- Consolidation of tasks. In order to organize an audience, analyze and optimize an advertising campaign, it is enough to put a Facebook pixel on the site once;
- High download speed. This indicator is extremely important. The point is that the script is loaded every time the user visits the site. If there are a lot of them on the page, then the download speed will be significantly reduced. In addition, during the download process, information is transmitted to the server social network. Passing data from multiple code snippets at the same time will cause conflicts. Thanks to the unification of tasks in one system, these problems have lost their relevance;
- Scripts can be shared. There are times when data about user actions needs to be transferred to another resource. For example, if you are setting up retargeting target audience, and a review of your product was posted on a third-party resource. In this situation, you need to transfer your code to a third-party site. For this you need a Business Manager. This official free platform allows you to centrally manage all your online marketing options.
Going to the main form of the Business Manager, you need to select the "Company Settings" item, and select the "Pixels" item from the drop-down list that appears. After selecting the desired element, click the "Transfer to the company" button;

- Fixing user actions and their parameters. The following activities are subject to tracking:
- Search;
- Completion of registration;
- Adding to cart;
- Order processing;
- Making purchases;
- Indication of payment details;
- Leads;
- visits home page;
- Registrations.
In this case, the following parameters are fixed by the system:
- Content category (product type of the online store);
- Content name (product name);
- Content ID (numeric product identifier in the electronic database of the online store);
- Currency;
- conversion value;
- Type of content (product, service, information download);
- Number of product units;
- search queries;
- Relevance status.
Such a detailed structure allows for detailed marketing research.
how to make a pixel on facebook
Consider how to install the Facebook pixel on Tilda (because this is the most popular tool for attracting the attention of large audiences). So, go to your Ad Manager account and follow the algorithm:

How to add facebook pixel to website

How to check if the code is working
In order for everything to work correctly, on the browser Google Chrome you need to install the Facebook Pixel Helper component. This extension allows you to evaluate the correct operation of the system, as well as find and eliminate errors that occur.
If you install the Facebook pixel on the site correctly, then the inscription "loaded successfully" will appear on the main form of the extension, marked with a green marker.
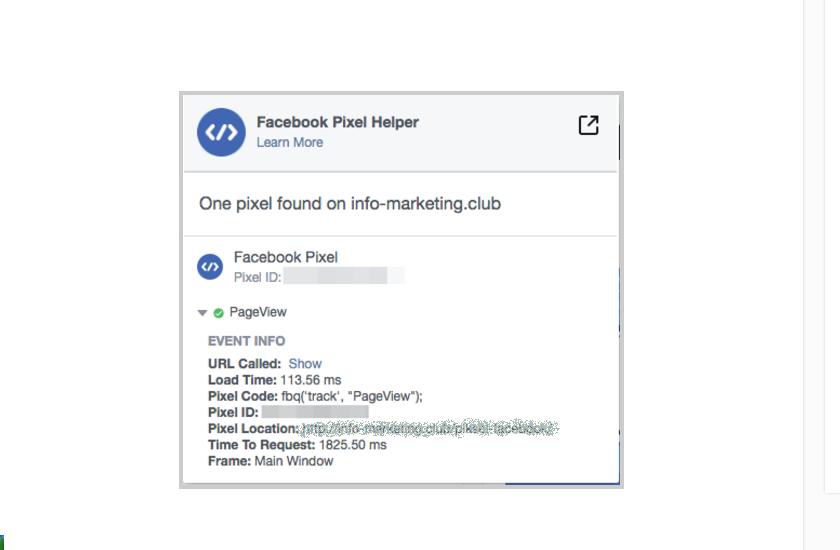
If the script does not work correctly, error messages marked with a red marker will appear on the form.
how to use facebook pixel
As mentioned above, this tool can be used to track and optimize conversions. Let's take a closer look at each process.
How to track conversions
To start the process of tracking user actions, you need to organize an individual analysis on the page of interest. It should be noted that for general analysis the base part of the script is placed on all pages of the site. If it is a specific target analysis, then only the pages under investigation are subject to configuration.
For a funnel page, the key is the site that the user lands on after completing the subscription. For the sales page, this is the form of the "Thank you for your purchase!" message.
An individual analysis is created as follows:

How to optimize ad conversions
Stage 1 - the choice of the object of study. To do this, in the "Goals" tab of the Ad Manager, select the "Conversions" item, and in it specify the event (for example, "Purchase").

Stage 2 - setting up optimization. Open the "Budget and schedule" tab and enter the details of the "Budget", "Schedule", "Conversion window" details. The last prop means the time interval between viewing advertisement and committing targeted action. With this attribute, you set the period for which you need to collect indicators that are important for the target audience.

How to remove a pixel in facebook ads manager
To do this, just go to your ad account settings and click the "Deactivate account" link.
is the ability to show ads to a predetermined audience. This can be both fixed contact details (addresses Email, phone numbers, account IDs), and dynamic audience of your website visitors. This article will focus on the latter option.
For retargeting to work, you need to install special advertising system code in which you are going to advertise. This code allows advertising system match your website visitors with your database. Depending on the advertising system, its name may change, but the essence remains the same. In the Facebook advertising system, it is called facebook pixel.
Recently Facebook updated retargeting pixel. Previously, you needed a separate code for creating audiences from websites and a separate code for tracking conversions and optimizing ads.
Now this is one code that performs the functions of both collecting the audience and the ability to work with campaigns that are optimized for conversions and track these same conversions.
Create a pixel
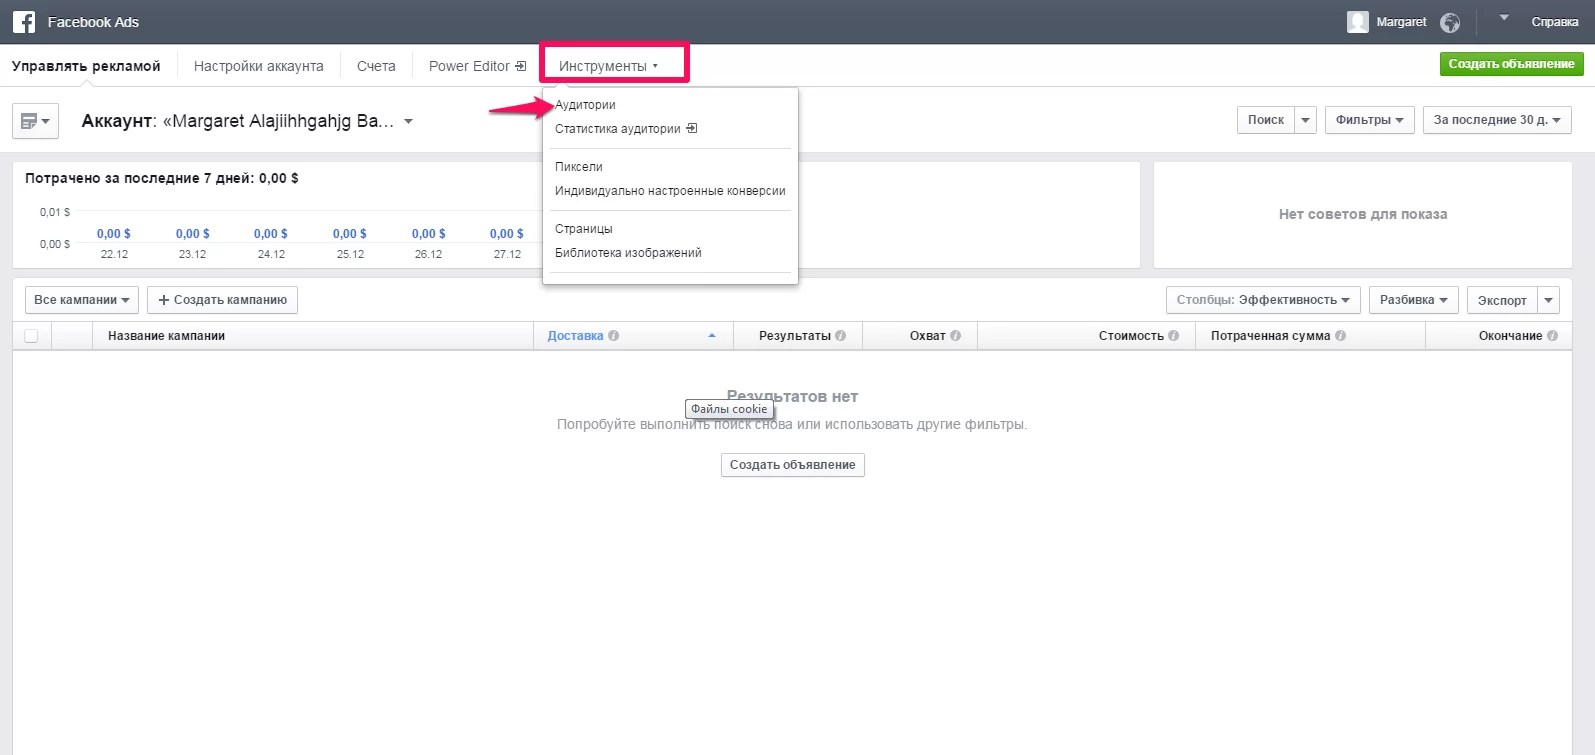
First of all, this code needs to be created. To create a new pixel, go to the Tools menu, point Pixels.
Menu "Tools", item "Pixels"
This is what the window looks like on the first visit:
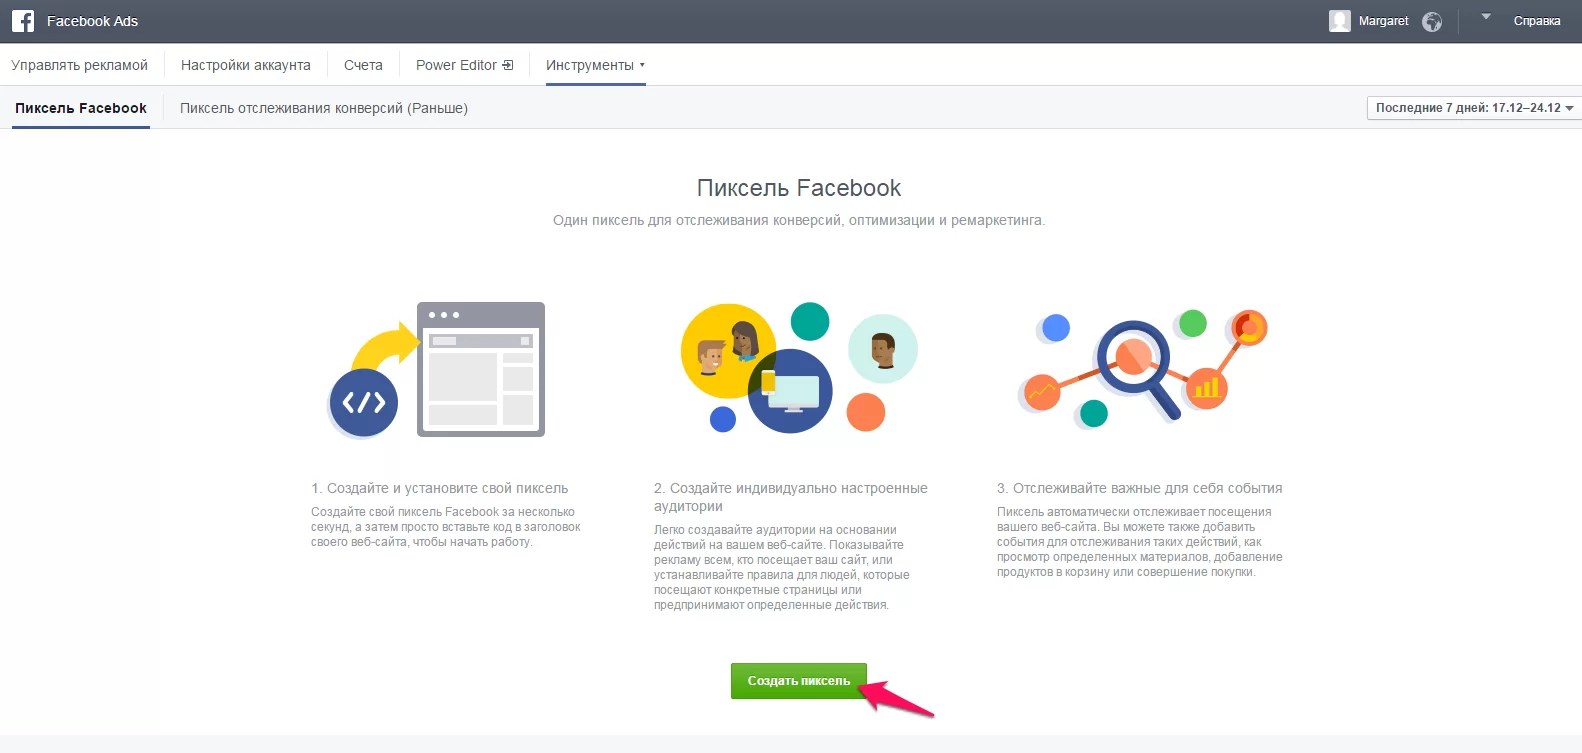
Click "Create Pixel"

Put a tick, come up with a name, click "Create a pixel"

![]()
We get the code for installation on the site.
Received code put on all pages of the site. Just like other counter codes, it is best placed inside head tags. To check the correct installation and further work, I recommend installing the Facebook Pixel Helper add-on (https://developers.facebook.com/docs/ads-for-websites/pixel-troubleshooting) for Google Chrome (in general, it is best suited for working with Facebook ads Google Chrome or another browser based on Chromium).
Without modifications, the code is already ready to collect audiences from website visitors, or to create Custom Conversions.
Pixel setting
Previously, you had to create a separate conversion code to track conversions. Now these functions are new pixel. To track conversions, it needs to be supplemented.
There are 9 basic types of conversions in total:
- CompleteRegistration- completion of the registration process (for example, visiting the thank you page).
- Purchase— a purchase, there are two required parameters for this event: value — the conversion price and currency, the currency in which the price is calculated (the setting is required for dynamic remarketing).
- lead Lead (the first step of any funnel).
- AddPaymentInfo- adding payment information.
- InitiateCheckout- the beginning of the ordering process.
- AddToWishlist- add to wish list.
- AddToCart— add to cart (setting required for dynamic remarketing).
- Search- site search.
- ViewContent— viewing page content (required for dynamic remarketing).
In the newly created pixel, only one event is sent - PageView, indicating the page is loading:

To track conversions on the right pages need to add after this event new event - conversion.
Adding a line
fbq('track', 'CompleteRegistration');
after code
fbq('track', "PageView");
Final code:
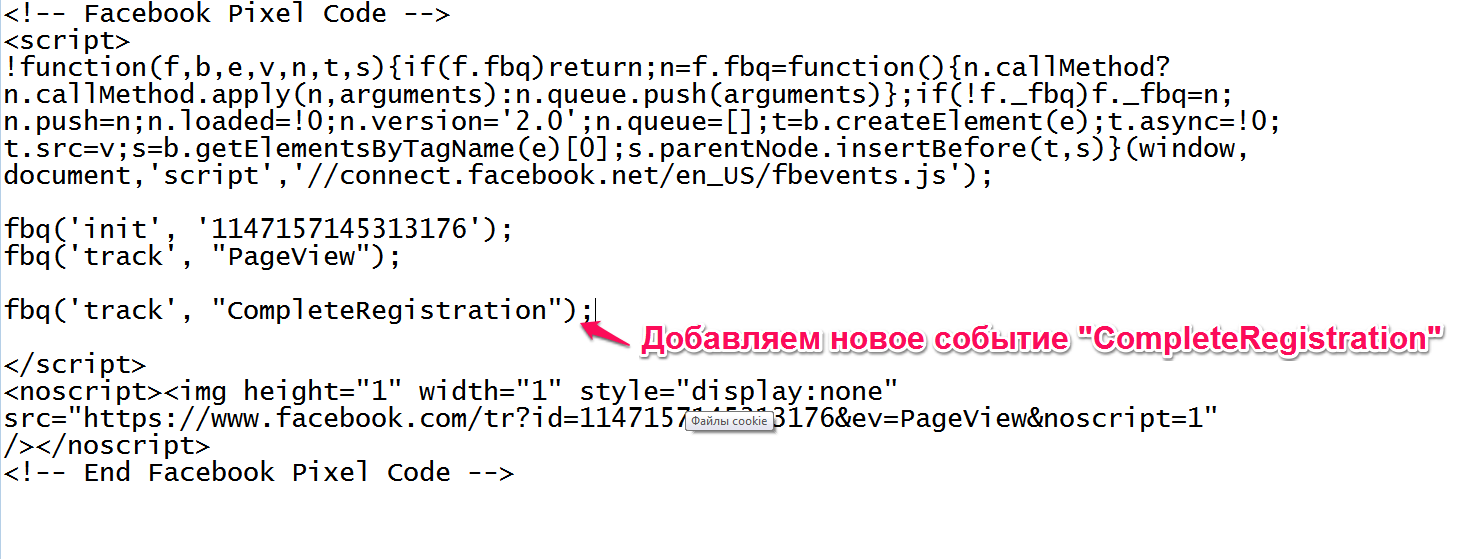
Now the resulting code will send a "CompleteRegistration" event to the Facebook servers, and we can:
- use this event for tracking conversions
- use this event for advertising optimization
- use this event to create audiences
In order to track user actions on the site (clicking on buttons, following links, adding to the cart, etc.), it is enough to add the execution of the code of only a specific event. It is important that the event is sent after the main pixel is loaded.
For example, when adding a product to the cart, you need to run

Along with the event, you can send additional data: product name, cost, quantity. Subsequently, on the basis of this data, you can also form audiences, or by creating Individually configured conversions, you can optimize the AC for conversions with certain properties.
content_ids must be specified
If there are not enough standard 9 events, you can create any of your events with the parameters you need
The code for the custom event looks like this:
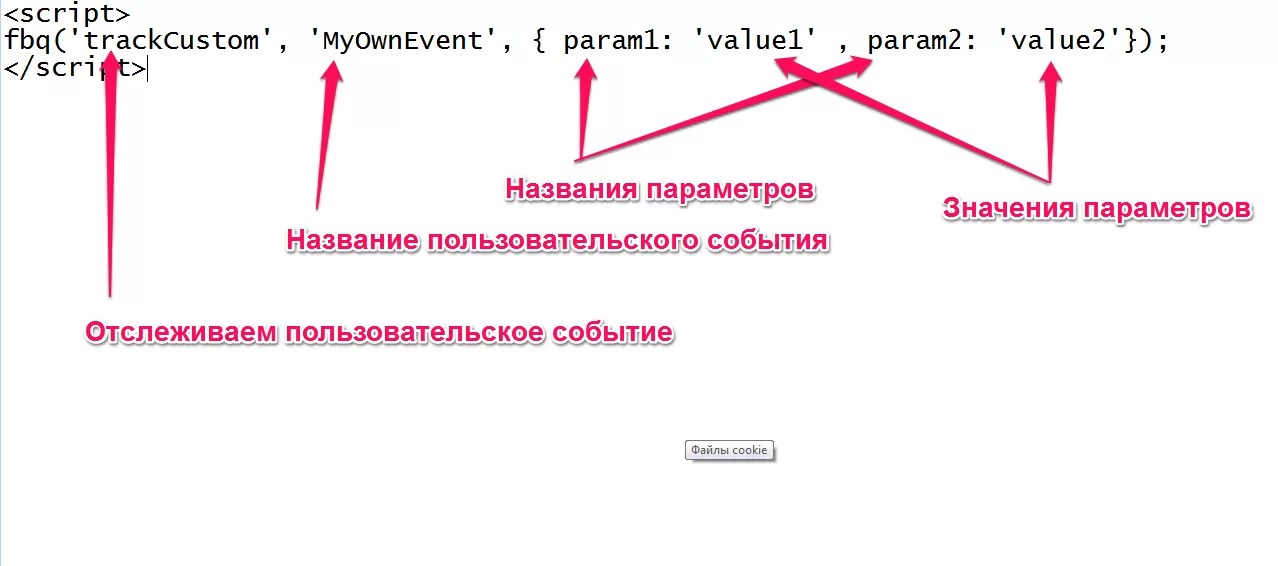
MyOwnEvent- any name for the event
param1-any name for the first parameter, value1- its meaning
similarly for param2 and value2
For example:

This is what an event might look like, indicating that the user has spent more than a minute on the page.
Custom events cannot be used to optimize ads, but using custom events you can create a custom conversion and optimize for it.
As a result, you can create any kind of micro-conversions to optimize ads.
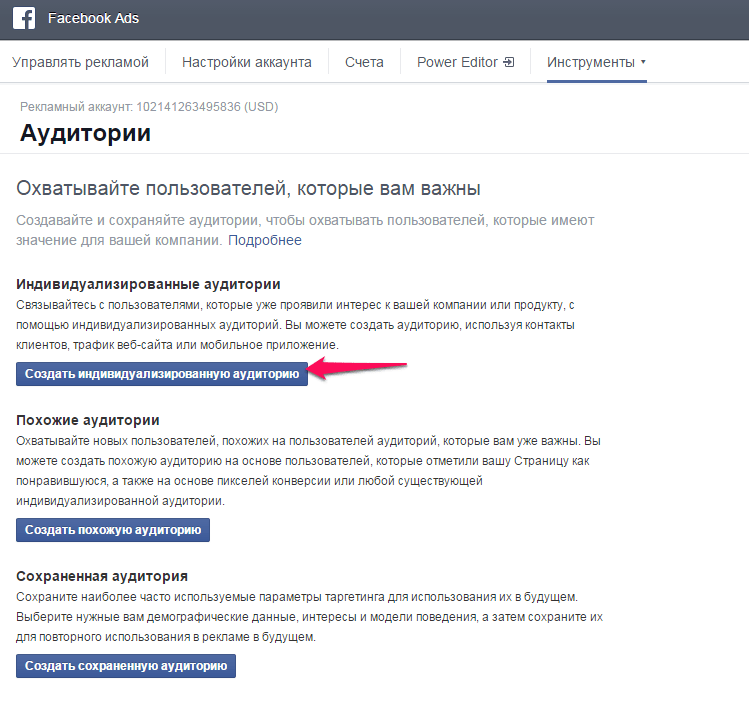
Creating Audiences
Now in the Audiences section, you can create audiences based on which visitors to your site visited.
To do this, select Create custom audience.
In the pop-up window, select Website Traffic.
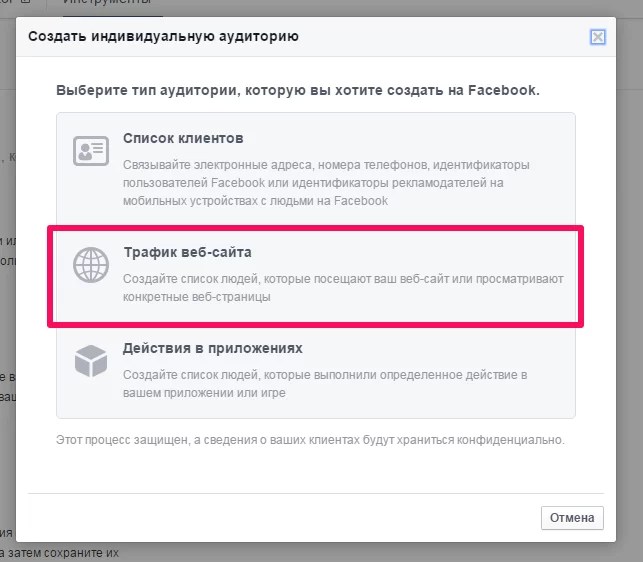
Here we have 5 options:
- Everyone who visits your website.
- Users who visit certain web pages.
- Only users who visit certain web pages.
- Users who have not visited the site for a certain period of time.
- user combination.

For all options standard settings- the name, the time the audience was stored (or the time when they did not visit the site) and an indication of whether to add information already available in the history to a new audience, or to fill the audience only from the moment of creation. Same for all options. maximum term audience storage - 180 days.
Now the features of each of the settings
For the whole audience who visits your website, it is possible to select the site domain if you have set the counter to several domains.
Next audience (users visiting specific web pages), allows you to specify the audience from which pages you want to collect, for this you need to insert either the full URL of the pages from which the audience will be collected from (the URL item is equal to), or part of the page address for the “URL contains” item.

This setting will work for all Thank You pages on the domain.

This setting will only give a specific thank you page (Application from the main page). As you can see in the examples, if you have several pages with the same name, it is better to specify a specific url with the page you need.
The third option for the audience, in addition to the previous features, it allows you to exclude some users from the audience received, using all the same rules. For example, you can create a pre-made audience that excludes visitors to the Thank You page, then when creating an ad, it will be enough to specify one audience, instead of separately specifying the targeting and exclusion audiences.
And the last, fourth point from the standard options - p users who haven't visited the site for a certain amount of time— collects an audience of people who visited your site before, but did not return at the time specified in the settings (up to 180 days).
user combination. If for some reason you didn’t have enough of the previous options (and their combinations in the targeting settings - inclusion and exclusion), this option comes into play.
In short, the possibilities for including and excluding audiences in this paragraph are practically unlimited - you can use an unlimited number of conditions (I did not get to this limitation). In my opinion the most important: in this option it is possible collect an audience by events configured to track user actions on your site and their parameters, which allows you to implement any audience based on behavioral factors.

As a data source, you can use not only the rules for the URL address, but also Events from the configured pixel.
For example, if you pass time spent on the page, you can highlight the audience of people who were on the page for more than a minute, but did not convert.
At first, this Facebook tool - Facebook Pixel - may seem overly complicated, but in fact it requires a minimum of knowledge to implement at the "Copy from here, paste here" level. But when used properly, it allows you to get a large number of information about users of your site in the context of this social network, as well as create the most relevant ads to work with the audience of your site.


For beginners: breeding a broiler at home Boiled water for broilers
Only lovers will survive
Features of advertising aimed at children
retouching old photos in photoshop retouching old photos
What is an NPO: decoding, definition of goals, types of activities Does a non-profit organization have the right