Have you seen the yellow and red photos?! Or too blue? I have no doubt that you have not only seen, but also quite have similar photographs in your family album or on your Vkontakte page. Many novice photographers are faced with a similar phenomenon and at the same time have absolutely no idea how easy and simple it is to get rid of such a shade of photos, both at the stage of photography and during subsequent processing ?!
The problem is simple. This is just the wrong white balance and this entire article will be devoted to setting and correcting it.
What is white balance?!
To keep it simple, we can say that this is the overall tone of the color in the photo, which determines how warm or cold the photo looks in its colors and shades. In particular, we can talk about how pure white in this photo looks like white, yellow or blue.
The question of the tone of white in the picture is extremely important for understanding the essence of white balance, since the shift of white to yellow or blue tint allows you to judge the correctness of the white balance as a whole. Figuratively speaking, with the correct color rendering, the white color should be white, but not yellow or blue. Accordingly, the task of the photographer is to ensure the correct color reproduction in the photograph, by properly setting the white balance.
How to adjust the white balance?!
There are a number of ways to get it right, and most importantly, all of these methods can be applied even at the stage of photography, which saves a lot of time in post-processing photos, since it eliminates the need for painstaking white balance adjustments.
Auto white balance
Before you start talking about how to set the white balance, you need to say a few words about the automatic white balance that is in your camera.
The automatic white balance has one significant drawback: the camera constantly adjusts it as soon as you remove the lens cap. And this is bad because the photos from the same series may have a completely different white balance. That is, if you photograph in the sun, then you will have a white balance shifted to the yellow spectrum. But, as soon as you go into the shade, your white balance will shift towards blue.
Why is it bad?!
This is bad because batch processing of such photos will be impossible. In fact, you will have to adjust the white balance for each shot individually. Of course, expensive cameras correctly adjust the BB when taking pictures, but the risk, as you know, is a noble cause.
To avoid this automatic white balance (AWB) behavior, use some of the built-in white balance options that your camera has: "Day", "Sunny", "Cloudy" and the like. Please note, I have listed the white balance settings that give a red-yellow tint to photos and this has its own explanation:
If you don't know what white balance to use, then use a warm red-yellow BB. Psychologists have found that a much larger number of viewers like this warm tone of color than the cold blue tone.
When using automatic white balance, it should be remembered that the issue of its accuracy remains open and if you want to set the WB accurately, then the following methods are much better than automatic.
Setting the white balance on the gray card
Perhaps this is the most accurate way to set the white balance. All you need is to buy the gray card itself. By the way, it can be purchased as a kit, along with a white and black card, which allows you to set the white balance, in case it programmatic adjustment, at once on three points: white, gray and black.
So, how to use the gray map?!
Simply and easily. Before you take a photo, you need to take one shot where your model is holding a gray card or position a gray card next to the subject. In post-processing, you can use this frame to fine-tune the white balance, after which you can apply this WB setting to the entire series of photos. This is the first use.
The second is that you are as close as possible, so that it fills large area frame, photograph the gray map. After that, in the camera settings, you select the "custom" white balance and set the frame with the gray map as the WB source. This method of setting a custom white balance is described in its entirety in your camera's manual.
This method has one significant drawback: it is not recommended to change the shooting conditions after setting the WB on the gray map. That is, if you set the WB frame by frame with a gray card shot in the shade, then shooting in the sun with the same setting will give a completely different shade of the photo.
To avoid this, shoot a new frame with a gray map as soon as something changes in the lighting conditions of the scene or you change the scene itself.
How to adjust white balance by white sheet
In its execution, this method is completely similar to the gray card. The difference is that instead of a gray card, you use an ordinary blank sheet of plain A4 white paper.
The beauty of this method is that it is free. The downside is this: Plain paper is not pure white. It always has a yellow or blue tint, which cannot but affect the set white balance. White balance, set on a white sheet, will be only relatively accurate, but quite acceptable.
The situation with the white balance set on a white sheet is aggravated by the fact that the white sheet reflects all the shades of the colors that are around you, and this cannot but affect the accuracy of its setting. A more accurate way would be the notorious gray map, since the gray color reflects all extraneous colors less and, therefore, the camera will be able to more correctly measure the WB and correct it.
Also, the white balance can be adjusted using the white card that is included in one set along with the gray and black cards. This kit can be bought on AliExpress for little money. The setup procedure is completely similar to the gray card.
To summarize:
All of these white balance adjustment methods are the most accurate and save money. a large number of time for subsequent processing. The essence of all methods is to place some reference color in a test frame, and this frame is saved in the camera settings as a custom white balance, on which the camera relies on subsequent photography, as the exact white balance value.
The following methods for correcting white balance are already related to the direct processing of photographs. This is setting the white balance in Photoshop, Lightroom or the Camera Raw module.
How to fix white balance in camera raw?!
It doesn't matter if you use the Camera Raw module: as a standalone program or as a built-in module in Photoshop. In all cases, Camera Raw gives you three tools with which you can adjust the white balance.

As you can see from the attached photo, this is a number of built-in white balance settings. You are free to choose any of the above, and Camera Raw will adjust the white balance according to your choice. I won't go into detail about each value, but I'll suggest you fire up Camera Raw and see the effect each of these settings has on your shot.

If you do not comply with the condition of "true white standard", let's call it that, then the white balance set by the pipette will not be correct. You may get a visually acceptable result, but it won't be accurate enough.
It's a completely different matter if you take a reference frame with a white card, which I talked about a little higher. In this case, the white pipette works perfectly, it is only desirable to check that extraneous color reflections from objects and objects surrounding you do not fall on the white card.

The next way to adjust the white balance is to use the two sliders "Temperature" and "Tint" (Temperature and Hue). The bottom line is that with the top slider you set the color shade you need in the photo, with the bottom slider you achieve the desired tone or get rid of other shades of a different color that you don’t need, shifting the tone of the image towards the corresponding spectrum.
This method of white balance correction is the most common among photographers, as it allows you to achieve the best results with complete control over the contents of the image. In fact, you adjust the white balance by eye, guided by your own feelings about how you remember the scene during photography, as well as your own sense of artistic taste and proportion. And that's great.
From my experience, I can say that the purchase of a gray card is constantly delayed for reasons beyond my control, but this method of manually adjusting the white balance is enough for me.
How to adjust white balance in Lightroom?

Lightroom has exactly the same tool as Camera Raw. And everything that I said above about setting the white balance in Camera Raw is entirely applicable to Lightroom.
In the above screenshot, you can see a drop-down list of built-in WB settings, manual white balance sliders and a white eyedropper, as in the Camera Raw module.
How to set white balance in Photoshop?
In Photoshop, white balance can be easily and simply set through a tool such as "Curves", or "Curves" in the Russian version of Photoshop. Pay all your attention to the above screenshot.

I have somewhat simulated the moment of processing the photo for ease of understanding. The bottom line is this:
- You photograph a frame by placing a white, gray, and black map in an arbitrary position in it. In this case, I placed them on the right side.
- In Photoshop, you call the "Curves" tool (CTRL+M) and click it with white, gray and black eyedroppers on the map of the corresponding color, after which Photoshop will adjust the white balance in accordance with the values obtained.
- Then, through the gear icon, you save the resulting curve as a preset.
Now you can open a normal frame taken without white balance cards and apply this preset on it. As a result, you will get a photo with a corrected white balance and its preset, which you need to apply to all photos in this series.
Have you noticed how difficult the process is?
Therefore, if you are shooting in RAW format, then it is more convenient to use RAW converters to set the white balance, and not Photoshop itself.
However, how to set the white balance in Photoshop if there is no reference color in the form of a gray card or a set of cards?! And in this case, you can use the white, gray and black eyedroppers of the Curves tool. You can adjust the BB as follows:
With an eyedropper of the corresponding color, you click on the photo in the area where, in your opinion, the pure color is located. That is, with a white pipette you click on a white area, with a gray eyedropper you click on gray and black on black. The result can be completely unpredictable, because white may not be completely white, gray will contain a green tint, and the black color that you choose as a reference will turn out to be a deep dark blue. As a result of such a correction "by eye", the white balance may turn out to be completely unimaginable, which makes this method of setting the white balance weakly applicable or applicable with certain reservations.
From my experience I can say that the black eyedropper works best due to the presence of areas of deep shadows in any photo. A little offtopic: When I was preparing this article, for some time I studied extraneous resources that shared revelations with novice photographers, and came across a "wonderful" tip on setting white balance.

In general, the next "guru" advised to use the tools for automatic adjustment of color, tone and contrast, which are shown in the screenshot. So, such an automatic correction will make a bigger mistake than setting the white balance "by eye" using the "Curves" tool. Never use this method, if only because you have no control over how it is done. In general, everything related to color correction and color processing of photographs is highly desirable to control at each step of execution completely and completely.
Let me take a bow for this.
White balance in professional circles is called BB or in English WB (White Balans). However, this does not change the essence.
This parameter is important in the practice of photography, and it is responsible, as you might guess, for the correct color reproduction. In a nutshell - white should be really white and without blue / yellow tints. By setting the WB correctly, this result can be achieved.
How does the camera understand white color?
When a person looks at a white canvas, he immediately sees and understands the white color. The camera, on the other hand, is equipped with not so smart "brains", and often it needs hints. The white color is determined by the camera due to the laws of physics. It is known that white color, heated to a certain temperature, gives an absolutely black body. Temperature gives a specific wavelength, and it is the wavelength that determines the color in our usual sense. The temperature is measured in kelvins. You may have heard it said that the color temperature of white daylight is 6500K.
We know it looks a bit silly, but temperature and kelvins are important when it comes to the White Balance setting. If the color temperature is below 6500 K, then another color will correspond to it, let it be more yellow. An ordinary candle, for example, has a temperature of 1800 K, and our eye perceives a warm yellow tint. With other heating, a bluish tint can be achieved, etc.
Is BB really that important?
White balance is a really important parameter, because it will allow you to achieve the naturalness of photos, i.e. correct color rendering. Depending on the WB setting, the skin of a person on the beach can have a natural correct color or a cool tone. Here are examples of two identical photos with different WB settings:

In this case, we have only one light source - the sun. However, we artificially set a different WB parameter to the camera, from which the color rendition changes dramatically. This example clearly shows how the White Balance affects the color change of the photo.
It is assumed that White Balances is designed to make photographs "correct", but the concept of "correct" is very vague. Correct color reproduction is good, but often, due to incorrect color reproduction, you can achieve the desired mood of the picture.
Here are some simple examples for you:


It is obvious that the color reproduction is correct in the second photo. It's just that the picture itself is dull and boring. In the first photo, the white balance is not set correctly, but the warm tones of the picture are more attractive and the atmosphere becomes more comfortable.
The third image is dominated by blue shades - pay attention to the color of the sky and water.
It is naive to believe that BB is needed only for correct color reproduction and use it solely for this purpose. Most of the time, that's exactly what they do, and rightfully so. We just want to say that this parameter in some situations will allow you to achieve a “fabulous” frame and create a certain plot, which opens up the possibility of creativity.
WB setting
Adjusting the White Balance is simple. Almost all cameras, whether it's an ordinary soap dish, SLR or mirrorless camera, have the function of setting this parameter. Most often, you can select a specific profile from the menu:
- Sunny;
- Mainly cloudy;
- Incandescent lamp;
- Flash;
- Auto.

In principle, it is even intuitively clear which BB value should be set in a particular case. If you take a picture in nature in sunny weather, then it is logical to choose the “Sunny” profile, in a room with artificial lighting - “Incandescent lamp”. In this case, you simply set the color temperature of the light sources to the camera.
Many professional cameras allow you to set not BB profiles, but the color temperature in Kelvin:

To immediately understand how the "brain" of the camera works, and how it understands the color temperature, conduct a simple experiment: take 2 identical frames, but with different white balance settings - at maximum and minimum temperatures. Most likely, after that you will understand how it works. However, this experiment is available only if you have a good expensive camera with the ability to set the color temperature, and not select a specific profile.
Something else
If you want to achieve perfect color reproduction, you need to adjust the WB as correctly as possible. This is easy to do: take a test shot of white paper and then, looking at the photo, it will become clear whether this parameter is set correctly. If wrong, adjust the BB to a more "warm" or "cold" side. Often they do just that. This method is called "white balance on a white sheet." But remember: the set BB will only be correct for one place. If you move to another room, you will have to set the BB again.
It is almost impossible to constantly monitor this parameter, because scenes and compositions change very quickly. For this, they came up with the “Auto” mode, when the camera tries to independently determine the color temperature of the light sources and select the correct profile (they do a good job, by the way). But if you want to convey the colors as accurately as possible, then you will have to manually set the BB.
Please rate this article:
Is this picture familiar when the photo looks unnatural and the colors in the picture are strongly distorted? What does it say? This indicates that the white balance in the camera was not adjusted and the digital automatic balance metering made a mistake, it did not correctly determine the color component of the frame and distorted the color settings.
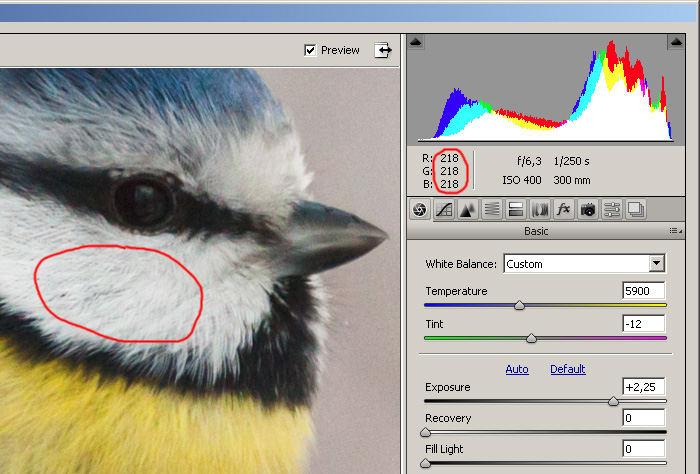
If in the program Photoshop or in any other graphics editor choose a conditionally white area, which is perceived by our eye in a familiar environment as an area of white color (the blue titmouse has “cheeks”), then it will be possible to notice that the color component in the three RGB color channels will have the same values - R: 218, G :218, B:218 (for a photo with the correct white balance). In the lower photo, these values will be noticeably different R:162, G:186, B:237 (photo with wrong white balance, with a clear predominance of blue).


If there are a lot of such white fragments in the frame, then the camera's processor will be able to independently, relying on these areas, automatically determine the balance and correctly convey colors, and if there are few or no such white fragments in the frame, then the processor begins to "get confused" and transmits colors are wrong. All this, of course, is arbitrary, the process of measuring in a camera is much more complicated, and the processor of the camera can be helped in this.
How to fix this and set the correct white balance?
Theoretically, there are two ways:
1) before shooting, teach the camera to understand the white balance;
2) after shooting, process the image in a graphics editor.
Many people think that processing photos in a graphics editor after taking a photo is easier and faster than setting a manual white balance in the camera before shooting itself, especially if you shoot not in JPEG, but in RAW (NEF). For RAW(NEF) you can agree only under certain conditions:
1) you need to shoot in RAW (NEF), and not in JPEG;
2) the photographs must contain reference fragments of conditionally white (like the cheeks of a titmouse);
3) the number of photos for processing should not exceed 20-50 pieces, because It's pretty monotonous and boring.
If you don’t know how to work with RAW (NEF), if there are suddenly no white fragments in the pictures, if the volume of photos is very large, then processing in a graphics editor will turn into flour and take a lot of time, and in some cases it will be possible to extract the correct white balance from JPEG extremely difficult or almost impossible.
Set up your camera before shooting
In all instructions they write (and the photographers themselves recommend) to adjust the balance with a white sheet of paper. Many beginners find this confusing, especially when shooting outside the home/office. Where to get this sheet of paper and how to carry it with you? Forget about the white sheet of paper!
We take a regular grocery bag from the store. The package must be white, translucent enough to allow some of the light to pass through and must not contain colored impurities. If the walls of the package have such transparency that it is possible to clearly read the inscription on the camera strap, then two such packages will be needed so that it is difficult to read the inscription through the layers of the double package. Next, temporarily set the AF-MF switch on the lens to the "MF" position and put the bag on the lens so that the front lens of the lens is completely covered by the bag and there are no inscriptions or drawings on the bag at this place. Then we point the camera in the direction where our subject is located and take one picture. We return the switch on the lens to the "AF" mode and go to the camera menu.
In the camera menu, find and select the "Manual WB" (Manual White Balance) option, select our last frame with the package as the reference white shot and press the "SET" confirmation. Then in the Menu we find the option "White Balance" and change "Auto" to "Manual" as shown in the figure.

We put the bag in our pocket and take pictures exactly until the lighting of the place where you are shooting changes, for example, the Sun has gone behind the clouds, fluorescent lamps have been turned on instead of incandescent lamps, you have entered a dense forest thicket from a sunny meadow, etc. . In this case, repeat the whole procedure again:
1) lens -> "MF";
2) put the bag on the lens;
3) point the camera at the object, take a picture;
4) removed the package and the lens back to "AF";
5) in Menu -> "Manual BB";
6) chose the last frame with the packet;
7) in the Menu we check -> "White Balance", "Auto" -> "Manual".
Now you can shoot both in RAW (NEF) and in JPG, the processor will have in its memory a reference, reference image of the white package as a sample and will already use it in its calculations, replacing the white cheeks of the tit with a white package.
How to fix white balance in photoshop?
If something didn’t work out for you or you forgot to turn on the manual balance in the camera, then the situation can always be corrected if you shoot in RAW (NEF). It is enough to open the RAW (NEF) file in edit mode, select the White Balance Tool (I) option, the key combination Ctrl + I, a tool will appear in the form of an eyedropper, it remains to poke into the tit's cheek area, into the very area that our eye is in real life perceives as an area of white. As soon as you do this, the entire photo will immediately change its color, and the RGB values will become equal to each other - R:218, G:218, B:218. In my case, this value is 218, you can have 224 or 188 or any other, the main thing is that all RGB values are the same - R: 224, G: 224, B: 224 or R: 188, G: 188, B: 188 .
What to do if there are no white objects in the photo?
If there is not a single object in the photo that would contain conditionally white color, then you need to look for fragments of the entire spectrum of gray, what in real life our eye perceives as pure gray, without impurities of other colors - it can be asphalt, and concrete , and stones, if we are talking about a landscape and there is no person in the frame. If we are talking about portraits of people and there is not a single piece of white or gray fabric on the clothes, then in extreme cases, you can use a fragment of the white area of the eyeball. If this does not help, our model has arrived from another planet and her eyes are yellow, then go to plan "B".
![]()
Plan "B" will require you to have a basic knowledge of what color temperature is and what values are in photography conditions with typical lighting or close to typical. Below is a table describing lighting and color temperature in Kelvin. The values from the table will give you at first numerical reference points, according to which you can adjust the value of the "Temperature" parameter and change the white balance, close to the conditions at the time of shooting. From 5000K to 6000K - the color temperature for a typical street shooting, from 2200K to 2800K - shooting gatherings in the kitchen under the light of incandescent lamps, from 3500K to 4500K - shooting in the office, where the fluorescent lamps of Armstrong lamps are on, etc. By choosing one of the table values for the type of lighting, you can bring the color balance to the most natural, to the colors that our eye perceived in environment at the time of filming.

What if I shoot in JPEG?
Well, what can I say? It remains only to envy, you still have ahead! It's going to be a very exciting journey to master the works of Dan Maruglis, I would say Photoshop Bibles: "PHOTOSHOP for professionals" and "Photoshop LAB Color". The amount of information of these works cannot be reflected within the framework of this article, moreover, in order to master these techniques, you must have a professional calibrated monitor from 24 "with a matrix no worse than IPS and free time for study from 1 to 6 months.
In any case, you have to choose between the usual package from the store and the development of a whole science called "Color Space", although you can not bother and leave everything as it is, the titmouse doesn't care what color her cheeks are in your photos :)
The best way to set the white balance allows a gray card. What is it and how to adjust the white balance you will learn from the article. Adjusting the white balance is not difficult at all. It is much more difficult to understand why this is done and for what reasons the white balance may be wrong.
In the right picture, the picture was taken with automatic white balance settings. The camera couldn't handle the fluorescent lighting. The special mode "Fluorescent lamp" on the left picture shows a better result. The colors are more natural. In addition, it is worth paying attention to the white fabric. In the right picture, it is not white. It is not right.
Lighting conditions affect the color of an object. The way the camera sees cannot be compared to human vision. The human brain adapts what we see and white always seems white, even though it is not. We can say that our brain is able to perfectly adjust the white balance in automatic mode. With a camera, it's different. Her brain is not that good, so we have to help her.

Camera automation reads the color temperature of objects in the frame and selects the appropriate white balance setting from the programmed ones. This works under normal shooting conditions with uniform lighting.

If your camera can't handle auto white balance, or you want to be sure of the quality of your shot, it's worth adjusting the white balance manually. Preset modes typically include Incandescent, Flash, Fluorescent, Shade, Cloudy, Sunny, Preset, and PRE.

When to use preset modes?
Incandescent is the most suitable mode for home lighting, although LED and HID lamps are increasingly being used in homes, so you should think before choosing this mode. "Fluorescent lamp" eliminates the greenish tint given by such lamps. Cloudy mode makes the picture a little warmer. Flash mode adds an aggressive warm tone to your photo. It softens hard shadows from flash. In the shadows, objects take on a bluish tinge. Shadow mode adds a pink tone to compensate for blue. In Sunny mode, the color temperature in the picture changes up to 5000 degrees Kelvin.

In the "Manual setting" mode, the camera analyzes the temperature in real time. In Live View mode, you can see the result in real time and set any temperature.

PRE mode is a gray card tuning mode. You need to place the card in front of the lens and press the shutter button. The camera will capture the reflected color from the map and add it to the blocked colors. This white balance adjustment mode is excellent for mixed lighting conditions.

If you set the white balance incorrectly when shooting in RAW format, then you can correct the situation in a graphics editor, but if you shoot in Jpeg, then the adjustment will not give a good result. Always check pictures on the camera display and make adjustments if necessary. Also consider that it is better to immediately adjust the white balance and make several hundred good shots than then correct the balance on a hundred photos in a graphic editor. This will be troublesome even with the possibility of batch processing.
If you want to do high quality photo, there is no need to rush anywhere. Take a test frame, see what happened immediately on the screen, analyze the result. Very often you need to adjust the exposure and correct the white balance.
If color distortion is not your artistic intention, then most likely you will attend to getting natural colors. This is not always possible in automatic mode, especially under artificial lighting, in which case it is necessary to correct the white balance in manual mode. I will tell you how this is done on Nikons, and on all other devices, you yourself can easily guess how to achieve this. The most important thing is to understand what you want to get.
In general, Nikon DSLRs work great in automatic mode, but if you shoot in the dim light of an incandescent lamp or in street lighting in the evening, then no camera can do it. Even the Nikon D700 and D3, which work fantastically in automatic mode, sometimes fail. AT previous article Kostya showed how to save the colors in the photo using a machine gun, but the attentive reader will pay attention to the fact that the yellowness remains.

And this is the same guy in the same club, but I was already armed with a Nikon D700:

As you can see, the new camera did a better job of adjusting the white balance, partly due to the fact that it FX sensor.
If you have one wheel on the camera, then that's it. If two, then read on.
If you have two wheels, holding WB and spinning the front will reveal a lot of interesting things. In automatic mode, on some cameras, you can make mode correction in the range A6, A5, ... 0 ... B5, B6. In the area "A" the colors will be warmer, in "B" - colder. Only 6 gradations in each direction. This is useful when you are completely satisfied with the automatic mode, but suddenly you want a little warmer. PRE will not save you in such a situation, and it takes a long time to select the temperature. On the title photo is just mode A with correction A2 (warm tones).
Color temperature is great for conveying mood, so I recommend using this if you want your photos to evoke emotions.


If you rotate the front wheel in PRE mode, expensive cameras will have d-0, d-1, ... d-4. Your preset white balance values (for a business card or something else) can be saved, in total you can remember 4 values \u200b\u200bon the D700, for example. The last measurement is always stored in d-0. This is useful when you need to remember settings for street lighting, because it is more or less the same everywhere, and such functionality will save you time, especially at night, when there is simply no passerby in white.
As for adjusting the temperature, this is the rarest case that you will encounter. On some devices, this is the K mode in the WB mode list, or through the menu, as on inexpensive cameras. Just set the temperature in kelvins and that's it. This is more interesting for research purposes, in real life you will not have time for this. Do not forget to return the white balance to automatic mode after the photo session so that the next day you will not be surprised why everything is blue.
Watch the white balance in your body and in your photos.


For beginners: breeding a broiler at home Boiled water for broilers
Only lovers will survive
Features of advertising aimed at children
retouching old photos in photoshop retouching old photos
What is an NPO: decoding, definition of goals, types of activities Does a non-profit organization have the right