The quality of a photo taken with a phone depends not only on specifications camera, but also on correctly set settings and user skills. In the article below, we will analyze all aspects of improving the camera on Android: shooting rules, parameters standard application and engineering menu settings. Also to name a few third party programs to expand the capabilities of the lens.
Rules for creating a good photo
Before directly changing camera settings and searching for applications with advanced functionality, you should make sure that the basic shooting rules are followed:
Settings of the standard application "Camera"
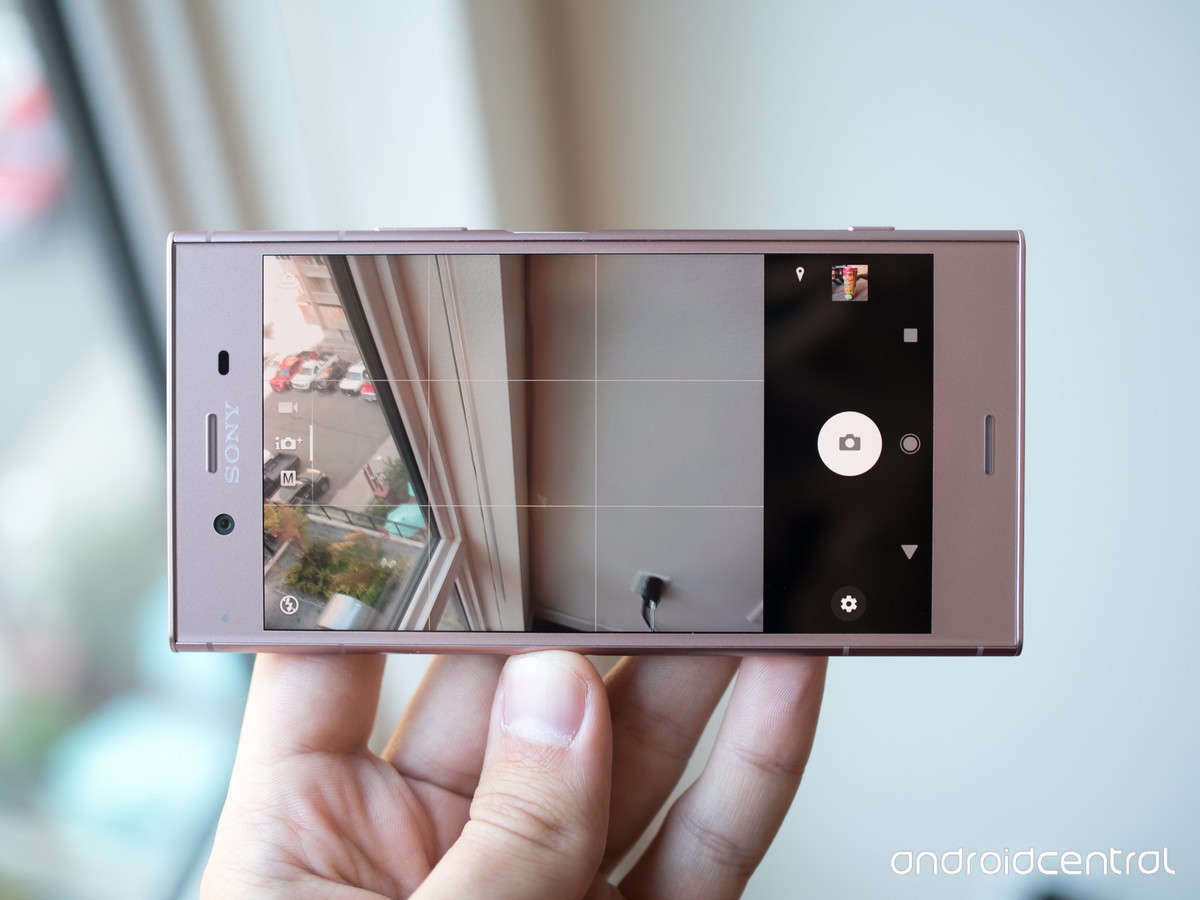
Wanting to know how to improve the quality of the camera on Android, you should pay attention to the settings of the application with which the shooting is performed. Depending on the manufacturer of the smartphone and the software used in it, the number and location of settings may differ. However, their names and effect will be similar.
So, to improve the camera, you need to set the following parameters:
- The photo and video quality is set to best or maximum. In some smartphones, the parameter is set according to the resolution or the number of megapixels - in any case, you should set the highest possible value.
- Frequency or flicker elimination - set to the maximum value (usually 60 Hz) or automatic detection.
- shooting mode. These are preset parameters suitable for certain conditions for creating a photo. For example, you can set the mode to "On the beach" or "In the city."
- If the preset modes do not give the expected effect, you should switch to manual control and set the parameters according to your own feelings:

- HDR extension dynamic range. With the activation of this option, the pictures become more saturated, but at the same time the amount of noise may increase.
- Sharpness - determines how well the outlines of objects will be visible.
- Saturation is the amount of color. The minimum value is black and white.
- Contrast is the difference between the characteristics of different parts of an image. It is better to set the average.


How to improve the camera on an Android phone through the engineering menu
In some smartphones, you can change the camera settings through the engineering menu. Often, the parameters presented there for the most part repeat those that are already present in the application settings. This method of adjusting photo quality should only be used by people who have the proper knowledge of electronics.
Instruction:
- Open the dialer and enter the code: *#*#3646633#*#*. Attention! The method of opening the engineering menu may differ depending on the phone model. Detailed recommendations should be sought in specialized forums.
- Go to the "Hardware testing" tab.
- Select the "Camera" section.
- A new window will display the parameters that allow you to improve the camera on Android:

- After setting the settings, you can exit the menu and test the camera's capabilities.


After launching DSLR Camera Pro, the user will be able to adjust:
- Flash operation: automatic, continuous firing, shooting with the backlight on.
- Focus mode: continuous, after shutter release, by pressing the subject, macro, face detection.
- White balance.
- ISO value.
- scenes.
- Image quality and resolution.
- Exposure and more.
With such an application, the phone turns into professional camera, on which you can set all the parameters in manual mode to get the best result.
HD Camera Pro has similar capabilities. The program is paid - 129 rubles.
It would seem that everyone should think of this before, but many people forget. Smartphones are with us everywhere, so the lens glass is often dirty with fingerprints and dirt. You might not notice the smudges, but taking a couple of seconds to wipe it down before taking an important photo can't hurt.
This is especially important when shooting with the front camera, since here the lens is often separated from the main glass on top of the screen and smudges are more likely to appear on it. The front camera usually has a lower resolution and image quality, so these spots are especially critical. By wiping the lens, you can significantly improve the quality of the photo.
Turn on the viewfinder grid
Most camera apps let you turn on the grid, but it's usually off by default. If your smartphone has this option, it will help you line up objects in photos more evenly. These stripes on the screen can be annoying at first, but you will soon understand the importance of separation and proportion in photos.
Usually the grid is 3x3, which helps to adhere to the principle of building a composition called the “rule of thirds”. Flat lines help you line up the horizon in photos taken from a distance.
Use flash only as a last resort
Photographing is said to be the art of lighting. On smartphones with tiny camera sensors, this expression is especially true, as they have difficulty receiving light. In low and mixed light, you may be tempted to turn on the flash, but resist the temptation. The flash is usually too bright for the subject in front of you, it blurs it out. At the same time, it is not strong enough to illuminate a large area.
Instead, move your smartphone or subject to adjust the lighting. On most smartphones, you can focus the camera by tapping on a specific area of the screen to change the exposure. It is often sufficient to simply light up the subject instead of the background, which is usually not thought of.
Use a small tripod

There are, but it is much more convenient to use a tripod from a smartphone. There are various cheap models, from options with rigid legs to flexible legs and magnets at the bottom. Mount your smartphone and you can take various types of photos.
Tripods are useful for taking pictures of yourself without a selfie stick, and can also improve low-light shots with slow shutter speeds just by holding the camera for a few seconds or a minute. A small tripod that fits in your pocket will greatly expand your photographic possibilities.
Use a backup service

Google Photos suitable for this in both free and paid versions, as well as dropbox. Best Services those that back up regularly and automatically.
Now you will not surprise anyone with the presence of a camera, all laptops, tablets and smartphones are equipped with them. Some are able to take photographs that are not inferior in quality to professional cameras. The article provides information about the front camera, which is designed for shooting using the front panel of the gadget.
What is a front camera and why is it needed?
There are two types of cameras: main and front. The front camera is called the camera, which is located on the front panel of the gadget. Usually the front camera is slightly inferior in quality to the main one, for example, if the resolution of the main one is 8 megapixels, then the front one will most likely be about 5 megapixels.
The front camera is designed for making video calls, that is, while communicating via Skype, or similar programs, the interlocutors see each other using these cameras. Therefore, before turning on the front camera, it would be good to clean yourself up.
Selfies have become very popular lately. For those who do not know, this is a self-portrait, that is, after turning on the front camera, pictures of yourself are taken.
How to turn on the front camera on your phone?
When it comes to video calling, usually the front camera turns on automatically. This is especially true for laptops. But sometimes on tablets and smartphones you still have to do it manually.

Let's say you are chatting with a friend on WhatsApp or Skype, but the interlocutor does not see you or sees a completely different image instead of your face, that is, the main camera is turned on. How to turn on the front camera in this case? Find the camera icon and click on it. Usually after that there is a camera change.
If you intend to take a picture of yourself and are wondering how to turn on the front camera on an Android smartphone, the approximate procedure is as follows:
- activate (unlock) the smartphone screen;
- find the icon with the camera on the desktop or in the main menu;
- By default, on all Android gadgets, the main camera is turned on first. In the shooting mode, the screen should have an icon in the form of a camera with two arrows that go around it, click on it.
That's it, now you know how to turn on the front camera. The interface of smartphones and tablets based on Android is approximately the same, so this guide is valid for all gadgets.
How to turn on the front camera on iPhone?
So, a guide to working with smartphones and tablets based on iOs:
- Find the gray icon with the camera in the middle in the main menu and activate it. If you are interested in how to turn on the front camera on an iPhone quickly, we recommend using the additional function. In cases where you urgently need to turn on the camera, just swipe left on the lock screen.
- In the screen that appears, there is an icon with two arrows (lower right corner), click on it if you want to take a selfie.
- At the very bottom there is a round white button, and above it is a horizontal list of all available shooting modes. To take a standard photo, set the photo mode and press the round button.
- To record video, set the video mode and press the white button again.

Well, actually, that's all. If you wish, you can edit the resulting photos at your discretion in the "Settings" tab.
Many modern smartphones that work at the expense of operating system Android, are equipped with a number of options. There are many applications for this most popular OS in the world. They are aimed at configuring the camera on devices. So you can get beautiful pictures, vivid videos. It will also be important to learn how to set up the camera on your phone in order to conduct Skype video conferences.
Smartphones have a lot of possibilities. All of them are described in the instructions that come with them. Sometimes, the factory settings are not able to meet the requirements of the owner of the device. You can change them yourself by logging into the application called "Camera".
In the framework of this article, we propose to dwell in detail on the process of setting up the camera so that photography brings only positive emotions.
Setting for shooting
Go to the application, which is indicated by a special icon. Choose the settings for a specific mode. There are several options. It's about auto, infinity and macro. If this is the first case, then it is suitable for creating unique shots when there is no time to change the parameters manually. There is also an infinity option, which allows you to learn how to photograph objects at a long distance. But for photographing as close objects as possible, Macro is worth choosing.
The photography mode itself should be chosen in view of the location of the photography. It can be a snowy plain, a beach, a landscape, etc. It is possible that this is the time of day, for example, you choose when the photo is taken - night or day.
The size of photographs is shown in pixels. The size is standard 640x480, which allows you to take photos in excellent quality. It is designated VGA. The quality of the image must be determined in terms of the size of the file to be saved. The color effect is also selected. Can be sepia, negative, monochrome, etc.
The exposure option is just as important. Due to it, you can determine the number of light rays that pass through the lens. If you increase the exposure on the lens, then more light will enter. The pictures will be bright and bright.
In order to improve the quality of pictures, there is an option "White Balance". Due to it, it is possible to get the ability to adjust the color in mind from the lighting option. It can be an incandescent lamp or daylight, sunny or cloudy weather, natural light. There is also an automatic adjustment of the light balance.
You can also set the option to record the location where the photo was taken. This is done through the use of GPS. But it is likely that you want to remove this feature.
There is also an option to set the flash mode. If you do not know at what point it should be applied, it is worth setting the "Auto" mode and then the device will turn on the function if necessary.
It is also important to note the option of image stabilization. This option will allow you not only to spoil the picture when you move the phone with uneven breathing or hand shaking when shooting.
Digital zoom allows you to zoom in from 1x to 2x.
It should be noted that all options are adjusted individually. It is possible to track the results on the display. The "Back" button will serve to exit the section.
Video mode setting
The movie mode includes all the categories of settings mentioned above. There are also additional steps that allow you to configure both cameras. We are talking about the main and frontal. You can also set the duration of video shooting and select the lighting, adjust color effects.
No exception is the ability to adjust the video resolution and quality. It can be high or low. There are also options for YouTube video hosting or sending MMS.

Camera setup for Skype
Setting up a camera for communication in the Skype program is not difficult. To do this, you should enter the section called "Advanced Settings" for video recording and check the box for "Forced Calls". The settings will apply to the front and main cameras. After that, it is worth rebooting the device and deciding on which camera it is more convenient for you to communicate with your interlocutors. As a rule, the frontal in this case is more appropriate.
Troubleshoot camera issues
While using a smartphone, the quality of the camera may become worse over time. This is due to various reasons. For example, sensor contamination, cache clogging, or mechanical damage to the module, which is responsible for settings and virus damage, can affect. Improving the quality of the device is possible in several ways.
In the case of automatic firmware updates, the basic settings can often be knocked down. All this will lead to incorrect work applications. To fix the problem, just follow these steps:
- Go to the gadget settings;
- Go to the "Backup" section;
- Enable the "Reset to factory settings" option.

The problem with the presence of viruses can be solved by cleaning the system and installing an antivirus program. To clear the module cache, go to the Settings option and select the "Applications" section. There will be a Camera subsection in the menu. There you should enable the Clear Cache option.

Setting up and downloading an application that is an alternative to the standard camera, HD or DSLRCamera, ShotControl, etc. By wiping the lens before use, you can remove the risk of dots or subtle spots in the pictures. Also try not to use Zoom. Photos can be corrected with graphic editor. With digital "zoom", the likelihood that it will deteriorate in an irreversible way will increase dramatically.
Manual camera setup in a modern smartphone
In fact, each picture is a combination of shadow and light. The more light hits the sensor, the brighter the picture will be. If there is not so much light, then the information will be lost over time. Such a picture will be overexposed. At the same time, very dark photos can be corrected by any editor. If the image is overexposed, then it is not possible to correct it.
The combination of light experts call the exposure of the picture. Those. if there are not many dark or too bright moments in the picture, then it can be called perfectly exposed. At the same time, keep in mind that the entire exposure, i.e. the amount of light in the picture, will consist of 3 key components. These are aperture, shutter speed and ISO. For some users this information may seem incomprehensible. We offer you a better understanding of each component.
Highlight in frame exposure: ISO setting
This parameter is responsible for the susceptibility of the smartphone camera matrix, which is exposed to light. The noise that occurs in the photo is associated with it. The higher the ISO, the brighter the photo and the more noisy the matrix. This parameter is usually measured in units. In smartphone cameras, it is designated 100-1600 and above. Under conditions of excellent lighting, it is better to screw the ISO up to minimum positions. It is also worth minimizing the parameter in a situation where high image detail is required.
Exposure - the effect of light on the camera matrix
The parameter is usually measured in fractions of a second. For example, it is 1/60, 1/500, etc. These shutter speeds are short. Those. for we divided 1 second by the specified amount of time and chose only 1 part, which is not large. When photographing with a smartphone, if a fast shutter speed is used, all subjects will be frozen in the camera. This option is ideal for capturing the most important sports moments, capturing raindrops or a ball thrown into the air. A photo where a person is jumping will also turn out very effectively. But remember that the faster the shutter speed is set, the more light is needed to take a quality picture. For this reason, it is worth increasing the other 2 parameters. Moreover, there is also natural illumination, which should be more than sufficient. Fast shutter speeds are best used on a sunny day or if you are working in a studio.
But keep in mind that shutter speed can be measured in seconds. For example, smartphone cameras can have settings of 4, 15, 30 seconds. Such slow shutter speeds are used to shoot inactive objects in low light conditions. You can shoot stars, landscapes at night and even the water surface. At slow shutter speeds, it is worth minimizing the ISO and aperture values. Remember that if you hold your smartphone at slow shutter speeds, then you will not be able to take a high-quality picture. The picture will be blurry and quite strong.
Immediately, we note that many photographers use the blur effect for their own purposes in order to emphasize the speed of movement in the picture. But for simple shots, it is still worth using a portable tripod. Those. you can draw a small conclusion, but very useful, which is that if the task is to shoot a fleeting process, then it is better to set the shutter speed on the smartphone to be shorter. How much shorter will depend on natural lighting.
It is better to choose smartphones that have static stabilization, in which case the image will be as clear as possible.
Aperture setting
This concept should be understood as the size of the hole through which light passes. He is in the matrix. The measurement of this quantity is indicated by the letter "f". The higher the setting, the lower it is set. Those. you will be able to get a hole. As for the average performance of conventional smartphones, here the value varies 1.9-2.2. Please note that if in cameras the aperture is adjusted by hand, increasing or decreasing the camera shutter, then in the case of smartphones, the aperture value will change at the software level.
The smaller the aperture, the more you need to set other camera parameters. And if it is set to the full power of the smartphone, this makes it possible to make the ISO lower when the shutter speed is shorter. The amount of aperture opening will affect the depth of field.
Shooting in RAW on a modern smartphone
To begin with, it is worth understanding what this format is. RAW makes it possible to capture information in its original form. Those. you will be able to get untouched pictures at the output, which can be edited in programs of a special kind, as it should be. Therefore, important photos are best taken in it. They allow you to correct inaccurate parameters that are specified when shooting. Of course, these frames take up more space, and therefore it is worth using the RAW format only for those frames that are important. Memory expansion is possible with memory cards. Choose and buy a memory card for your smartphone. You can do this in any salon where modern mobile devices are sold.
It is important to note that in order to take really high-quality photographs, it is important to have not just a device, but also the hands and skills of the one who takes the photo. Therefore, if there is no opportunity to buy a device with cool camera characteristics, then you can learn how to set it up manually. The mobile device will please you with good photos.
It is important to note that some owners complain that the application of the standard plan, which is used by default, may not give the proper shooting result. Then don't wait, download another one. Today, Google Camera is very popular. Note that the result is really pleasing. The pictures will be very beautiful. They are noticeably better in quality. But be aware that this way would be appropriate for those who are advanced users. In the case of ordinary users, it is worth noting that you do not even need to try to take pictures of him. The thing is that you need to carry out a lot of manipulations. A smartphone, as a result of a number of mistakes made, will completely become a brick. But if you did everything correctly, the result can surprise you.
But the list of applications for the camera is not limited to this. One of them is Open Camera, thanks to which you can achieve good quality pictures.
I would also like to note the fact that you should not be shy to use photo editors to correct the shortcomings of the photo that you already have in your arsenal. For Android platforms, it is recommended to visit the Play Market. There you can download good utilities. They will be able to use all the same settings as the phone's camera, but apply on the finished photo. Not a single hour can be spent processing photos and experimenting with filters. The most popular applications will be VSCOCam, Snapseed, Adobe Photoshop Express, Pixlr Express. All of them are free and easy to use.
We advise you to take a picture of the same object, but taking into account different angles. Change your phone's camera settings, use editors, and soon you will be able to amaze your friends and loved ones with the wonders of photos taken on your familiar smartphone.
In turn, we hope that our article will be useful to you. Share in the comments below how you set up your smartphone, reveal the secrets of the perfect photo!
Check the number from where you called
May be useful:
Nowadays, it is difficult to imagine a mobile gadget that is deprived of the ability to take photos and record videos.
Today, any, even the most budgetary device, has a full-fledged photo and video camera with a bunch of settings for settings. The problem is that not every smartphone owner can navigate all the variety of these settings. In this article, we will try to shed light on the main camera parameters of phones (Android) and reveal their purpose.
Camera Resolution

Shutter speed/aperture/aperture
This setting is for aperture control. The greater the value of the parameter, the better camera will be open to light. Do not set too long a shutter speed, as overexposure may result.
All the details about aperture and camera aperture are collected and .
ISO
The short name of this function can be decoded as (Image Sensor Optimization). Changing the characteristics of this parameter makes it possible to increase or decrease the sensitivity of the lens to light. It is recommended to increase the ISO value only when shooting in low light conditions, otherwise extraneous noise will be noticeable in the photo.

exposition
This feature allows you to adjust the brightness of the picture. By moving the slider left and right, the user changes the light level of the frame. This allows you to set the most suitable mode in terms of aperture ratio in order to improve the visibility of objects.
We talked about the most important camera settings in Android phones and smartphones. Using all the available settings wisely, you can achieve best quality shooting.


Only lovers will survive
Features of advertising aimed at children
retouching old photos in photoshop retouching old photos
What is an NPO: decoding, definition of goals, types of activities Does a non-profit organization have the right
Gleb Nikitin First Deputy