Good day, new designers. If you believe the professionals, then after two years in in social networks and the Internet as a whole will be left with very little text. All of it will be in the pictures. It is understandable, because we all love drawings since childhood. We can safely not pay attention to the article, but we will read the phrases from the picture immediately, without even thinking. Such is our psychology and advertisers cannot ignore it!

Today we will talk about how to write text on a photo in Photoshop and make it beautiful. I'll show you some variations.
Technical side It's important, we'll get to that. It's pretty easy to deal with this question, but I also wish you didn't make the common mistakes that come up here and there.
Do you think everything is so simple? Take a look at two photos. Both have the same word written on them: "Dream." The first one was done well. Not too bad, but not exactly great either.

And the second one makes me want to gouge my eyes out.

Pay attention to learning the basics and rules. Try to learn the basic mistakes and you will be fine. We will talk a little about the main ones in this article, do not turn off.
Eternal classic or how to make a photo that everyone will like
Let's play idiots. I will tell you now, and you will pretend that this is new information for you. Photoshop can be found in the online version: https://editor.0lik.ru/ , download a hacked one on your computer or buy a licensed version.

On the right side of the screen we find the letter "T" - horizontal text. Click on it. A menu will appear at the top that allows you to work with text. Here and the choice of font, and size, alignment. Nothing new. You can work with these indicators in advance, to your taste and color, or edit when the phrase appears in the picture.
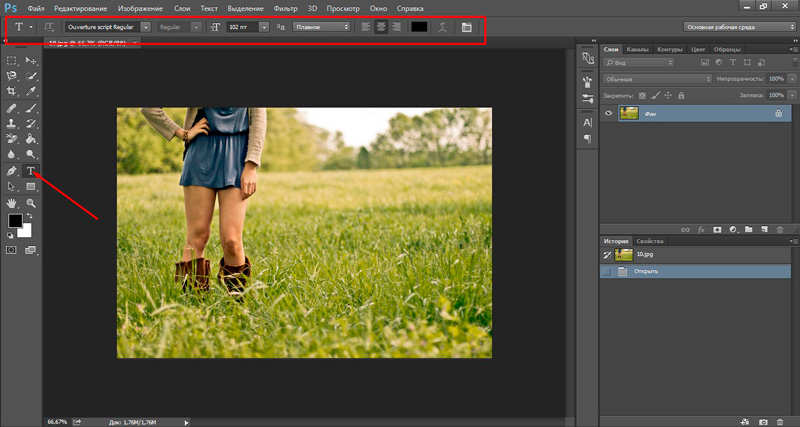
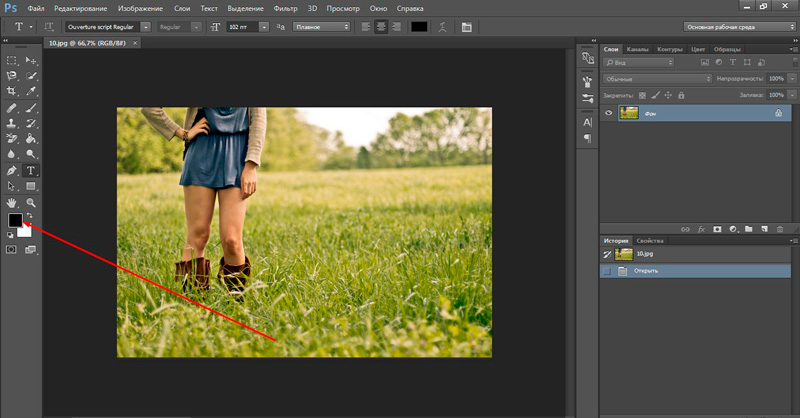
Next comes the color. You are provided with two ideal colors: black (active since it is on top) and white. With a small double-sided arrow in the corner, you can switch these colors, and if you want to use another one, just click on the active bar and select from the spectrum.
Be careful with flowers. Black and white are almost always winning. Poor understanding of combinations - use them, do not try to pervert with purple, red and gray-brown-goat.
The text is beautiful in contrast. Black looks better on a white or light background, white on a dark background. I know smart people who believe that someone will peer into the image in order to find out what the author wanted to say. Wake up, this will never happen. You are fighting for the attention of the reader, and he is free to choose from 1000 sentences. You are obliged to provide him with comfort and convenience if you want him to fall in love with your site or project.
In addition to the color, you can immediately choose the font.
I urge you, if you are not good at design and do not consider yourself a super professional, then you should not play with fonts. Use standard Times New Roman or Arial. Elms, serifs and other “interesting” chips should be used with extreme caution, only real specialists or people with incredible taste should do this. Not all designers have adequate self-esteem. In most cases, all these options look rustic.
If you are not confident in yourself, then standard fonts and schemes will do just fine. They always look stylish and will appeal to more people than third grader coloring books. Show yourself as an expert in everything, especially if you are not. The less gag, the better.

When the preliminary work is done, you can click on any free space in the picture. A blinking vertical stick will appear. The height of the letters directly depends on the size of the photo. Sometimes the picture is small and 12 pt will look great, but on the other, very large and 300 pt, only small letters. You can't guess here. We'll have to act according to the situation and choose the best. You can do it right away or fix it later. Immediately after that, you can enter text from the keyboard and it will appear on the image.

To exit Type mode, I usually just click on the Layer button.
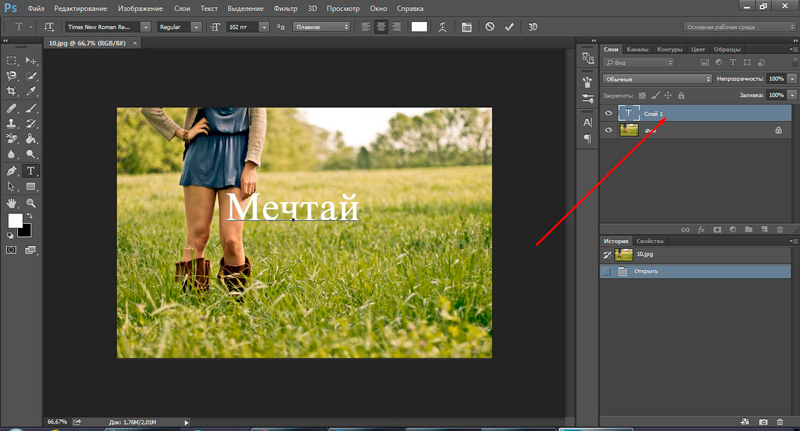
Now the word needs to be moved. There is a special button in Photoshop for this. Use a space that is not cluttered with an image. The text should look harmonious. If there is an empty space, be sure to write on it.

To edit the image now, simply click on the "T" again. Make sure that the layer you are working with is highlighted in the menu on the right.


Work with text. Selection
One of the most useful skills is the ability to stroke. The photo may be too light, dark or colorful. The stroke perfectly highlights the text, and making it is not a problem. Right-click on the text layer and select Blending Options from the menu that appears.

Select "Outer Stroke".

In my case, I need to change the color to black.

And play with the boldness of the lines. Just enter any value and look at the result. It is immediately shown in the illustration.

We agree with the changes.

This is what the image looks like with the stroke.

And so without her.

In my opinion, the choice is obvious.
And for dessert… a very nice text overlay technique
And now I will teach you another very simple, but beautiful technique. Let's make the text transparent. To do this, you need to insert text and make a stroke. You already know how.

Please note that the layer you are working with should be highlighted. Set the fill to zero.

See, the background has disappeared, and you have learned how to make the text colorless.

What would you like to say in the end? If you are interested in the Photoshop program, then this is a very profitable hobby! The better you know how to work in it, the more chances and opportunities open up. In it, you can easily draw websites, advertising banners, book covers and much more. Clients are willing to pay a lot for such work.
Talent is not required for this, sometimes it even gets in the way. It is best to study traditions, basics, rules and work on skills. Design should work, people should like it, make them take action. A famous writer once said that it is much easier to write a thousand books than one selling text. It's the same with pictures. Beauty is not the most important thing.
Knowledge of human psychology has been collected over the years. Even now they are cool large corporations spending millions on marketing research hoping to find out what people really like.
In order to make money, you need a little talent, which is easily replaced by experience and knowledge of the technical and practical parts. For this you will have to try. The fastest way is not to surf the Internet, bit by bit collecting useful lessons one by one, but to purchase a video course developed by what is called "From A to Z" https://photoshop-master.org/ . If you are currently reading this article and learned a lot from it, then these lessons will definitely come in handy.
At the same time, keep in mind that not only the technological part is collected here, but also a bunch of examples.
Think you can learn everything just by surfing the web? Of course you can. But how long will it take. We tend to value only what we pay for. The rest of the time is often not enough. Learn everything in the shortest possible time and never be out of work.
Change your life by choosing a new path to achieve your goal.
Brief video instruction
Good luck and see you again. Subscribe to my blog newsletter and learn more about the work of designers on the Internet.
Adobe Photoshop CS6 allows you not only to make new drawings and process uploaded photos, but also to work with text. The functionality of the graphic editor contributes to the creation of impressive inscriptions with an original design. In this article, we will figure out how to make beautiful text in Photoshop CS6 using the widest set of tools.
First, let's look at how to insert an inscription in Photoshop, so that we can then process it. The sequence of actions is as follows:
- Create a new drawing or open the one to which we want to add an inscription.
- Click on the "T" icon in the left toolbar.
- We choose in which direction the inscription will go - horizontally or vertically.
- We write the desired text.
- We stretch the field to the desired size, move it to the right place.
Photoshop CS6 has a rich set of text editing tools. For example, the user can choose a beautiful font, change the style, work with color and alignment.
You can edit the inscription using the following algorithm:
- Select the layer that contains the symbols, and click on the "T" in the toolbar.
- Click on the dropdown list in the upper left corner. It will reflect those fonts that are installed in the system. If the system fonts are not suitable, you can download additional ones. To do this, you need to find the one you are interested in on the Internet in TTF or OTF format, and then paste it into the Fonts folder in the Control Panel.
- Select the text and click on the rectangle at the top to change the shades. Hue can be selected manually using the palette. If there are pre-prepared parameters, then they must be entered in the appropriate field.
- To reverse the line, click on the "T" with arrows.
- You can change the style by highlighting the inscription and selecting points of interest. In the same menu, you can adjust the anti-aliasing parameters - smooth, hard, saturated, clear.
To apply the changes, you need to click on the checkmark in the panel at the top. As a result of the actions described above, you will get the basis in order to eventually get the most beautiful text.
The richest menu can be called "Effects". It is here that you can change many parameters that change both the entire text and only its individual details. The settings are as flexible and detailed as possible, so the final result depends only on you.
An example of working with effects:
- Right click on the symbol layer.
- Go to Blending Options.
- In the list that appears, click on "Create Stroke".
- Set the parameters of the frame - its shade, width, position, transparency, etc.
- Click on "Type" to change the texture. Color, Pattern, and Gradient are available. A gradient, for example, allows you to create multi-colored text.
Adding a frame is the simplest action. By understanding the Effects menu, you can add a shadow, work with lighting, apply a glossy effect, etc. The result is displayed immediately after applying any tool.
Photoshop allows you to create three-dimensional shapes from signs. For this:
- Select the layer and click on "3D".
- Go to the menu "New grayscale mesh" and select the characteristics of interest.
- Use the New Structure option to modify the layer. The choice is available "pyramid", "cube", "ball" and other shapes.
The inscription can be deformed - for this you need to click on the curved "T" and go to the "Deform" item. The text can be built in an arc, wave, arch, or in any other way.
If you do not want to manually process the text, then you can use ready-made styles. On the Internet, you can find metal or wood lettering, neon sign style symbols, etc.
Typically ready-made effects are distributed in PSD format. To use the downloaded file, just paste it into Photoshop as a regular picture, and then replace the text with your own.
Video instruction
Attached is a detailed video tutorial showing how to create beautiful text in Photoshop CS6.
Conclusion
Spending a certain amount of time to master the functionality of the program, you will be able to translate any ideas into reality. Photoshop offers the widest range of options, which allows you to create unique beautiful inscriptions in just a few steps.
CS6 can do more than just create drawings or retouch photos. It has access to text. And not with the usual symbols that are in Microsoft Word. Photoshop after all graphics editor- in it you can make an inscription with an original design. Although there are also standard printed characters in the utility. Learn how to rotate text in Photoshop, add effects or textures to it, choose the size, shape. And in general, how to interact with symbols in this program.
In Photoshop, you often have to deal with working with text.
You can design a postcard, flyer or greeting, add a beautiful font to a photo collage, create an outline or shadow for it, add volume, lighting, a gradient. This will give you a unique and attractive character set.
First you need to figure out how to insert text. After that, you can already do something with it.
- Create a new drawing. Or open the picture you want to add a caption to.
- On the panel on the left, find the button in the form of a capital letter "T". If you hover over it, a tooltip "Horizontal" or "Vertical" will appear.
- Click on it with the right mouse button. Select the direction of the label.
- Click on the place where you want to add symbols. Or select the area in which they should be located.
- You should write what you need.
- If you click anywhere, the text borders will "stretch" as you type. You can wrap lines by pressing Enter. If you selected an area, you will have to resize the frame manually.
- To expand the printable area, "drag" the markers on this border with the mouse. They will be active if the "T" button is pressed.
- To move a block with text, click on the icon in the form of a black cursor and crosshairs. It's on the panel on the left. Usually at the very top. After that just drag the object. This is similar to moving shortcuts in Windows.

You can do something with any object only if the layer on which it is located is selected. A list of all layers is displayed at the bottom right. To work with one of them, click on the corresponding item.
Editing
Photoshop CS6 has text editing tools. You can choose a beautiful font, style, size, color, alignment. The settings will appear on the top panel if you select the letter layer and press "T".
- To change the calligraphy, click on the drop-down list at the top left. All the fonts you have on your computer will appear. Next to the name is an example of how the signs will look. You can download new character sets if there are not enough pre-installed ones. They must be inserted into the "Fonts" folder, which can be accessed through Start - Control Panel. And the next time you open Photoshop, they will appear in the list. Calligraphy is in .TTF or .OTF format.
- To change the hue of the signs, you need to select them and click on the rectangle at the top. It is the same color as the text. This button opens the palette. You can set the hue manually by moving the slider along the scale and adjusting the brightness. You can enter parameters as numbers. And you can immediately write the name of the color, if you know it. It looks like a code of numbers and Latin characters. To emphasize the inscription, create a stroke of a different shade.
- To reverse a line, click on the "T" icon with small arrows. She is also at the top.
- The size is set in the drop-down list, which displays numbers with the addition "pt" (this parameter is measured in pixels or points - abbreviated "pt").
- To line up, use the Justify Left, Justify Right, and Justify Center buttons. This is an analogue of the options "Left Alignment", "Right Alignment".
- To change the style, select an inscription fragment and right-click on it. In the context menu there will be items "Faux Bold" and "Faux Italic".
- There you can also adjust anti-aliasing: clear, saturated, smooth, hard.
To apply the changes, click on the checkmark on the top panel. To return the original formatting - to the crossed out circle.
Similar options are available in almost any word processor. They are not enough to create designer inscriptions. However, this is the basis without which it is impossible to work with symbols. Photoshop has other tools as well. It's time to figure out how to make beautiful text in Photoshop CS6.
Deformation
On the top panel there is a button "Deformation". It is displayed as a curved "T" and a semicircle. The same setting can be accessed by right-clicking on the layer name. In the drop-down menu there will be a line "Deform text".
In the window that opens, in the "Style" field, select how the line should be displayed: arc, arch, wave, fish, bubble. So you can make an extraordinary design.
effects

The most complex and varied menu is "Effects". You can set a huge number of parameters in it. Detailed settings - even minor details are available. Web designers use these options to create unique and amazing creations.
Let's show the possibilities of effects on a concrete example. Here's how to stroke text in Photoshop CS6:
- Click on the label layer with the right mouse button.
- Select Overlay Options.
- In the list on the left, find the item "Create Stroke" or something similar. Click on it and mark it with a marker.
- There you can set the shade of the frame, width, position (outside, inside, from the center), transparency, blending mode.
- To change the texture, click on the "Type" list. There will be a choice between "Color", "Gradient" and "Pattern".
- A gradient is several shades. The image with it changes from one color to another. That is, in one part of the picture there will be saturated blue, in the other - light purple. You can even draw a stroke in the form of a rainbow.
- Pattern is texture. Go to this point - an example of a drawing will appear. Click on the arrow next to it pointing down - there will be a choice between different images. In the menu that appears, click on another arrow pointing sideways. A menu will open in which you can select style sets - each has its own collection of textures. New patterns are available for download - they must be in .PAT format.
Writing a sentence and adding a frame to it is the easiest thing to do. In the effects menu, you can apply a gradient and a pattern to the text itself, add gloss, embossing, lighting, and shadow to it. Each function has many internal parameters. For example, in the "Shadow" section, there is a size, an angle, an offset, and even a noise effect (similar to a TV ripple).
You can experiment with the settings. When you change some option, the result will immediately be displayed on the picture. The utility has a list of ready-made effects. It's in the "Styles" tab. All parameters are already set in them.
Professional designers and artists work with several layers at once. For example, they copy the inscription, make it transparent, add lighting and superimpose it on the original letters. Then they duplicate it again, use other attributes, and again place it on top of the previous characters. It turns out a multilayer structure. The effects are combined.
Volume

You can write beautiful text in a different way. Create three-dimensional figures from it.
- Select a layer. Do not select the area with the inscription.
- Click on "3D" in the menu bar.
- If you have some model as a 3D file, you can download it and use it.
- To make a 3D object out of the lettering itself, hover over "New Grayscale Grid". This menu has a very poor selection of features.
- The New Structure From Layer option converts the entire layer. It folds into a shape, like a sheet of paper. There are many objects in this section: a pyramid, a cone, a cylinder, a ball, a cube, and the like.
To create 3D text, it is better to use the effects menu. You can change the lighting, add shadows - and the resulting inscription will look believable and natural. Among the ready-made styles, there are also voluminous ones.
Ready effects
Text effects can be downloaded from the web. With them, you can make an amazing inscription without any effort. Creating it from scratch is definitely more interesting. And the end result is exactly what you want. But suddenly one of the existing designs will suit you.
Neon signs, reflections, letters from ribbons, metal, wood, sand and even ice cream. Just type "Text Effects for Photoshop CS6" into any search engine and browse through several sites. Perhaps the desired font has already been created by someone, and there is no need for you to make it yourself.
Styles are distributed in .psd files (often packaged in RAR or ZIP archives). This is not an add-on or plugin, but images that can be edited. All the necessary colors and effects are already configured there. Just open the picture in Photoshop and paste your text. Copy and add it to other pictures.
Some styles may use fonts that you don't have. Before downloading an effect, check if it comes with a file with the desired calligraphy. Or look at what character set is there (if this information is in the description) and set it in advance.
If you don't want to look for additional fonts, but you like the style, feel free to download it. When you open a file, Photoshop will warn you that the required calligraphy is not in its database, and will replace it with your own. Then select any character set from those that are already in the program.

You can understand how to write text in Photoshop and edit it. However, the utility has a wide variety of textures, styles, effects, and numerical parameters that can easily get confused. It will take time to learn the program and memorize all its functions. But everyone can make an interesting and unusual signature. You don't need to be familiar with Photoshop to do this. Ready-made styles are also available online. The effects are already placed in them. Just enter your text.
It's no secret that advertising banners, postcards and much more are designed in Photoshop. Perhaps you have an idea and want to create your own motivator or holiday card. Picture matched but don't know how to write text in Photoshop? If you have never written in Photoshop (Photoshop), in this article we will tell you how to use the text tool. We warn you in advance, writing text on a picture in Photoshop is very easy, even if you don't know how to make text in a circle.
Photoshop has a whole bunch of text tools. Working with text in Photoshop takes place on special form layer - text.
Open the image you want to write on in Photoshop. Move the cursor to the toolbar and right-click on the icon with the letter T. A group of text tools will open. If you press on the keyboard T(English), then automatically select the text tool, which is the first in the group by default.

As you can see, the text tools allow you to set the orientation of the text, vertical or horizontal.
With the text tool of the desired direction selected, click on the image in the place where you want to make an inscription. A new layer will immediately appear labeled T, which is the text layer. On the image, you will see a blinking cursor, and on the control panel, text settings. They are the same as in the usual text editors like Word. Here you can choose the font, size, style (bold, italic, and so on), set the color and alignment of the text, paragraph, that is, everything that may be needed to write text.

If you open the list of fonts, then in front of each you can see a sample of its spelling in the form of the word "Sample". So you can easily decide on the font. The next attribute will allow you to select the thickness of the writing. But it is not available for all fonts.

Next is the font size, which can be selected from the list. If these sizes are not enough, then by placing the cursor in the list box, you can enter the desired number from the keyboard. If everything in the list is too small, enter a number greater than the last one in the list.

The next option allows you to select the type of text anti-aliasing. It is used to smooth the edges of the written and get rid of the denticles at the ends of the letters.

Here's a good example of Windows anti-aliasing (left) and Smooth/Smooth (right).

The next three attributes are alignments. They are all familiar from text editors. This text alignment is centered, right or left. The next element is the choice of color. Click on it once and select the desired color in the palette that opens.

Attribute with letter icon T, standing on an arc, allows you to set the writing of the text in an arc, in a circle or in another form.

Expanding the next attribute, you will find that almost all of the previous ones are collected here. In addition, it allows you to set line and letter spacing, paragraph indentation, and everything else you may need to write text. You probably know how, because we all used Microsoft Word at least once. Therefore, we will not focus on this point.

Choosing a tool "Horizontal Text", click on the place on the image where you want the inscription. Choose a font, color and size. Changing the font size will change the height of the blinking cursor. This will help you figure out what size your text will be. Write the intended phrase. If writing is complete, click Enter in the numeric part of the keyboard (on the right). You will notice that the name of the text layer has changed to the phrase you entered. If you need to correct the text, change the color of the entire character or a single character, then using the same text tool, standing on the text layer, click on it. Your cursor will flash again. Text can be selected, characters can be deleted (erased) in the same way as in Word or another text editor. You need to move the line with the key Enter on the alphabetic part of the keyboard.

If you plan to write long text, set its area in advance so that it does not go beyond the boundaries of the text container. You can then change this area manually. Select the text tool. Before writing, hold down the left mouse button and drag the mouse as if you would like to select an area. You will have a container for text with vertices. Then, by dragging these vertices, you can change the size of the container with the text. So your text will not run into the invisible zone.

To move the text, simply stand on the layer with it, using the "Move" tool (called by the key V) grab the text by holding the left mouse button and move over the image.

To rotate the text, stand on the layer with it and click ctrl+t. This works in the same way as in the case of rotating a normal layer. When a frame with vertices appears, move the cursor to the corner. As soon as a rounded arrow appears on the cursor, start rotating the image in the desired direction. When done, click Enter.

Adding a shadow and stroke on the text is done in the same way as on a regular layer. We have covered this in previous articles. To add a shadow and stroke, you need to call Blending Options(bottom panel in the layers palette, bottom right corner).

In the dialog box on the right, select "Stroke" / Stroke, or "Shadow" / Shadow. In the right part of the window, select the desired size, color and, upon completion, click Ok.

Now let's look at how to make text in a circle. There are two ways to do this. We touched on the first one a bit when we described the text tool's control panel.
Write text. The cursor should blink while waiting for the next character to be entered. Now on the toolbar, click on the letter icon T standing on an arc. Choose from the list Arc Text/Wave.

Values Horizontal Distortion and "Vertical Distortion"/Vertical Distortion leave in position 0 . "Bend" / Bend move as far to the right as possible. Click when finished Ok.
Now select the text tool and click on the edge of the circle. It will turn into a text outline. You will see a blinking cursor. Start typing. If not all of the text is included, pay attention to the cross and the dot on the outline. Press English on the keyboard A, the tool is activated "Outline Selection". By moving a cross and a dot along the contour of the circle, you can move the text along the circle and increase the line so that words that you did not find when you entered entered the field of view.

Adjust the resulting text by moving the layer with it so that the inscription is around the cup. Everything!

As promised at the beginning of the article, making text in Photoshop is as easy as in any text editor. We wish you new ideas!
Dear friends, in this lesson you will learn how to make beautiful inscription on a photo in Photoshop.
Especially for you, I made step by step instructions how to add beautiful text to your photo or image, and if you want to learn how to do it yourself, then this tutorial is for you.
In this lesson, we will also learn along the way how to search for new fonts for Photoshop, learn how to install their program, learn how to change the size and resolution of an image, get acquainted with the cropping and free transformation tools.
I hope this lesson will be useful to you and after studying the lesson you can easily make a beautiful inscription in Photoshop.
Before we get started, let's select a photo to add text to.
For the lesson, I chose this photo with the image of nature. Immediately you need to decide what we will do with this photo (the picture is of excellent quality and has a resolution of 300 pixels per inch - you immediately need to understand that the higher the resolution, the better the photo will be, but there is a minus - it will take up more space on the disk) :
1. Print in a photo salon.
2. Publish on the Internet (if you plan to publish an image on the Internet, then you can safely set the resolution: 72 pixels per inch, now I'll show you how to do it).
I chose the second.
Let's get to the lesson itself.
Resizing and Resizing a Photo in Photoshop
1.Open the picture in Photoshop.

Immediately look at the picture to have a large size: width 1024, height 768 and resolution: 300 pixels per inch (to display this window, go to the menu Image - Image Size, Image - Image Size).

For a picture in my blog, I need to make it the size of the width - 550 pixels(height is not important to me), as well as permission to do - 72 pixels/inch, you need to crop what you don't need in the image. There are two ways how to do it:
a) you can just in the window Image size, first set the resolution to 72 pixels per inch, set the width to 550 pixels and click OK.
b) you can immediately remove everything you don’t need in a photo, make it 550 pixels wide and with a resolution of 72 pixels. Wondering how to do it?
Cropping photos in Photoshop
We take the tool framing(Crop, C) and set the following parameters in the tool settings panel at the top.
After that, we simply draw an area on our photo. Select the desired area (you can change the area by grabbing the knots in the corners of the image with the mouse) to us the area and click Enter(cutting off everything that is not needed).

As a result, we get an image with the parameters we need - 550 width and 72 dpi resolution.

We have prepared all the pictures. Now we need to add a nice caption to the image.
Adding new fonts to Photoshop
2. You can use a standard font, but we are not looking for easy ways, right?) That's right, we'll figure it out once and then we will constantly use this skill - we will find the font we like on the Internet, download it to a computer, add it to Photoshop and already then we will make a beautiful inscription.
I go to any search engine, I use google.com, entered the phrase “ Russian fonts” (you can also try in English russian fonts), got to the site xfont.ru and chose this one font(Archangelsk Regular).

In order to load the font into Photoshop, you need to copy it to the folder with fonts, the folder name Font on your computer, this folder is located on drive C in folder Windows and there is a folder Font
Here is the full path - C:\Windows\Fonts.
You can also open the folder with fonts, just through Start - Control Panel - Fonts.

After that, be sure to restart Photoshop - for the changes to take effect.
Restarted, open our photo and start working with text in Photoshop.
Adding a Beautiful Caption to a Photo in Photoshop
3. How to write text in Photoshop and overlay it on a photo? Everyone just take the tool Horizontal text(Horizontal Type Tool, T).. In the settings, select our font - Archangelsk, set the size - 25 points, saturated and any color.
And we write the text we need, in my example Italy, 2012.

Now let's add effects to our text. Go to the palette with layers (menu Window - Layers, Window - Layers), double-click on this layer with the left mouse button and select the following settings:

Let's add a shadow to our caption. Choose an item Shadow, set Opacity - 75% , Offset — 10 pixels and Size - 10 pixels.

Add an outer glow for the inscription, select the item External glow, set the color, scope - 8% , the size - 27 pixels.

Making a gradient fill for the inscription. Choose an item Gradient overlay, click on the gradient, kiss on the lower left slider and set this color #fbfea0, then click on the lower right slider and set this color #ffef04.

It remains to add a stroke for the inscription. Select the Stroke item, choose a size - 3 pixels and a color #031f01.

As a result, we got a great inscription with effects.

You can add another inscription below, just write the inscription in a different font (I think now after studying the lesson, you can do this with ease). You can also make the text at an angle, select in the layers palette - the desired text layer / several layers, then use Free Transformation (menu Edit - Free Transform, Edit - Free Transform or just press Ctrl + T), rotate the layer to the desired angle and click Enter.

That's all, thank you for your attention, I hope my lesson was useful to you and now you will have no more questions how to make and write beautiful text on a photo in photoshop!
If you have any questions, feel free to ask them in the comments, don't be shy, I don't bite)
Sincerely, Sergey Ivanov.


For beginners: breeding a broiler at home Boiled water for broilers
Only lovers will survive
Features of advertising aimed at children
retouching old photos in photoshop retouching old photos
What is an NPO: decoding, definition of goals, types of activities Does a non-profit organization have the right