Would you like to know how the world around us would look if the human eye perceived light rays not only of the so-called "visible spectrum", but also far beyond it?
One way to see the world in a way that the human eye can't see is through infrared photography.
IR filter on the lens, a necessary element for infrared photography
For a long time from a purely technical, applied field, infrared photography entered the world of artistic photography. By shooting in the IR range, you can get incredibly beautiful, "space" landscapes.
In general, this type of shooting and post-processing is a subject for a separate large article or even a series of articles. But today our goal is just to get to know the basics.
So how do you get an infrared image? There are many options. Previously, a special photographic film was used for this. In specialized digital technology, special matrices are used.
But you can try to take an infrared photo with a simple digital camera.
Infrared photography equipment
By and large, the optics of any camera transmits rays in the IR range. But the problem is that the matrices of modern cameras are equipped with special Hot-mirror filters. And these filters often almost completely cut off the IR spectrum.
There is an easy way to check if your digital SLR is suitable for infrared photography. Take a regular remote control - from a TV, music center, etc. All of them work on the basis of IR rays.
Put your camera on a tripod and in complete darkness take as many shots at different shutter speeds and apertures. At the same time, keep the remote control pointed at the lens and hold down any button.
If a bright dot appears on the frames taken, then the filter of your camera passes IR rays to a sufficient degree and you can move on. If not, then there are several options. Look for another camera or try to act further "at random". It is curious that relatively inexpensive soap dishes are often equipped with a weak Hot Mirror, and not fancy DSLRs.

Experiment with shutter speed and aperture. You may need a very long exposure to achieve the goal, so that the IR rays break through the filter.
Some go to great lengths, tuning the innards of their DSLRs for IR. If you decide to go down this path, then for this purpose it is quite possible to buy a “donor” from among used DSLRs inexpensively. The essence of tuning is the mechanical removal of the Low Pass filter, on which the Hot Mirror filter is usually mechanically deposited.
On the Internet, especially in English, there are many communities where there are detailed instructions for disassembling and removing filters from different camera models.

Mechanical filter removal after camera disassembly
The second integral part is the purchase of a filter for the lens. The most popular and proven models are Hoya R72 and Cokin 007. But given the expensive cost of IR filters (from $ 80-100), it makes sense to first test your camera with this filter, and not buy blindly in an online store.
True, there are manuals for making an IF filter from improvised means. But this is a separate conversation.
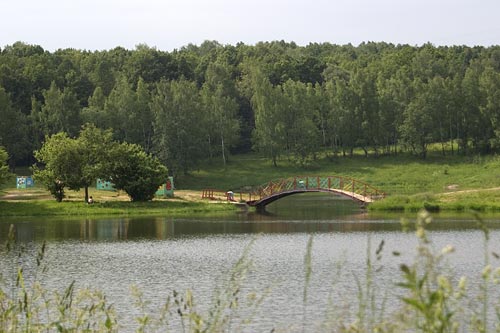
Landscapes look most interesting in the infrared range. This is due to the fact that, in fact, we fix the ability of objects not to emit, but to absorb IR waves. For example, the sky absorbs them in large quantities and in the picture it will go black, the green of the trees, on the contrary, reflects the rays and in the picture they will look white, as if covered with frost on a frosty day.
Given that when using IR filters, the amount of light entering the matrix is extremely small, you will have to shoot at slow shutter speeds and therefore you will need a tripod.

Hoya R72 is one of the most popular infrared filters.
In addition, it is worth putting the camera into manual focus mode, as autofocus can shamelessly lie because of the filter.
Then it is worth experimenting with different exposure settings, analyzing the result.
After we got the coveted frame, we should do post-processing. Since a rare shot taken in the infrared range will be a masterpiece without processing.
There are a lot of processing methods. Consider one, the simplest.
Infrared photo processing
There are a huge number of techniques for post-processing (processing) infrared images. Consider briefly one of the simplest.
At the exit from the camera, you will get something like this.

Infrared photo exiting the camera
If you shot in RAW, it makes sense to change the white balance to make the greens as close to pure white as possible.
Then, open the image in Photoshop and adjust the Levels. It is better to do this for each channel separately (Red, Green, Blue).

Approximate view of Levels for a raw image

Levels correction - move the slider sliders to the edges of the histogram
As a result, our image will become more contrast and acquire visual “depth”.

Photo after changing the white balance and adjusting the levels
The next step is color inversion.
To do this, open the Channel Mixer (Image - Adjustments - Channel Mixer.)
Select the red channel and for it Red is removed to 0, and Blue is raised to 100

adjusting the Red channel
Then we open the Blue channel and do the opposite for it. Red at 100% and Blue at 0%

Adjusting the blue channel
Then click Ok and enjoy the result. For achievement best effect you can still work with color saturation tools - Adjustments - Hue / Saturation

Final IF snapshot
Examples of infrared photographs
Well, for inspiration, so that you have a desire to still try to shoot in this technique, there is a large gallery of infrared images.


There is a wonderful kind of photography that opens up a different, "parallel" world, hidden from the human eye - infrared photography. Images obtained with the help of infrared filters allow us to get into a fairy tale, which at the same time is an integral part of our everyday space.
Infrared photography began in the film era, when special films capable of recording infrared radiation appeared. But since digital SLR Cameras much more popular than film ones and it has become quite difficult to get a special film (besides, it should be noted that not every film DSLR will allow you to shoot on IR film due to the presence of an infrared sensor inside the camera that will illuminate the frames), in this photo tutorial we will only touch on aspects infrared photography with digital SLR cameras.
To begin with, in order to understand the process of obtaining an infrared image, it is necessary to understand the theory. The radiation forming a color image perceived by the human eye has a wavelength ranging from 0.38 µm (purple) to 0.74 µm (red). The peak of the sensitivity of the eye falls, as you know, on the green color, which has a wavelength of approximately 0.55 microns. The wavelength range with a wavelength of less than 0.38 microns is called ultraviolet, and more than 0.74 microns (and up to 2000 microns) is called infrared. Sources of infrared radiation are all heated bodies.
Reflected solar infrared radiation most often forms an image on a film or camera matrix. Since infrared photography has found the most common use in the landscape genre, it should be noted that grass, leaves and needles reflect IR radiation best of all, and therefore they turn out white in the pictures. All bodies that absorb infrared radiation appear dark in the images (water, earth, tree trunks and branches).
Now we can move on to the practical part.
Let's start with filters. To obtain an infrared image, it is necessary to use IR filters that cut off most or all of the visible radiation. In stores you can find, for example, B + W 092 (transmits radiation from 0.65 microns and longer), B + W 093 (0.83 microns and longer), Hoya RM-72 (0.74 microns and longer), Tiffen 87 (0.78 µm and longer), Cokin P007 (0.72 µm and longer). All filters except the last one are ordinary threaded filters that are screwed onto the lens. Filters from the French company Cokin must be used with a proprietary mount, which consists of a threaded ring for the lens and a filter holder. The peculiarity of such a system is that for lenses with different thread diameters, you only need to purchase the appropriate ring, while the filter and holder remain the same, which is much cheaper than purchasing the same threaded filters for each lens. In addition, up to three filters with different effects can be mounted in the standard holder.
Since we are only looking at IR photography with digital SLR cameras, it should be noted that different camera models have different ability to detect infrared radiation. Camera matrices themselves perceive infrared radiation quite well, however, manufacturers install a filter (the so-called Hot Mirror Filter) in front of the matrix, which cuts off most of the infrared waves.
This is done to minimize the appearance of unwanted effects in the pictures (for example, moiré). How strongly the IR radiation is filtered determines whether the camera can be used for IR imaging. For example, Nikon camera D70 with Cokin P007 filter can be removed from hands, and for Canon EOS 350D and most other cameras will always need a tripod due to slow shutter speeds. Some photographers who are passionate about IR photography resort to modifying the camera by removing the infrared filter.
Now let's touch on the processing of images in Photoshop. The resulting frames, depending on the white balance setting, will have a red or purple tonality. To get a classic black and white infrared image, you will need to desaturate the image, for example, using a gradient map, after adjusting the levels and contrast. There are also several ways to get very effective color infrared photographs. For example, you can use the Channel Mixer tool by first setting the red channel to Red - 0%, Blue - 100%, for blue - Red - 100%, Blue - 0%, and then by slightly manipulating the percentage of one or another color in channels to choose such values at which the picture will look most attractive.
In conclusion, we note the main advantages of infrared photography: the absence of haze in the pictures and the sky is always well-detailed, the absence of debris, since it does not reflect IR rays, and, of course, what was said at the very beginning is most important - the ability to see unusual, a non-everyday world in which, in addition to the fabulous color, all moving objects disappear or turn into "ghosts".
A bit of theory
The boundaries of the visible (eye) range are considered to be ultraviolet UV (380 nm) and infrared IR (760 nm). Everything that is behind them, the eye does not distinguish. The retina is, in fact, sensitive to the shorter wavelength zone of the spectrum. But the lens and the vitreous body protect it from relatively "hard" radiation. However, the retina can perceive the "residues" of ultraviolet in the form of a fluorescent bluish glow of the lens (re-emission in the longer wavelength zone of the spectrum). In the IR range, we do not see, because otherwise we would blind ourselves with our own heat.
Outside the visible zone of the spectrum, the radiation does not end. And the mechanisms and principles of optics continue to operate (there are lenses and mirrors). Radars see in the invisible zone of the radio range (even longer than IR), and mirror-plates for radio waves spoil architectural views everywhere. Light sources shine in both IR and UV ranges. And in the mountains and by the sea you can’t do without a UV filter, otherwise what is invisible to the eye can significantly spoil the pictures (there is no haze that absorbs ultraviolet near the sea and in the mountains). Scattered light, haze creates the impression of depth of space, but if you need the clarity of a black and white shot for distant objects, put an orange filter on the camera.
The UV zone conditionally extends up to 1 nm, and the IR zone up to 1 mm. The atmosphere (ozone, steam, dust) strongly absorbs and scatters the range of 10-300 nm, and glass also cuts off longer waves, so for photography (without additional light sources and special lenses) you can actually use only the near UV zone - 300-400 nm.
The main limitation is still photographic materials. Non-sensitized photosensitive materials are sensitive in the range of 350-450 nm, so in the early days of photography, nothing but "blue" and UV could be captured. But in a photo lab, when printing, you can use red and green filters and control the development process visually. For shooting in the IR range, special photographic materials are needed. Typically, IR films require special storage and operation conditions, and the camera body should not be “transparent” for the rays that illuminate the IR film.
To illustrate the different aspects of visible and "invisible" photography, consider the following flash movie. It graphically presents (conditionally, but close to actual values): the spectrum of colors visible to the eye, the spectra of light sources, the spectral sensitivity of the eye and photographic emulsions, the spectral characteristics of filters and glass. By default, only the visible spectrum is enabled. In order to understand what can be shot on a certain photographic emulsion with certain source light and with a certain filter, you need to “turn on” (tick) the necessary elements. The section of the spectrum that will be filmed or visible will remain at the intersection.
Let's note the following important points for photography:
1) the spectral composition of light when the Sun is at its zenith allows you to shoot in both the IR and UV ranges and this is the only powerful and versatile light source; the light of the Sun above the horizon is almost completely devoid of the UV component;
2) an incandescent lamp is well suited only for IR shooting;
3) flash light contains both IR and UV radiation;
4) the maximum sensitivity of the eye under normal illumination is about 555 nm, and at dusk about 510 nm (Purkinje effect);
5) almost all photographic materials are suitable for UV shooting, and for IR only infrachromatic;
6) optical glass with increasing thickness “cuts off” more and more ultraviolet; for photography it is better to use old lenses or special modern ones;
7) the filter on the matrix of a digital camera cuts off a significant part of the IR and UV radiation;
8) the degree of radiation transmission of filters and optical glass depends on their thickness; some filters that are opaque to visible light can transmit both IR and UV at the same time. Practice
For photographing in "invisible" rays, we will use digital cameras. A well-known test for "sensitivity" to the IR range - removing the remote control (the IR source is directed at the camera lens, the button on the remote control is pressed) allows you to determine whether the camera is suitable for IR shooting. If the photo or display compact camera You can clearly see the glow of the IR source of the remote control - it fits. A filter is usually installed on the matrix, which significantly cuts off IR and UV radiation, so to shoot in this range, you will need long shutter speeds and filters that cut visible light even more effectively (thin ebonite plates are also used). Below is a table of common IR filters from various manufacturers, which indicates the limits of full cut-off and 50% IR transmission.
For photography, we used domestic filters UFS 6 (4 mm), IR 1 and more contrast IR 3 (2.5 mm), cameras Canon EOS 300D and Canon PowerShot G2, Cokin mounting kits. It was not possible to fit relatively thick filters into standard Cokin filter holders, so the filter was simply attached with rubber bands to the Cokin ring. If, nevertheless, you manage to attach the filter to the Cokin holder in the standard way, cover all the slots well with foil, otherwise, at slow shutter speeds, the remnants of visible light will illuminate the matrix stronger than IR.
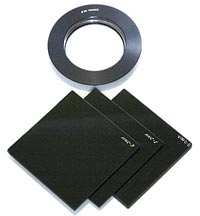
Cokin ring and filters
When shooting in the IR and UV range, there are two "difficulties" in which the operational features of the "numbers" are very useful. These difficulties are exposure and focusing. Since you can’t set up one or the other “by eye” in the case of “invisible” light, you have to do several takes and use the picture on the display to make the necessary adjustments. Determining exposure is easier than correct focus. After all, the focus for “green” visible rays and IR or UV do not match (therefore, in good modern lenses, these rays, invisible to the eye, but visible by the film, try to completely cut off the rays so that they do not reduce the sharpness and contrast visible on the print). You have to set the distance by eye and aperture the lens. Compact digital cameras like the Canon G2, having a small sensor and a larger relative depth of field at the same aperture, are more convenient for the first method (focusing on the eye). But with a shutter speed of 10 seconds and a sensitivity of 400, the picture they get is very noisy. With a DSLR, you will have to do more takes, trying different focusing distances, but the image will be cleaner.

On the good lens there is usually a special mark (red line "R") for IR shooting. This is of course a plus, but there is no universal line for various IR filters and films, just as there is none for UV. Therefore, the sampling method is, in general, the only one.
Photo
sunny day
Canon EOS 300D, ISO 100, f/9.0, 1/200s.

X1, Canon EOS 300D, ISO 800, f/11.0, 15 s.

IKS 1, Canon EOS 300D, ISO 800, f/11.0, 15 sec, Photoshop processing.
It's a nasty day

I don't know about you, but I've always wondered: what would the world look like if the RGB color channels in the human eye were sensitive to a different wavelength range? Rummaging through the barrels, I found infrared flashlights (850 and 940nm), a set of IR filters (680-1050nm), a black and white digital camera (no filters at all), 3 lenses (4mm, 6mm and 50mm) designed for photography in IR light. Well, let's try to see.
On the topic of IR photography with the removal of the IR filter on Habré - this time we will have more options. Also, photos with other wavelengths in RGB channels (most often with the capture of the IR region) can be seen in posts from Mars and in general.
These are flashlights with IR diodes: 2 left at 850nm, right - at 940nm. The eye sees a weak glow at 840nm, the right one sees only in complete darkness. For an IR camera, they are dazzling. The eye seems to retain microscopic sensitivity to near IR + LED radiation comes at a lower intensity and at shorter (=more visible) wavelengths. Naturally, with powerful IR LEDs, you need to be careful - with luck, you can quietly get a retinal burn (as with IR lasers) - the only thing that saves is that the eye cannot focus the radiation to a point.
Black-and-white 5 megapixel noname USB camera - based on Aptina Mt9p031 sensor. I shook the Chinese for a long time on the topic of black and white cameras - and one seller finally found what I needed. There are no filters in the camera at all - you can see from 350nm to ~1050nm. 
Lenses: this one is 4mm, there are also 6 and 50mm lenses. At 4 and 6mm - designed to work in the IR range - without this, for the IR range, without refocusing, the pictures would be out of focus (an example will be below, with a conventional camera and 940nm IR radiation). It turned out that the C mount (and CS mount with a working length that differs by 5mm) - we got from 16mm movie cameras of the beginning of the century. Lenses are still actively produced - but already for video surveillance systems, including famous companies like Tamron (4mm lens just from them: 13FM04IR). 
Filters: I again found a set of IR filters from 680 to 1050nm from the Chinese. However, the IR transmission test gave unexpected results - it does not look like bandpass filters (as I imagined), but it seems like different color "densities" - which changes the minimum wavelength of transmitted light. Filters after 850nm turned out to be very dense, and require long shutter speeds. IR-Cut filter - on the contrary, it only allows visible light to pass through, we will need it when shooting money.
Filters in visible light: 
Filters in IR: red and green channels - in the light of a 940nm flashlight, blue - 850nm. IR-Cut filter - reflects IR radiation, so it has such a cheerful color. 
Let's start shooting
Panorama in the daytime in IR: red channel - with a filter at 1050nm, green - 850nm, blue - 760nm. We see that the trees reflect the nearest IR especially well. Colored clouds and colored spots on the ground - turned out due to the movement of clouds between frames. Separate frames were combined (if there could be an accidental camera shift) and stitched into 1 color image in CCDStack2 - a program for processing astronomical photographs, where color images are often made from several frames with different filters.

Panorama at night: you can see the difference in color of different light sources: "energy efficient" - blue, visible only in the nearest IR. Incandescent lamps - white, shine in all range. 

Bookshelf: Virtually all ordinary objects are virtually colorless in IR. Either black or white. Only some paints have a pronounced "blue" (short-wave IR - 760nm) hue. LCD screen of the game "Just you wait!" - in the IR range does not show anything (although it works on reflection). 

Cellular telephone with an AMOLED screen: absolutely nothing is visible on it in IR, as well as a blue indicator LED on the stand. In the background - nothing is visible on the LCD screen either. The blue paint on the metro ticket is IR transparent - and the antenna for the RFID chip inside the ticket is visible. 

At 400 degrees, the soldering iron and hair dryer glow quite brightly: 
Stars
It is known that the sky is blue due to Rayleigh scattering - accordingly, in the IR range it has a much lower brightness. Is it possible to see the stars in the evening or even during the day against the sky?Photo of the first star in the evening with a conventional camera:
IR camera without filter:
Another example of the first star against the background of the city: 
Money
The first thing that comes to mind for authenticating money is UV radiation. However, banknotes have a lot of special elements that appear in the IR range, including those visible to the eye. About this on Habré already - now let's see for ourselves:1000 rubles with filters 760, 850 and 1050nm: only some elements are printed with ink that absorbs IR radiation: 
5000 rubles: 
5000 rubles without filters, but with illumination of different wavelengths:
red = 940nm, green - 850nm, blue - 625nm (=red light): 
However, the infrared tricks of money do not end there. The banknotes have anti-Stokes marks - when illuminated with 940nm IR light, they glow in the visible range. Photo taken with a conventional camera - as you can see, IR light passes through the built-in IR-Cut filter a little - but because the lens is not optimized for IR - the image is not in focus. Infrared light looks light purple because Bayer RGB filters are . 
Now, if we add an IR-Cut filter, we will see only glowing anti-Stokes marks. An element above “5000” glows the brightest, it can be seen even in dim room lighting and backlighting with a 4W 940nm diode / flashlight. This element also has a red phosphor - it glows for several seconds after irradiation with white light (or IR->green from the anti-Stokes phosphor of the same label).
The element slightly to the right of “5000” is a phosphor that glows green for some time after irradiation with white light (it does not require IR radiation). 
Summary
Money in the IR range turned out to be extremely tricky, and you can check it in the field not only with UV, but also with an IR 940nm flashlight. The results of shooting the sky in IR give rise to hope for amateur astrophotography without traveling far beyond the city limits.Infrared photography is a very complex form of photography. During the lessons, you need to be very attentive to the process of setting up equipment and shooting. I have prepared a list for you, according to which it is convenient to check your actions. I advise you to print it out and put it in your bag along with the camera. All items on the list will be discussed later in the lesson.
Can your camera receive infrared rays?
Before you go out and buy a filter, test your camera for infrared sensitivity. Some cameras cannot do this. The easiest way to check this is to point the camera at the remote's LED light and press a few buttons on it. If you notice that the red light is flashing, then the camera is detecting infrared rays.
If the light from the LED is dim, then the camera detects infrared rays, but the exposure time will increase due to the internal filter blocking them.
If you don't see the LED blinking, set a long exposure and take a few shots while pressing the remote control buttons pointed at the camera lens. The photos should show the red light from the LED. If it is not there, then your camera cannot receive infrared rays, and this lesson will not help you.
Purchasing a filter
I have several suggestions when choosing an infrared filter. These are spin-on filters like Hoya, and square filters from Cokin.
Spin-on filters are a very good tool for infrared photography. One, they are relatively expensive. I recommend buying filters from famous brands for best results. For example, I have a Hoya R72 filter, which impressed me very much with its results, even though it costs more than $100.
Square filters are quicker to put on or take off. At this point, the risk of spoiling the image with light rays is much higher than when working with winding filters. The average price for such a filter is $60.
If you're going to buy a large spin-on filter, get an adapter ring as well so that this filter will fit all other lenses. This saves you from having to buy a separate filter for each lens.

Wavelength and other options
The 720nm filter is considered the standard for infrared photography. I think it's worth starting with him. There are other options, for example, 900nm (RM90), but the prices for such filters are very high, they exceed $300. These filters are designed for professional infrared photographers with "big pockets".
There is another option in case you don't want to use a filter. You can set your DSLR camera to always detect the infrared spectrum. To do this, you need to calibrate the camera and lens. This is a very expensive service, after which your camera will only shoot in infrared mode.

When and where to shoot?
One of the most popular genres of infrared photography is landscape photography. Due to the effects created when shooting, the foliage can turn white when rendered, which will make the photo very gloomy and memorable. You can experiment with trees, flowers and grass.
The ideal shooting conditions are sunny days. In the rendering process (with incorrect color processing), the sky will be a deep blue color, and the leaves will be white. But this does not mean that in bad weather it is impossible to achieve the desired result.
If you set a long exposure time for the infrared filter, the results are almost the same as when working with Neutral Density (ND) filter. The photos will have a strong effect of movement.
Don't be afraid to experiment and don't limit yourself to simple situations and objects.

Lens Problems
Some lenses may produce anomalous infrared effects such as hot pixels. When this happens, you may notice a light, colorless spot in the center of the image. It happens that stripes appear throughout the photo. They can be removed in post-processing, but it takes a lot of time and effort.
Currently, there is no complete list of lenses that work correctly and those that produce colorless spots. The site dpanswers.com provides a rather large list of most lenses and their problems.

1. Customization
Camera setup is very important to get good infrared photography. Do not install a filter until you have adjusted the focus, exposure, and white balance.
First, set up your camera on a tripod. Hang your camera bag on a tripod hook to maximize the entire tripod and minimize movement.
The following tips will help you get a clean image:
- Shooting in RAW format. Shooting in RAW will allow you to easily change the white balance in post-production. Never shoot in JPEG format, otherwise you will get noise and other defects that will be very noticeable.
- Turn off Long exposure noise reduction. Since a long exposure time is necessary for infrared photography, you need to turn this option off. There will be no noise during processing. It will also help you change the intensity of the noise in post-processing.
- Turn on Exposure delay mode / Mirror Lock-Up. If you turn on any of these modes, you will minimize vibration when you release the shutter.
- Remote shutter release or timer. Using the remote control is not necessary, but can reduce the amount of vibration since you are not touching the camera while shooting. Alternatively, you can set the timer to 2 seconds.

2. White Balance
White balance is very good with infrared. You can use the preset values or Pre-White Balance to get a normal balance under current conditions. In any case, you will need to take time for this in the post-processing process.
There is nothing wrong with using presets. For example, the Incandescent setting is the most appropriate.
Go to the White Balance menu and select PRE. Then do the following:
- Click OK.
- Select Measure and press OK.
- Select Yes and overwrite the existing information.
- Make sure the main part of the subject is green in the viewfinder. You can point the camera at a patch of grass.
- Take a picture and wait for the camera to respond. “Data Acquired” or “Gd” should appear.
- If the camera shows "Unable to acquire" or "No Gd", then check the exposure.
The result should be a photo with a strong red-orange-magenta tint. We will fix it in post-processing.

3. Focus and stabilization
Focusing can take a long time if there are no infrared markings on the lens. It's best to use a small aperture, such as f/20, to get good depth of field and minimize focus issues.
If your lens has IR focus marks, adjust the focus according to focal length. If there are no such marks, then it will not be easy to focus on the object. The best thing you can do is set a small aperture to get a large depth of field. Because of this, the pictures will have good sharpness, but this does not mean that you can use a large aperture for a small depth of field. Without calibrating the lens for continuous infrared shooting, it is impossible to achieve the desired focus with a large aperture.
Focus on the subject first with normal Auto Focus. Then switch to manual mode. If you have a camera with a rotating ring on the lens, then be careful not to move the ring.
Any stabilization system must be disabled. The use of VR/IS/OS is not recommended because the camera is mounted on a tripod and because the lens will make unnecessary corrections that may cause blur.

4. Aperture
One of the important settings for IR photography is a small aperture. It gives greater depth of field and minimizes the focusing problems described above.

5.ISO
In most cases, it is best to use the lowest light sensitivity (ISO) to minimize the amount of noise. Take into account the length of the exposure. I would recommend using an ISO of no more than 800 for shooting between 10 seconds and a minute. For exposures longer than 1 minute, use ISO 400 or less.
Any values that exceed these limits increase the risk of getting a large number of noise and hot pixels in post-processing.
If you use ISO from 100 to 200, then the waiting time for IR exposure will be halved. An 8 minute exposure at ISO 100 will be reduced to 4 minutes at ISO 200. The amount of noise will increase slightly, but it will help you when time is very short.

6. Shutter speed.
Finally, let's talk about shutter speed. First you need to determine the exposure time. Get your stopwatch ready.
IR filters require a slow shutter speed. As with ND filters, you can calculate the amount of delay to compensate using the Exposure Calculator.
For example, if the visible light exposure is 1/30, ISO 100, f/11, and the best IR result is 1 second, then you should have a 5-stop light blocking filter.

7. Take a picture!
Now you can screw the IR filter to the lens. After that, do not change the settings and do not twist the focus ring. Press the shutter button and wait for the result!

In the second part of the lesson, we will deal with the processing of IR images in Lightroom.
Share a lesson
legal information
Translated from the site photo.tutsplus.com, the author of the translation is indicated at the beginning of the lesson.


For beginners: breeding a broiler at home Boiled water for broilers
Only lovers will survive
Features of advertising aimed at children
retouching old photos in photoshop retouching old photos
What is an NPO: decoding, definition of goals, types of activities Does a non-profit organization have the right