In the country, as a rule, they put up small greenhouses (the area is limited, and the larger the structure, the more expensive it is), and I want to plant as many plants as possible in it. This can be achieved if you know how to properly arrange the plants in the greenhouse. How effectively the useful area of the greenhouse will be used depends on the number and width of the beds.
The location of the greenhouse on the site
Even before the start of construction, you need to think about how the ridges will be located in the future greenhouse, it is advisable to develop a plan and draw a diagram. Properly placed buildings in relation to the cardinal points and the sun will provide uniform lighting to all plants in the greenhouse.

Scheme: good location of the greenhouse on the plot
If the ridges are located along the greenhouse, then it is better to place the greenhouse with the long side from north to south, in which case the sun will pass across the sky, illuminating three of its four sides and, accordingly, most of the plants in a day. This will be the best option, because morning and evening rays are the most effective for photosynthesis of greenery, and plants that are not fully provided bright light, turn pale, stretch and give a lower yield.
If the place on the site is limited, then you need to set up the greenhouse so that the maximum illumination of the ridges is in the morning. Then the night cooling will not cause much harm to the sprouts. If relief land plot pronounced, it is better to install the greenhouse on the southern slope, and place the beds across the slope.
Important! Tall plants are best placed at the end of the greenhouse, from west to east, in which case they will be better lit during the day.
Arrangement of beds in the greenhouse
The greenhouse can be equipped in different ways. Depending on the crops grown, summer residents can use pots, boxes, pallets, racks or shelves. Small containers are convenient in that they can easily be turned to the right side to the sun, rearranged to another place in the greenhouse, or even taken outside. The beauty of shelving and shelves is that they allow you to make the most of your greenhouse space. This option is suitable for cultivating seedlings, undersized crops and perennials.

The process of arranging beds in a greenhouse
But most often, growers still equip beds in their greenhouses. This is the most practical and efficient way to grow vegetables. How to properly arrange the beds so that there is enough space for plants and for manipulating them? There are various layout options, you just need to choose the one that suits you. This will depend on the size of the greenhouse and the crops being grown.
Two wide longitudinal beds
This layout is practiced when the greenhouse is narrow or equipped with a through passage. The width of the passage should be such that it is convenient to pass through it with a tool, watering can, buckets or hose. If the width of the greenhouse is standard - 3 m, then the ridges are recommended to be made at 0.95 m, and the passage - 1.20 m. In a narrower greenhouse, you will have to sacrifice the width of the passage, which may not be a very good solution. Thinking about this arrangement, think about whether it will be convenient for you to care for the furthest plants (from the wall). Will you be able to reach them to get rid of weeds, water or harvest fruits? After all, stepping on the ridges is completely undesirable. There is a way out: additionally leave transverse paths along which it will be possible to approach distant plants.

Layout of beds for a narrow greenhouse
Important! If, to facilitate work in the greenhouse, you plan to use garden wheelbarrow, consider in advance that the width of the passage allows this.
Three ridges + two passes
This option is more practical in terms of developing a usable area, and it will be much easier to process plants. If the greenhouse has a second exit, the middle lane can not be fully equipped. In narrow ridges, due to better illumination of the sprouts and more efficient ventilation, the plants can produce a higher yield. With such a layout, depending on the width of the greenhouse, you can equip three identical beds of 45 cm each, or you can make the middle one twice as wide, because the approach to it is two-sided. The optimal width of the passages is 50-70 cm. You can increase the central ridge due to one of the passages. In this case, you will only have to drive a wheelbarrow along a wider path, and plant plants that do not need careful care from the narrow side.

Narrow beds are much more convenient to handle
Placement of ridges according to Mitlider
Dr. Mitlider from Canada has been growing plants in a greenhouse for over fifty years. As a result of research, he came to the following conclusion: the ideal bed layout is 45x90 cm. He believes that with a ridge width of 45 cm and a 90 cm pass, each plant will receive maximum sunlight per day and fresh air. The main condition for this is that the surface of the soil must be strictly horizontal. Plants need balanced fertilizer and watering, but loosening the soil is excluded.

Greenhouse beds according to Mitlider
What should be the height of the beds
When the location of the ridges in the greenhouse is already planned, they begin to equip them. To do this, a board is installed from boards, slate, metal or polycarbonate, and then the substrate is poured into the resulting boxes. The standard height of the ridge is 20 cm. But the higher the box, the warmer the soil in them will be. To obtain early greens and vegetables, it is recommended to make a box 80 cm high. Moderately warm soil will contribute to the rapid growth of plants and early fruiting. There are several ways to arrange additional heating of the soil.

High boxes for arranging beds in a greenhouse
Advice! In high boxes, the earth loses moisture faster, so it is necessary that the roots of the plants do not dry out, regularly moisten the soil.
Arrangement of a warm bed with manure
As you know, manure, decomposing, releases heat for a long time. It is this property that is used in the arrangement of a warm bed. It is best to take horse manure, it gives the highest temperature: in the first days - 70 degrees, and then keeps 30 degrees for up to 20 days. If there is no horse - any will do another. Before using manure, you need to let it lie down until the process of decay begins. Adding straw and sawdust in a ratio of 3:1 (three parts of manure, one part of additives) will speed up the process. Readiness can be determined by measuring the temperature inside the heap. An indicator of 45 degrees indicates that it is time to get to work.

Warm bed in the greenhouse
At the bottom of the box, 15 cm of sawdust are poured, and already on it - 30 cm of prepared manure. Seal everything well and pour boiling water over it, let it brew for two days. After that, pour prepared fertile soil into which peat and humus can be added.
Wood thermal pad
Any organic material that decomposes, like manure, will release heat, albeit not as intensely. So if there is nowhere to take organic matter, you can use the remains of wood materials. Shredded wood waste and materials are placed on the bottom of the box. To compact the lower layer, you can fill the gaps that will inevitably remain with food waste, grass, young (without seeds) weeds, tops, etc. All this is sprinkled with a mixture of sand and peat and poured with either boiling water or diluted bird droppings or urea to speed up the start of the process . In order to activate the decomposition of plant waste, you can use special preparations. They contribute to the rapid decay of the material and the formation of humus.

Sawdust can be used to equip a warm bed
Important! Birch wood has disinfectant properties, so using this material as a thermal cushion (at least partially) will bring double benefits.
The compacted layer is covered with a regular or black polyethylene film for a week, and only after that it is covered with a layer of soil of about 30 cm. The thermal layer of wood will last for several years until the material completely decomposes.
Thermal pillow from improvised materials
Very simple, but also efficient technology soil insulation is to lay on the bottom of the box natural materials capable of giving off heat as a result of decomposition. Fallen leaves, straw, hay, freshly cut grass will be used. You can also add potato peelings, sawdust, chopped branches and waste paper. All this is compacted and covered with fertile soil.

Warm bed based on leaves
In a business like growing plants, everything matters. good harvest can only be obtained if all the necessary factors are taken into account and the sprouts are provided with everything necessary.
How to make a warm bed in a greenhouse: video
How to equip beds in a greenhouse: photo


The beds in the greenhouse 3 by 6 meters have their own device nuances. Today we will take a closer look at all the features, pay attention to the arrangement of beds in two and three rows, their location in the greenhouse. Then, given all the advice, gardeners will be able to place plantings in the most successful way. It will be comfortable to work in the greenhouse.
Usually compact greenhouses 3x6 m are widely in demand in suburban, summer cottages. Here key features such greenhouses.
- It is necessary to place the greenhouse in an open place. It is important to organize a convenient approach to it.
- The beds usually go along the long sides, along the walls.
- In order for the lighting to be of better quality and longer, the long side must be turned to the west.
- It is important to create conditions for comfortable care of the beds. The height of the ridges relative to the track is usually a maximum of 40 cm.
- It is advisable to leave paths at least 45 cm wide. Only under such conditions is full-fledged effective work possible.
- The beds are best done at 60 or 90 cm. Wider beds are used with paths on both sides, and when approached from one side, beds 60 cm wide are suitable.

It is important! It is necessary to take care of the proper width of the tracks. If they are too narrow, it is inconvenient to walk on them, there is nowhere to mark the necessary equipment, inventory, watering hoses, and the integrity of the beds will be constantly violated. Wide lanes are much easier to work with.

We arrange the beds rationally
There are a few simple secrets to the proper arrangement of beds.


It is important! Remember key principles selection of the optimal landing pattern. It is necessary to rationally use the entire area of the greenhouse, be sure to provide free access to each bush, plant, branch. In addition, the conditions for the plants themselves should be the best - so that there is enough light and nutrition.

We plant tomatoes in a greenhouse measuring 3 by 6 meters
In the summary table, we will look at the key features of planting crops. As an example, we take planting tomato bushes in a polycarbonate greenhouse. We will pay attention to the features, key characteristics of planting, as well as the method of planting. We will also indicate approximate calculations for two and three beds in a greenhouse 3 by 6 meters.

Table. Features of planting a tomato in a polycarbonate greenhouse.
| Index | Two beds | three beds |
|---|---|---|
| Peculiarities | The beds are best placed along the long sides. Then the width of the beds will be approximately 100 cm, and the rest of the area will be needed for the path. | More convenient option with efficient use of space. You can make the paths a little wider by narrowing the beds. |
| Disembarkation method | It is optimal to use the method in two lines and a square-nested landing. Sometimes, for greater comfort, the bushes are placed in a checkerboard pattern. | The checkerboard arrangement of the bushes is optimal. A little less often use the square-nested method. |
| Calculation | In total, 60 bushes can be planted, if you leave a gap between rows of 60 cm, and the distance between the bushes is only 40 cm. Then 15 bushes can occupy 1 row. | It is recommended to seal the gap up to 30 cm. Then you can plant 20 bushes in one row at once. |

Now let's take a closer look at the important points.
Seating in a greenhouse in two beds
Many gardeners and experts note that it is more convenient and easier to place beds along the entire length of the greenhouse, along the walls. For standard ground beds, a height of 30-40 cm becomes traditional. At the same time, it is important to take care of the required width of the path, otherwise it will be inconvenient to use and place tools, walk with a wheelbarrow, and water the plants.

For high quality and speed of work, it is important to have adequate free space. Most often, bushes are planted in nests in the form of squares or rectangles, as well as in two lines.
This method is more popular because it allows you to use the entire area as competently and rationally as possible. At the same time, it is possible to achieve a sufficient width of the tracks, making the beds at the edges more compact.

For those who are going to plant exactly tomato bushes, there is a special tip: it is better to plant determinant varieties of tomatoes on the outer rows, since the greenhouse has a low height near the walls, when compared with the central part. It is advisable to pre-select varieties with an average height, early ripening.
Consider planting tomatoes in a 3 by 6 greenhouse with three beds in more detail. It is better to form the extreme rows in two stems, while increasing the gap between them. On average, it should be about 40 cm, since bushes with large volumes need enhanced nutrition. It is easy to calculate the number of bushes in a row: just divide 600 by 40. As a result, it turns out that 15 tomato bushes can be planted in a row. In total, in one greenhouse with such parameters, it is quite possible to freely place as many as 90 bushes with tomatoes, while their collection time will be extended.

According to ripeness, you can also select the beds in a special way. In the center it is desirable to grow mid-season, mid-early varieties. But for side beds, early ripening tomatoes are more suitable.
The best solution is to ripen the tomato in turn. It is very important to correctly select varieties in accordance with the budget, taste preferences, and soil characteristics. Then all the tomatoes will ripen in turn, and there will always be fresh tasty tomatoes on the table.
Basic principles for creating beds in a greenhouse
Now it's time to consider the formation of beds in greenhouses with dimensions of 3 by 6 meters.
Focusing on the world
First of all, it is necessary to remember the cardinal points when beds with different crops are planted. You can use boxes, racks, make beds directly on the ground. In any case, the location of plants relative to the cardinal points will be of great importance. Plants should receive maximum heat and light, solar energy.

For accurate orientation, you will need a compass. It is best to place the beds in a north-south direction. This is when the plants will be able to get more sunlight throughout the day.
At the same time, it is important to remember: regardless of the crop, type, dependence on heat and light, each plant must be placed in the beds, taking into account its maximum possible growth before harvesting. Undersized plants should never be in the shade of tall ones.

The location of plants in height
Experts note: it is tall plants that need a special approach. Large growth, the presence of foliage determine the significant shading of the beds. As a result, other plants may suffer from a lack of heat and light. The best solution is to place tall plants along the east-west line. Then the lower tiers of the leaves will be perfectly illuminated by the morning sun.

Sometimes it happens that greenhouses have to be installed in uneven terrain. In this case, it is advisable to opt for a slope with a southern exposure. Such a site should have a slope oriented to the south. Racks and beds are placed across the slope. The ideal option, because. maximum amount plants will be exposed to direct sunlight, as they will fall on the greenhouse at an angle.
It is important! You may encounter various interference, problems when orienting in accordance with the cardinal points. If it is not possible to properly install the greenhouse, you have to choose the best possible option.
There are also some pitfalls. For example, if the slope is southern, but there is a shadow from the crowns of trees, the best option would be to locate the greenhouse on the northern slope, but free from plantations.
We take into account the design features of the greenhouse
Design features also affect the order of planting in their own way. Here's what to take into account.

Advice! Specialists and experienced gardeners note that it is impossible to save on aisles. Paths must be comfortable. The optimal minimum is 40 cm. Decided to use a wheelbarrow? Then it is better to leave a passage of 80 cm in the center, and plant the plants on the sides on two beds.
Wise use of vertical
It is not at all necessary to place the beds exclusively in one plane. You have an excellent opportunity to organize a rack structure in the greenhouse. It is the vertical layout of the beds that makes it possible to use all the free space very efficiently. However, there are also difficulties here. It is extremely important to distribute all plants and containers with earth in such a way that the lower tiers are not in the shadow of the upper ones.

Here are three simple rules rack placement.
- Directly under the racks, you can make a niche like a warehouse for storing the necessary fixtures.
- The lower, middle tiers are ideal for adult plants. You can also place containers with fertile soil in which young bushes are planted. For example, this is a good solution when growing strawberries according to the Dutch method.
- Containers with seedlings need warmth and light most of all. That is why they should be placed on the uppermost tiers with shelving beds. According to growth, development, they can be gradually moved lower.

It is important! Stick to a certain standard. The depth of the rack should be no more than 50 cm. Then the shelves will not obscure the plants.
The vertical can also be used for terraced beds. This is a good option for those who want to gradually switch to shelving. In the greenhouse, on one side, the beds are left traditional. For this, the southeast or south side is more suitable. But the terrace can be made from the opposite side of the greenhouse.

It should be noted that such experimental designs are appropriate in cases where the combined cultivation of different crops is carried out within the same greenhouse. If you grow one crop, you need to create uniform conditions throughout the area.
Greenhouse area planning according to Mitlider
Traditionally, the layout of the beds in two and three rows is used. Both options are quite feasible in greenhouses with dimensions of 3 by 6 meters. We have given approximate calculations above. However, another innovative method is known - the method of Jacob Mitlider.

When the greenhouse is planned according to the Mitlider, crops are planted in beds that are 45 cm wide. This resembles the traditional version. However, it is recommended to make the widest paths between the beds. For example, a good passage width is 90 cm. This technique will ensure good air flow and sufficient illumination.

The technique provides for the creation of comfortable conditions for the gardener. It is recommended to plant plants in two narrow rows, leaving free soil between them. At the same time, there will be a good air exchange, and a person will not have to reach far to the bushes to work.

The most original method is the placement of beds on racks, which are arranged in a spiral. Can be made from pipes that are used for communications, plumbing. This method is ideal for growing low-growing crops, such as greens and strawberries.
We make the best beds in a 3 by 6 greenhouse
It's time to consider step by step instructions arrangement of beds in the greenhouse. It is important to ensure maximum efficiency, to create the best conditions for plants.
You will need fertile soil. The soil is prepared specially or purchased ready-made. In addition, you need to stock up on boards, sawdust or straw. You will also need manure as the main fertilizer layer. We act according to the algorithm.
Step 1. First, a trench is dug in place of the beds.
![]()
First you need to dig a trench
Step 2 Then you need to install a fence - formwork made of wooden boards.


Step 3 Then a layer of straw or sawdust is poured out. Its thickness should be 10-15 cm.
Step 4 Then comes the turn of manure. You need to take manure, which is already starting to rot. The layer is made compacted. Height - 20 cm.

Step 5 The created pillow is poured with boiling water so that the manure and the bottom layer are soaked. After this, the beds should be left alone for two days.


You can make a multi-layer fertilizer using chicken manure and a decomposition stimulator. When decay is intense, a maximum of thermal energy is released. Just it is necessary for the best growth of planted crops. You can leave organic fertilizer under the black film for a week so that it warms up well, and then pour out the soil and plant the plants.

Organic fertilizer can be covered with a black film for a week (pictured is a mini-greenhouse)
To protect the seedlings from rodents, you can lay out the bottom layer with a special mesh. Also, sometimes rotten boards, bark and hemp are put down instead of sawdust. Manure can be replaced with herbal humus. It is necessary to compact everything well and pour boiling water over it, be sure to let these layers “infuse” before filling the soil.

Even on swampy, rocky or sandy soil, you can organize good conditions for growing various crops. Just install the boxes and fill them with fertile soil. The boxes are warmer, they protect from pests. The height of the box is approximately 40 cm.


Video - Arranging beds in a greenhouse and preparing the soil for sowing
To get a rich harvest, you need to competently approach the choice of a greenhouse, choose the right varieties, and equip the beds. The most popular option for greenhouses among gardeners is 3x6 houses. They are suitable for small areas. You can make a greenhouse with your own hands from glass, wood, film, or buy a ready-made one. Greenhouse houses made of polycarbonate have become especially popular. The material is stronger than glass constructions, diffuses sunlight well, and lightness allows you to quickly install or disassemble the room.
How to plan the beds in a greenhouse 3 by 6: orientation to the cardinal points
When using greenhouses in garden plots, it is necessary to correctly position the structure, relative to the cardinal points and wind loads. Failure to comply with these conditions may affect the quality of seedlings and lead to a low yield.
When preparing beds in a greenhouse, experienced gardeners focus on the cardinal points:
- For low crops, it is better to position the greenhouse from North to South, it is this layout of the beds that will give the fruits more sunlight.
- However, to illuminate tall plants, the beds are arranged from West to East. Dense foliage can produce blackouts, and such a scheme will allow the sun's rays to penetrate between the rows and illuminate the lower leaves of the crop.
- If the surface is sloping, we turn the greenhouse towards the south, and we create the beds using a stepped method.

Such principles will give the plants the opportunity to be on top of each other, and fully receive an equal amount of sunlight.
Layout of beds in a greenhouse 6x3 m
In pursuit of a large harvest, gardeners try to use every centimeter of the greenhouse.
When planning beds in a greenhouse, consider your physical capabilities.
Wide beds make it difficult to care for plants.
There are the most common ways to arrange the beds:
- 2 wide ridges that will stretch from the beginning to the end of the structure. The width of the seats will be 1.2 m, and the width of the track will be 60 cm. With this landing option, there is one minus, it will be difficult for some to get to the extreme crops.
- 3 identical beds and 2 paths of 60 cm each. In this case, the planting area will slightly decrease, but convenient plant care will be provided.
- A bed, more than a meter wide, should be put in the center, with an approach from both sides. In greenhouses with a similar layout, plants will receive the largest number light and heat, but the size of the usable area will remain small.
- It is possible to arrange narrow landing rows around the entire perimeter of the house, and one wide one in the center.
The solution for the layout of the greenhouse depends on the selected vegetable crops. Each plant has its own microclimate in which it will fully develop. Plants should be selected for the neighborhood with similar growing conditions.
Country greenhouse 3 by 6: how to arrange the beds
Depending on climatic conditions, gardeners decide to what height they need to raise a warm bed. The height of the ridges varies from 20 to 50 cm. With this arrangement, it remains convenient access to plants and there is no rapid drying of the soil. For the device, boards, bricks, polycarbonate sheets, pieces of slate are used for the sides, which prevent the earth from shedding. All sorts of waste is laid at the bottom of the beds: straw and hardwood fillers, rotted tree bark, dust, wood chips. All this is poured with boiling water to start the fermentation process and covered with manure on top. When rotting, heat begins to be released, this affects the growth rate and the scale of the culture.
For effective use of the area, you can apply the vertical method. Vertical beds save space and help to get an equally rich harvest.

You can install such structures in several ways:
- Garter beds. They are made specifically for crops that require tying to a support. Various shields and partitions, plastic nets serve as a vertical surface. Growing plants begin to cling to the support and reach up.
- Beds-shelves. They represent a structure of several boxes stacked one above the other. The height between the shelves depends on the crop being grown. Such shelves are good for growing low plants with a superficial root system.
- Beds made of plastic pipes. Holes are drilled in the pipe, the earth is filled in, and the structure is installed vertically in the greenhouse. It is very good to grow strawberries in such devices.
Vertical beds have their own nuances that every gardener needs to know about.
Not all plants can live in a confined space. We select a culture with a small root system.
In such mini-beds, the soil dries out much faster and requires constant feeding, but it is less susceptible to infection. Gardeners will be especially pleased to care for plants without bending their backs. A competent approach to growing a plant will give a rich harvest even in a small area.
A small greenhouse 3 by 4: how to arrange the beds using a new method
Greenhouses sized 3x4 are suitable for gardeners with a limited summer cottage area. The average height of such structures is 2 meters. These sizes are optimal for many crops. The planting pattern is similar to the arrangement of beds in a 3 by 6 greenhouse.
Along with the traditional decision of the location of the seats, new technologies appeared according to the Mitlider method, which derived the formula for the width of the beds.
According to the invention, the plants receive maximum light and air when the beds are 45 cm wide and the passage between them is 90 cm. With this planting, the soil does not need to be loosened, and balanced fertilizers and good watering will give a big harvest.

Often gardeners are interested in the question of how many crops can be grown on one ridge. The second invention of Mitlider are narrow beds in one strip. On one ridge, 2 types of crops are placed, similar in climatic requirements. The crops ripen at the same time and 2 crops can be harvested per season.
Compacted beds are used to save space, while taking into account the difference and the period of development of vegetable crops. Lettuce and parsley are added to the onion seeds. Early ripe crops get on the table in a month, and the place in the garden is freed.
Closely it is desirable to grow plants that have a beneficial effect on each other, thereby improving the taste and getting rid of unwanted pests.
The location of the beds in the greenhouse 3x6 (video)
In conclusion, it is worth noting that it is impossible to combine vegetable crops that require different agricultural conditions. The best option there will be placement of these plants on opposite sides of the greenhouse. The process of preparing the beds requires a competent and serious approach; a convenient location will bring pleasure and a rich harvest to the gardener.
Beds for a greenhouse with a width of 3 and a length of 4 meters at a price from the manufacturer. The strength of the panel provides a metal thickness of 0.7 mm. and stiffeners. Sets of beds are equipped with everything. You won't have to buy anything.
The pegs are deepened by 25 cm and securely hold the bed in place. The presence of screeds gives additional rigidity to all structures. Due to these elements, the bed can be weeded and dug up without fear for breaking the sides and changing the geometry of the structure.
All models are in stock. The table shows the dimensions of the beds for greenhouses 3 by 6 meters and 3 by 4 m, but at your request we can change the width without additional charges.
Specifications:
For a bed 25 cm high metal thickness 0.7 mm. There are 6 stiffeners on the panel. The thickness of the peg is 1.5 mm. Pegs are buried in the ground to a depth of 25 cm. The maximum length of the panel is 2 meters. Width to choose at no extra charge.
For a bed 35 cm high metal thickness 0.7 mm. There are 8 stiffeners on the panel. The thickness of the peg is 1.5 mm. Pegs are buried in the ground to a depth of 20 cm. The maximum length of the panel is 2 meters. Ties and pegs go every 2 meters. Width to choose at no extra charge.
For a bed 50 cm high metal thickness 0.7 mm. There are 16 stiffeners on the panel. The thickness of the peg is 1.5 mm. Pegs are buried in the ground to a depth of 20 cm. The maximum length of the panel is 1 meter. Ties and pegs go through every meter. Width to choose at no extra charge.
Prices for beds in a greenhouse 3x4 meters and sets at a discount.
How to choose beds in a greenhouse 3 by 4 meters.
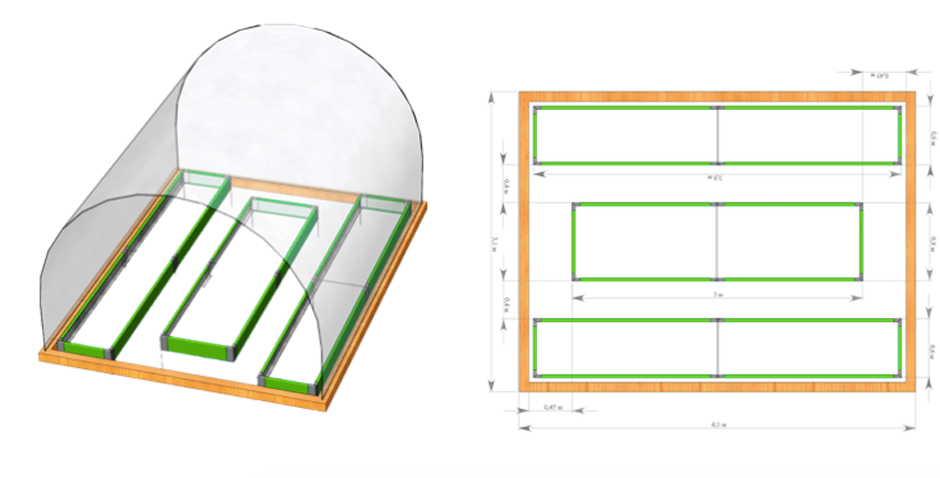
We offer 2 options for installing beds in a greenhouse. In the first version, the beds are located at the edges. Their width is 1 meter. Using a larger width is inconvenient to maintain. The use of a smaller one is not rational, since the landing area is reduced. Less is possible only for the second option, where a 3rd bed is added 2 meters long and 60 cm wide.
The option with 3 beds: two 70 cm and one 60 cm is optimal. You can change these dimensions at no extra cost, but then the passages will be reduced and it will be difficult to work the land and water it if you use buckets and watering cans. That is why the central bed is 2 meters shorter than the length of the greenhouse, so that it is convenient to enter.
What is needed for assembly.
For assembly, you will need 2 keys for 12 or 1 key and a screwdriver with a bit nozzle.
A shovel for digging the soil, as the pegs go deep enough.
Garden transportation.
A set of beds fits in any a car. The maximum length of the set is 2 meters for heights of 25 cm and 35 cm and 1 meter for 50 cm. Each bed is completed separately. The package includes everything for assembly. In the future, you will not need to buy anything.
about how they will beds in, it is worth considering even at the stage of its installation. If the structure is installed incorrectly, it will not be possible to choose the optimal location of the beds in the greenhouse.
The question of the orientation of the beds to the cardinal points is especially important, since it depends on it in the growing process. Their device is considered traditional with north to south.
However, this method is not suitable for all cultures. It is well suited for growing tall crops. undersized plants better position from west to east.
If your greenhouse is located on a terrain that has irregularities, then it should be oriented in south side, and landings should be done perpendicular to the slope.
Each subsequent one with such a device will be higher than the previous one, which means that all plants will receive the maximum amount of light.
For seedlings or potted plants, shelving is arranged inside the greenhouse along the walls of the greenhouse. Plants can be moved from shelf to shelf as they grow to maximize their light.
Optimal row width
Greenhouse bed width directly depends on the overall width<строения. Чтобы за растениями было удобно ухаживать, максимально допустимой шириной является их размер до 90 см. В узких возможна ширина 45-50 см.
An interesting and convenient option is to make two beds 45 cm wide along the walls, and additionally make the same in the center of the greenhouse.
If your greenhouse has a gable roof, then landing is done in it in the middle, and the passages are along the walls. Its width is 150 cm.
IMPORTANT. It should be noted that the passage between landings should be at least fifty centimeters.
We make beds according to Mitlider
This technique has been verified by an experiment that has been carried out for 50 years. As a result, it was confirmed that with a width of beds of 45 cm and a size of passages between them of about 90 cm, under greenhouse conditions, plants receive maximum illumination and optimal air access. Landings are oriented with.
IMPORTANT. According to this method of cultivation, loosening of the soil under the plants is excluded.
What height should be the beds in the greenhouse
 For the quality cultivation of vegetables, it is important not only how to arrange the beds in the greenhouse, but also how high they should be.
For simple greenhouse beds, the standard is height in 20 cm. This type is suitable for warm regions. Since natural heat will be enough for the development of plants.
In regions with unstable and insufficiently warm spring temperatures, it is preferable to do high, and even better.
High landings are constructed by installing wooden boxes in the greenhouse. Their bottom is covered with agrofibre and filled with soil. The height of the soil should be 35-40 centimeters. Plantings at this height are in warm soil, and fruiting occurs earlier.
If you decide to grow in a greenhouse, the height should be increased to 80 centimeters. This will allow the soil to warm up most quickly in order to prepare it for planting seedlings.
IMPORTANT. The same high places for planting must be made for growing vegetables in a seedless way.
Secrets of the device of a warm bed
The construction of warm beds in various shelters contributes to the maximum heating of the soil. Their classification depends on the biological filler:
- With wood pillow. It is laid in a trench 40 cm deep. It consists of a layer of various small pieces of wood: pieces of rotten stumps, logs, tree bark, wood chips. All this is poured with boiling water in order to start the process of decay. A layer of wood is covered with a layer of dry manure. The hottest during decomposition is horse manure. It is able to warm up to 70 degrees and hold the temperature for 20-25 days.
IMPORTANT. Do not put fresh manure - it will burn the roots of plants.
- With straw or leaf filler. In this case, the trench is digging on the bayonet of a shovel and chopped straw or dry foliage is laid in the bottom layer. You can use any vegetable fillers, as well as food waste, potato peelings.
The heating pad, laid inside, is compacted, spilled with hot water and covered with a black film for heating. Warming it up lasts 5-7 days.
After this time, fertile soil 30 cm high is laid on any heating layer. On such warm plantings, you can get a crop two or three weeks earlier than on ordinary ones.
ADVICE. Currently, special preparations have appeared on sale that accelerate the processes of decay in the heating layer. They spill the filler and it begins to emit heat.
A photo
See below: greenhouses inside arrangement with photo beds, beds in a greenhouse photo


How to choose a frame for the beds
The arrangement of the greenhouse is one of the most important points for obtaining a good harvest. Now you know how best to arrange the beds in the greenhouse, however, they also need to be done correctly. For example, in order to prevent the earth from the beds built in greenhouses from spilling out, you need to do for it fencing. You can choose ready-made solutions that are widely available for sale today (plastic, galvanized iron, etc.).
Very comfortable ready aluminum sides. This material is covered with a special polymer composition, which makes it durable. Aluminum curbs are not afraid of moisture and heat of the greenhouse, so this formwork will serve you for decades.
Alternatively, you can use any improvised means. Strengthen plantings it is possible with the help of bricks, boards, pieces of slate, tiles, in general, any construction waste.
- The easiest to make is edge of slate pieces and old metal tiles. The disadvantage of this option is its fragility. In addition, sharp edges are inconvenient during plant care.
- Manufacturing formwork with bricks- one of the cheapest and most affordable options. However, its disadvantages are fragility, since the brick quickly begins to crumble, and a large volume. Even when laying the curb in one brick, the wall thickness is quite large, which eats up some useful soil.
In addition, water seeps through the bricks during irrigation and some soil is washed out. To prevent this, laying a layer of roofing material between the bricks and the soil will help. 
- formwork from old boards made in the form of a rectangular box, into which the soil is then poured. Such a frame is easy to manufacture, cheap. But it has one drawback - the boards can become moldy, or a fungus can develop on them. To prevent this from happening. It is advisable to treat the boards with a fungus preparation.
In order to prevent rotting of the boards, they can be separated from the soil layer with pieces of roofing material. This will extend the life of the wooden formwork by several years.
- Very handy for fencing plastic leftover from the manufacture of the greenhouse cover. This material is durable, and curbs made from it will last you at least 10 years. Billets 30 cm high and 1-15 meters long are dug into the soil and fixed with wooden pegs for reliability.
- Borders from glass bottles in addition to preventing spillage and washing out of the soil, they also serve for heating. If you make a fence from bottles dug halfway into the ground and filled with water, then warming up during the day, the water will give off heat at night.
The process of preparing beds in a greenhouse requires a serious approach, since the convenience in caring for plants also depends on their correct location and well-made fencing. However, as you can see, making beds in a greenhouse with your own hands is not difficult at all.
Useful video
Watch the video: how to properly break the beds in the greenhouse
If you find an error, please highlight a piece of text and click Ctrl+Enter.


For beginners: breeding a broiler at home Boiled water for broilers
Only lovers will survive
Features of advertising aimed at children
retouching old photos in photoshop retouching old photos
What is an NPO: decoding, definition of goals, types of activities Does a non-profit organization have the right