Collect your images. Make digital copies of the images to use in booklet design. There are several places where you can find good images:
- Hire a professional photographer to capture your office, workers, or whatever the booklet is about. The cost of 1 hour of work of a professional photographer can vary from $50 to $500, so look for the best price and book a photographer that you can afford. Remember that good photos increase the effectiveness of your booklet.
- Find or buy ready-made photos. Use any search engine and find the photo you need. Click on an image and see if it's open to use or needs to be purchased. Good finished images cost $5 or less.
- Buy photo rights from social media or local photographers. If you need a stunning photo for a single project, then buying from the range of photos on offer is an excellent investment. Compare the cost of the photos and discuss the limitation of ownership if you will use this image in only one project.
Choose a program that creates booklets. There is also a very large selection in this sector:
- This feature is provided by Microsoft Word. Use the latest version of this program, click on "File", "Create from Template". In the table shown, select Brochures & Booklets.
- Apple's Pages is used by many graphic design enthusiasts because of its high quality templates and ease of use. Click the Brochures button on the left side of the Pages list. You can buy this program on your Mac for $19.99 or on your iPad for $9.99.
- Graphic designers can turn your template into a finished product using programs such as Adobe InDesign or Illustrator. Hire one of your employees or private graphic designers. Most designers have samples of their work so you can view them.
Insert your images into the booklet. Pages lets you drag and drop your images into a template. In Word, you need to right-click on the image in the template and change it. This is also possible using the "Insert" button on the menu bar above the template.
- Don't forget to insert your logo in several places in the booklet.
Insert text into your template. You can print it from a sample, unless, of course, it is already on the computer.
- Be careful when copying and pasting text from Microsoft Word into Pages. You may want to save the text in another program, such as Notepad or Textedit, and thereby remove all formatting.
- Don't forget to include your contact details.
- Format your information using the formatting menu in Word/Pages. Both programs are similar and use both the top menu for formatting and the pop-up window. Click on the format menu to see the various features.
Scroll to the second page. If you are using Word or Pages, then to insert information on the inside of the booklet, you need to fill it with a second page. The first page will contain the front, back and middle parts of the booklet, while the second page will contain the three inside parts of the booklet.
Ask a few people to check your booklet. Automatic spell checking is not sufficient for printed projects. Ask other people who are involved in this project to check the spelling of the text and look for possible errors.
- At the same time, as you send the electronic version of the booklet to your colleagues for review, print a test copy of the booklet on your printer. In the printed form, you will be able to notice various errors.
A booklet is a convenient format for placing useful information. This:
- advertising;
- a brief introduction to the material on the work;
- basic recommendations for solving health issues, organizing repairs, etc.
The booklet is made on good quality paper with attractive colors. It takes up little space. A prospectus (brochure) is made by analogy with a booklet and contains basic information with the provision of contacts for full familiarization, clarification of details.
How to make a booklet in Word
Advice! Before proceeding with the execution, you need to imagine that the booklet is information that is placed on an A4 sheet. It has an inside and an outside. On the inside - information, external - cover. A4 sheet is divided into three parts and then folded. Realizing this, it is easier to start creating a booklet.
Microsoft Word 2003, 2007, 2010, 2013 provides a booklet making tool. Depending on the version, there are features of this procedure.
But each of them provides two ways:
- make your own booklet
- use ready-made templates.
Word 2003 using a template
This will open a window in which you need to enter the specified text and, using the prompts, create the booklet you need. You can use the suggested default style or select other styles. After entering the information on one and the other side of the booklet, it remains to print and fold the sheet in three.
How to make a booklet in Word 2007: step by step instructions
In these versions, the procedure differs in that in the menu "File" → "Create" we select "Booklet" and from the proposed set of booklets we use a more suitable one for our requirements. We enter information and print. Everything is simple.
This procedure can cause difficulties regarding the correct placement of information. A little spatial imagination will eliminate difficulties. How to make a booklet in Word: step by step instructions:

The page is now divided into three parts.
We enter the required information. First page:
- first column - title image, logo, name, etc.;
- the second and third columns - text containing content about the product or service;
Second page:
- first column - contact details (telephones, faxes, e-mail addresses and web-page addresses (when folded, this is the last column of the prospectus);
- the second column is filled with a picture, or a general background color.
For aesthetics and attractiveness, both pages are filled with a background image. We also recommend that you familiarize yourself with Word's capabilities for writing text vertically.
Important! The position of the background image should be selected "behind the text".
The next step is sending the prospectus for printing. Print settings vary by printer brand and model. For one-sided printing, you will need to turn the page manually.
Important! When double-sided, you need to correctly set the binding - "Turn pages relative to the short edge."
A booklet is called a sheet of A4 paper folded in half. Booklets can be used to inform customers or company employees about a product or a planned event. In order to professionally make a booklet, special programs and designer skills are required, but a simple version of a booklet can be made using a regular Word text editor and minimal skills. This is what we will talk about in this article in the form of step-by-step instructions on how to make a booklet in Word.
Step #1: Change the page orientation to landscape.
In order to make a booklet in Word, you first need to change the page orientation from portrait to landscape. This is done in order to be able to type text along the sheet. To do this, go to the " Page layout", Click on the" Orientation"And select the option" Landscape».
Step number 2. Reduce the margins from the edge of the sheet.
Next, you need to reduce the margins from the edge of the sheet. If this is not done, then the booklet will be framed in a large white frame, and it will not look very attractive. Therefore, on the same tab " Page layout"Click on the button" Fields"And select the option" Narrow». This option will use margins of 1.27 centimeters on each side.

Usually margins of 1.27 centimeters are great for creating booklets. But, if you want even smaller fields, then select the option " Custom fields».

After that, the window " Page settings» in which you can set the desired margin sizes for each side of the sheet.

Step #3 Divide a sheet of paper into three columns.
After you have adjusted the margins, you need to divide the sheet of paper into three parts. To do this, on the same tab " Page layout"Click on the button" Columns"And select the option" Three».
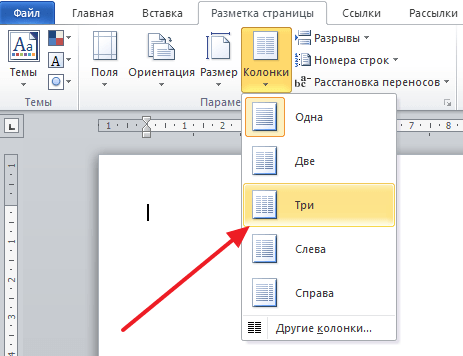
After that, the sheet of paper will be divided into three parts. You will be able to notice this by the change in the ruler above the sheet.
It should be noted that the transition to the second column will be possible only after the first one is filled with text. In order to solve this problem, you can simply press the Enter key and fill the page with a lot of line breaks.
Step #4: Adjust the separator and other booklet settings.
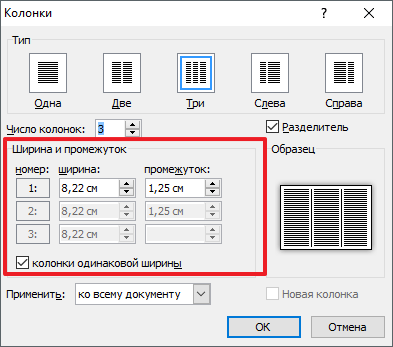
If necessary, you can add a separator between the columns of your booklet. To do this, click on the " Columns" button again and select the option " Other columns».

After that, a small window with booklet settings will appear. Here you just need to check the box opposite the " Separator". It should be noted that the separator appears only if all the columns of the booklet are filled with text to the end. While the booklet is empty, the separator is not displayed.

Also in the window " Columns»You can adjust the width of the booklet columns and the gap between them. If necessary, you can even make columns of different widths. To do this, uncheck the box next to the function " Equal Width Columns» and set the width value for each column manually.
How to make a booklet with more columns
If you want to make a booklet with more than three columns, then this can also be done using the Word text editor. To do this, click on the " Columns"On the "Page Layout" tab and select the " Other columns".

After that, set the desired number of columns for your booklet.

And click on the OK button to save the settings.
The main feature of the booklet is the brevity of the advertising text contained in it.
These types of booklets can be easily ordered from any company that deals with advertising or printing. However, you can do it yourself using the Microsoft Office Word typing program.
Now you will learn how to make a booklet in Word.
Launch Microsoft Office Word, a blank page will appear in front of you. Now we need to change its orientation. To do this, select the "Page Layout" menu item, and in it click on "Orientation" and set it to "landscape". The sheet will turn on its side (become landscape).

Now you need to adjust the settings for the top, bottom and side margins. You set these parameters one centimeter wide.
To do this, in the same tab of the “Page Layout” menu, click on the “Fields” item and click on it, a window with ready-made field templates will open. Select "Custom Fields" at the bottom.

A field settings window will open, in which you set four parameters for one centimeter and click "OK". The figure below shows everything clearly.

In the same menu, click on the "Columns" item and divide the sheet into three columns.

The sheet will be divided into three parts, but you will not immediately see this until you start typing. Do not forget that the booklet will need to be folded several times. For the convenience of folding the sheet, mark up in the form of lines between the columns of the document.
To do this, in the same menu item (“Page Layout”), click on the inscription “Columns” and select “Other columns” in it.

In the window that opens, check the box next to the "Delimiter" item and click "OK".

After the done actions, when filling out the column, you will see a vertical dividing line on the sheet.

Now fill the finished template with text and photos, then print it out. Bend and use for promotional purposes.
How to make a booklet in Word using a template?
Open the "File" menu and select "New".
On the right, you will see the "Create Document" menu that opens. Choose "On my computer".

The Templates window opens. In it, go to the "Publications" menu item at the top, select the "Brochure" template and click "OK".

A new sheet will appear with ready-made markup and information entered.

Now you just have to edit the content by changing the proposed text and photos to your own version, as a result you will have a finished booklet. Below are some examples.


As you can see, the booklet must be double-sided, so it is better to create these sheets separately from each other. If desired, the booklet can be set to any background color.
To do this, select the "Drawing" menu item and click on the "Rectangle" button.
Using the mouse, expand the frame across the entire sheet, and the text will disappear, but don't be alarmed, everything is fine.

You will see your typed text and pictures again, but the content will now be framed. After that, in the same menu, select the color of the desired fill.

Booklet in Word 2013
Making a booklet in Word 2013 is very easy, there are several ways. Let's start with the most common.
Each Word document is displayed in the program with a ruler, which is located on the left side. Click the left mouse button on the ruler, this will open the page settings window. Go to the "Fields" tab and set the parameters you need.
Choose the page type "Brochure", while the document will automatically become landscape orientation. Here you can set how many pages will be in the booklet and the width of the margins of the document. After that, click "OK" and fill out the sheet with information.

You can make a large number of booklet options, it all depends on your imagination, but we will describe one of the ways.
To create the first page of a booklet, use the title page. To do this, go to the "Insert" menu item in the top control panel of the program and select the "title page" item there.
A window will appear that provides options for cover pages to choose from (in this example, we chose Whisp). If you do not like any of the proposed options, you can download other themes from the official website of the Office.com program.
To change the background color of a sheet, use the "Design" menu, and in it select the "Page Color" item. A palette of colors will drop out, in which you choose the color that suits you best and see what happens.

Write the text in those fields of the sheet that are active. You can experiment with text placement, font type, and size.
Now you can design the next pages of the document. In this example, the text area is decorated with interesting text boxes. To do this, click on the active “text field” window, which will open various design options. Select the Whisp option in the panel on the side, and the sheet will acquire the same design as on the main page. If you click in the inner area of the block, you can change the background color, font type, margin size, placement of text information, and so on.

To decorate the page, add photos through the menu "Tab" - "Pictures". Select the desired image from the computer's hard drive and add it to the document. After that, when you click on the picture, the "Format" menu will open, with which you can process the picture - change its position, add effects, set borders, set styles, and so on. Try it, it's very exciting.
Do the same for all other sheets.
The second option is to use ready-made layouts already included in the program.
Click on the "File" tab, in the drop-down menu, select "Create Booklet". If there are few options, you can automatically view other types of design that are on the official Word website directly from the program and download it.
Now the only thing left is to replace the text and images. All is ready!
uchieto.ru
How to make a brochure
If you need to print a brochure, for example, of an advertising nature, do not rush to contact a computer salon. You can create a brochure yourself in Word, it is quite simple and does not require much time from you.
Prepare the material you plan to include in your brochure. It should be a competent text without errors, thematic photos, various icons and symbols. Think carefully about the look of your brochure. It should be informative (contain a maximum of useful information for a potential reader), easy to understand, bright and interesting, attracting attention.

Open a Microsoft Word document. From the top menu bar, select File, New. The "Create Document" menu will appear on the right. You need to select "On my computer". In the "Templates" window that appears, go to the "Publications" tab, select "Brochure" and click the "OK" button. A brochure layout will appear on the screen with detailed instructions on how to create it.

You can insert any text and photos, pictures into the brochure. It is possible to edit the design style, insert various symbols. For beauty and greater impact, you can print a brochure on colored paper or give your document a beautiful background. To do this, there should be a "Drawing" toolbar at the bottom. If it is not there, go through the top menu to "Tools", "Settings", go to the "Toolbars" tab, check the box next to "Drawing" and click "Close". A corresponding menu with various graphic design options will appear at the bottom. Now you need to select the rectangle icon and use the mouse to stretch the frame that appears to cover the entire sheet of the brochure being created. The result is a blank page. At the bottom of the Drawing tab, select Order, Place Behind Text. Now the text will reappear, but will be enclosed in a frame. This frame around the document should be selected, go to the panel "Drawing" "Fill Color", select the shade you like.

Using the Format menu, you can change paragraph styles. You can insert various symbols using the menu item "Insert", "Symbol". You can also change the page break, paragraph spacing, character size, paragraph fill color, and more using standard Microsoft Word menu options. You can change the picture as follows: first it should be selected, then in the "Insert" menu, select the command "Picture", "From File". With your new drawing selected, simply click Insert. Save the finished version of the brochure with the .dot extension by selecting the "File" menu, "Save As" (in the "Document Type" list, select "Document Template").

If you did not like the last change, you can undo it by selecting "Edit", "Undo" or by clicking the special button on the taskbar in the form of a blue rounded arrow. When printing, print the first page first, then turn the page over and print the second. This will turn out to be a real double-sided brochure, made at a high professional level. In addition, you can create a brochure using the "Page Layout" menu item in Word or in the editor in Corel Draw.
SovetClub.ru
How to make a brochure. Step by step instructions in Word.
- 1 Introduction
- 2 Doing everything step by step
- 3 Conclusion
- 4 Say "Thank you!"
Hello readers. Whether you're doing a school assignment or creating promotional materials, a beautiful brochure can always come in handy and make a lot of positive impressions! Therefore, in this article I will show you how to do it in a simple way.
Introduction
Using Microsoft Word 2007, I'll show you how to create professional-quality brochures, and then, if you have a good printer, you can print them correctly yourself. With just a few simple mouse clicks. Yes, everything is very simple.
Frankly, the only real work will be preparing the actual content for the document. After all, Word will automatically print each page in the proper order and correctly place it on the sheet when printed. Before you dive into brochure design, you first need to define the page layout. When you switch to booklet mode, Word essentially compresses each one as if it were folded in half. We will discuss layout issues when we get to step 3 below. So let's get started!
We do everything step by step
- Open the "Page Layout" tab on the ribbon, go to the "Page Setup" section and click on the desired icon in the lower right corner (see the screenshot):
Another option that is suitable for Word 2010 and above: File, then Print and at the bottom click on Page Setup.

A note about page sizes (in millimeters):
- A1 - 841 x 594
- A2 - 594 x 420
- A3 - 420 x 297
- A4 - 297 x 210
- A5 - 210 x 148

- When you're ready to move on to printing brochures, click File and then Print. Next, in the Pages section, select Printing Options, configure the settings supported by your printer. If your printer supports automatic printing on both sides, then use one of the two-sided printing options - Flip pages on long edge or Flip pages on short edge. However, if your printer model requires manual feed to print on both sides, select Manually print on both sides.
Conclusion
Now you can add new pages and additional design elements to your booklet, expanding it as much as you want! Remember that the more of them in the booklet, the greater the value will need to be set for binding in order to avoid text falling into the page junction area when the booklet is subsequently stapled. 
By the way, this method works in any version of Word 2007 and higher.
We say "Thank you!"
Tell me in the comments if you managed to make your brochure according to my method.
And in order to always be aware of new releases - subscribe to the mailing list and be added to groups: Odnoklassniki, VKontakte - links to groups in the menu. Learn with me the secrets of working in Word.
How to make a brochure: step by step instructions in Word Link to the main publication
v-office.com
How to make a booklet in Word (Word): step by step instructions
A booklet is a convenient format for placing useful information. This:
- advertising;
- a brief introduction to the material on the work;
- basic recommendations for solving health issues, organizing repairs, etc.
The booklet is made on good quality paper with attractive colors. It takes up little space. A prospectus (brochure) is made by analogy with a booklet and contains basic information with the provision of contacts for full familiarization, clarification of details.
Ways to make booklets
Advice! Before proceeding with the execution, you need to imagine that the booklet is information that is placed on an A4 sheet. It has an inside and an outside. On the inside - information, external - cover. A4 sheet is divided into three parts and then folded. Realizing this, it is easier to start creating a booklet.
Microsoft Word 2003, 2007, 2010, 2013 provides a booklet making tool. Depending on the version, there are features of this procedure.
But each of them provides two ways:
- make your own booklet
- use ready-made templates.

This will open a window in which you need to enter the specified text and, using the prompts, create the booklet you need. You can use the suggested default style or select other styles. After entering the information on one and the other side of the booklet, it remains to print and fold the sheet in three.
Word 2007, 2010 using a template
In these versions, the procedure differs in that in the menu "File" → "Create" we select "Booklet" and from the proposed set of booklets we use a more suitable one for our requirements. We enter information and print. Everything is simple.
Step-by-step instruction
This procedure can cause difficulties regarding the correct placement of information. A little spatial imagination will eliminate difficulties. For the rest, the procedure is as follows:

The page is now divided into three parts.
We enter the required information. First page:
- first column - title image, logo, name, etc.;
- the second and third columns - text containing content about the product or service;
Second page:
- first column - contact details (telephones, faxes, e-mail addresses and web-page addresses (when folded, this is the last column of the prospectus);
- the second column is filled with a picture, or a general background color.
For aesthetics and attractiveness, both pages are filled with a background image. We also recommend that you familiarize yourself with Word's capabilities for writing text vertically.
Important! The position of the background image should be selected "behind the text".
The next step is sending the prospectus for printing. Print settings vary by printer brand and model. For one-sided printing, you will need to turn the page manually.
Important! When double-sided, you need to correctly set the binding - "Turn pages relative to the short edge."
If you have any questions about Microsoft products, please contact us. We will try to help.
windowsten.ru
Create a booklet in Word

Today we will talk about how to make a booklet in Word. Surely, many of our readers are familiar with this program firsthand. This is probably the most popular program for working with documents and printed materials. Read on and you will learn how to create a booklet in Word step by step. First you need to run the program.
How to make a booklet in Word
The initial screen of the program will look like this.

A standard booklet consists of 3 columns, which are then folded into an elegant booklet. Printing will be done on 2 sides of the paper. The result is 6 columns - 3 on the front side and 3 on the back.
In order to make a booklet in Word, the sheet must be given the required formatting. To do this, select the "Page Layout" menu, then "Orientation". You need to change the orientation to landscape.

Now you need to set the markup to 3 columns. To do this, select the "Columns" item and set the three-column layout.

You also need to set indents from the edge of the sheet. It is desirable to make them equal to 1-2 cm. This can be done in the "Fields>Custom fields" menu.


You can start filling out the booklet. The first 3 column pages will be on the 1st sheet.
To begin with, it is desirable to prepare the background of the booklet. As a background, any image from the Internet is quite suitable. To set the background, select the menu item Page Layout>Page Color>Fill Methods

On the Image tab, select the desired image from your computer.

If you wish, you can use ready-made sets of patterns and textures for the background that are in Word.
Now you can start filling the booklet with material. Adding text, pictures and other things happens in the same way as when filling out regular pages in Word. The only difference is that you will have 3 columns on one sheet.
Complete the first column - the title page. Add the company logo, name, slogan, introductory text, pictures.

Complete the remaining 2 columns in the same way.

Now proceed to fill in the remaining 3 columns on the 2nd sheet. It will be the back of the booklet, so keep in mind that the 1st column on the 2nd sheet is the last page of the booklet.

On the last page, you can also specify the company's contact details and other information if you wish - it's up to you.
It remains only to print the received booklet. To do this, go to the print section.

When printing, select duplex printing.

After printing, you will receive a brand new booklet, which is just waiting to be read.
It happens that you do not want to contact the Agency and order a booklet from professionals. Well, is it really impossible to make polygraphy with your own hands? Hm...let's try! I have a computer (with Windows) where MS Office 2016 is installed. I can use MS Word, PowerPoint, Publisher for my purposes.
Which program is better? Microsoft claims that Publisher. I think that this is true, because Excel works very poorly with images, powerpoint is more sharpened for video and animation, and Word is most inconvenient with its auto-formatting, which makes it difficult to put letters in the places where they should be according to plan author...
By the way, the publisher is good because if you suddenly capitulate to the complexity of the program, you can always save your project in DOCX format and finish your booklet in Word. This is the way we will go: we do it in the Publisher (Word in the mind).
WITH security
How to make a booklet in a publisher (or Word). Step-by-step instruction
So... For example, I'll be making a booklet for our Media Aid Design studio. I'm not a designer, I can't even draw, but I need a booklet. Let's go through the technology and see what happened in my example.Step 1. Preparation
Before you open the program, you need to examine the available resources and make several decisions. So what do I have:- Goal: What will I do with the booklet after it is ready?
I need the booklet in order to distribute it in the smoking room near our business center to addicted smokers like me.
- Goal by goal (or my business goal): what do I want these people to do as a result of seeing the booklet? If I don't understand this, I won't be able to judge whether I made a good booklet or not. So... I want these smokers to start putting their cigarette butts in the ashtray more often. Or at least started trying.
- The target audience. Neighborhood office plankton.
- How can I make sure that I have achieved my goal? Well... Visually assess the order in the smoking room before and after the promotion.
- Logo of our agency (in EPS vector format).
- Written texts and photographs. Of course, when I started writing this article, I did not have them, but they are needed, so I quickly googled and found everything. Often there is a problem with the quality of photographs for printing, but this is a separate article. Here I will write that my pictures are of quite sufficient quality.
It will be a standard euroleaflet (A4 with 2 bigs), printed on an office color printer in a run of 10 copies. Sometimes the question is asked: why does it look like this? Answer: Yes, because I decided so. This is my booklet! I do what I want. At this stage, I can look at "references" - similar printed products or competitors, or just one that I came across somewhere and liked. References help to decide how the final product will look like, what it will look like and vice versa - it will not look like.
The preparation is over: I know exactly what and why I am going to do, how it will look like, what I will do it from (the content is in the folder), what I will do with the booklet, when it is ready and, as I understand it, successfully whether I applied the booklet in the work or not.
Step 2. Page plan
I separate the plan into a separate step, although in essence it is the completion of the preparation for the design of the booklet. The main task of the page plan is to figure out whether everything that I want to place there will fit into the format I have chosen. Well, when I draw or make something out of paper, I get some ideas along the way about what to write or what to place where.Page plan, inner stripes
Page plan, outside
Well, in general, I got something like this. And immediately several layout options began to appear in my head, I wanted to come up with some other columns, all the brilliant ideas did not fit on a piece of paper ... This is normal. The finished product is always the “last draft” and will never be perfect – there is always room for improvement. But you need to stop somewhere - and make a product, otherwise you can spend your whole life thinking about one booklet. And he's not worth it.
Step 3. Choosing a template
Since we decided to start with Microsoft Publisher, let's decide whether to use the built-in templates offered or not. I think it should be used. Because design templates for Microsoft were developed by designers, and I hope not the last. Pretty page settings, fonts, column spacing, and everything else are set by default. And since I'm not a designer and I don't want to hire a designer, it's better for me to use a template, and not shock others with my amateur performance at the level of school drawing lessons.
Template selection
A template can be selected when creating a document.
If you can’t find templates in the publisher, here are the instructions.
I did not like the limited set of templates in this program, and I went to look for more on the Internet. And here the first disappointment in the publisher awaited me - there are a lot of templates on the Microsoft website, but I didn’t find templates for MS Publisher there. Basically everything for Word and Powerpoint.
Download template
Immediately there was a feeling that MS Publisher is Microsoft's unloved program. But I hope this does not prevent us from making a booklet! ☺
I selected a template and opened a new document in the program. I was immediately pleased that the pages in the template were arranged in the correct order - I can not be afraid that after printing on the printer, all this will have to be cut and re-glued with tape to get the planned booklet ...
Watch Template
Step 4: Arranging Pictures and Headings
It is the pictures that organize the composition of our booklet. Therefore, we start with them. If the text and graphic blocks of the template interfere with us somewhere, so much the worse for them - we work out the Delete command.
Change Template
I thought that WALL-E is a cool illustration for my concept, I found a photo and put it on. Since this is a booklet for private non-commercial use, I do not need to buy the copyright for this photo - and I just downloaded it from Google. I stretched the photo into 2 stripes, demolished all unnecessary design elements. The text on the background of the photo was not readable, and I put a yellow rectangle under it (all the designers of our Studio will be hysterical when they see it - but the text is readable). Using the publisher is quite simple - all the menus are the same as in Word. Comfortable!
By the way, a very useful button "Clear all formatting". When I couldn't beat the underline in the template, I used it and everything was gone! :)
Clear formatting
On the inside of the booklet, I had to adjust the pre-prepared text to fit the layout template. As a result, I added the text directly in the layout.
We place the text
Step 5. Posting all the content
Having placed the main design elements, images and headings, we try to put all the available content there. This can be a very painful process: everything does not fit, and if it does, it is in such small print that it is impossible to read. Therefore, in the process of pushing content, some pictures may decrease, or even disappear altogether. And the end result depends on your design vision.
I got something like this:
Placing content on the outside of the booklet
And on the other hand:
We place content on the inside of the booklet
By the way, MS Publisher has handy guides that allow you to align text and graphic blocks relative to each other. But this is already the next stage of our work.
Step 6 Alignment
After the main goal of our booklet is achieved (it contains the optimal amount of information), we turn our attention to the design. Of course, most of our design was in the template we chose.
From what you should pay attention to at the final stage, I want to highlight two things: the alignment of the blocks relative to each other and the font size. There are several alignment principles, there is a separate material on this on our website, here I will say: look at your taste so that nothing sticks out.
As for the fonts, a stripe typed in one font size looks better than several. The same goes for headers. I assessed and redid the inside of my booklet a bit. Here, look:
alignment
Now, the right side doesn't seem to be so constricted - I had to delete a few lines of text and shorten the title.
Well, it seems that the design is basically finished, let's see how our file looks in Word! Save as:
Save to word
Saving text in word
It wasn't there. In the Word, all our beauty quickly turned into a pumpkin. Hmm, the integration of the office is far from Adobe.
Booklet in word
Well, since you can’t continue editing in Word, then our work on the design is over. The layout of the booklet is ready. In principle, there is nothing to do there in the Word: the spell checker does not perform badly either.
Step 7: Print
I decided to print my circulation on our office printer. To do this, you need to correctly specify the duplex printing settings in the printer properties. And most office printers have extremely nasty 5mm margins, so my great bleed photo idea doesn't look so cool anymore. Conclusion: it is necessary to provide printing technology at the concept development stage.
Seal
Well, we take a standard A4 sheet, insert it into the printer, and so I printed a signal copy of the booklet:
Finished booklet, front page
And on the other hand.
Finished booklet, inside
Marketing goal achieved. The guys in the smoking room neighed, read the texts and, in such a humorous manner, learned the message about the need for cleanliness around the urn. No one tried to play the proposed game.
The art director of our studio was hysterical for a long time, but in the end he said: if you want good design, contact Media Aid Design. Well, nobody expected anything else from him.))).


Profession Development Director Job responsibilities of the Regional Development Director
Coursework: Liquidity and solvency of the enterprise, methods of evaluation and management
Using Logistics Performance Indicators
The concept and elements of the logistics process
Job description for the head of the motor transport section Job description for the head of the transport packaging department