slide 2
Technology
You will need: basic materials: a kitchen bowl, old newspapers, adhesive tape, paste or wallpaper paste, gouache paints or the like, brushes; additional materials: Moment glue, sequins, gel sequins, beads, pieces of textile and fur, yarn remnants, etc.; and most importantly, a little patience and good mood!
slide 3
Newspaper sheets must first be crumpled, then straightened and formed into two dense cylindrical bundles - for the nose and eyebrow line. Then roll up a ball - for the chin. We fix the received parts with adhesive tape at the bottom of the bowl. This is the shape for the future mask.
slide 4
Crumple the newspaper sheet, wet it with water, straighten it and spread it over the surface of the mold, carefully repeating its relief.
Slide 5
Now it's the turn of working with a paste (glue), which should be thick enough. Small pieces of paper, well saturated with glue, are evenly applied to the first sheet of newspaper, slightly overlapping. There should be at least five such layers, applied in two approaches.
slide 6
Now the mask needs to be dried well. And while it dries, you can do a sketch of the painting, for example, based on African masks.
Slide 7
The dried mask must be carefully removed from the mold and evenly cut the edge. Now let's start painting. You need to start with large color spots, and finish with small details. We decorate the product to your liking additional materials. If necessary, we make holes for the eyes and cover with varnish. You are ready for the carnival!
GBOU DOD DDT "Sovremennik" of the Vyborgsky district of St. Petersburg Association "Folk Artistic Creativity" Presentation of the manufacture of a carnival mask from papier-mâché "My boat". Prepared by Rumyantseva Sofya, 12 years old Consultant teacher of additional education Alekseeva Margarita Alekseevna Stage 1 I came up with the idea of making a boat flying under sails from my mask. She covered the mask with black tempera, made waves and anchors on the mask with silver braid, glued black sequins. Stage 2 I drew and cut out a detail resembling a ship from silver corrugated cardboard, glued it to the mask by the corners. Stage 3 I took white paper, wound it on a pencil, these will be masts. I glued them on corrugated cardboard, different in height, decorated the masts with silver braid. Stage 4 The triangular-shaped silver cardboard became sails and flags. The mask turned out to be fun, you can go sailing. Truth is great! The project program THE PROJECT OF CREATING A CARNIVAL MASK APPEARED THANKS TO THE ANNOUNCEMENT OF THE COMPETITION "BALL - PAPIER", THE DESIRE TO MAKE A MASK WITH YOUR HANDS, TO TEST YOUR CREATIVE ABILITIES. WITHIN THE FRAMEWORK OF THE PROJECT IS PROPOSED: ACQUAINTANCE WITH METHODOLOGICAL MATERIAL; MANUFACTURING OF DETAILS FOR THE MASK; SELECTION OF MATERIALS BY COLOR, SIZE. RUMYANTSEVA SOFIA - HAS BEEN STUDYING IN ASSOCIATION FOR 4 YEARS. DURING THIS TIME I LEARNED A LOT, CAN WORK IN MASTER CLASSES, HELPS YOUNGER STUDENTS, IMPROVING THEIR SKILLS. IS A MULTIPLE WINNER OF MANY COMPETITIONS, HAS CREATED MY OWN CARNIVAL MASK PROJECT. PRODUCTION DATE - 2013-2014 ACADEMIC YEAR. MATERIALS REQUIRED: PAPIER-MACHE MASK, WHITE PAPER, BLACK ACRYLIC, BRUSH, SCISSORS, CORPORATED CARDBOARD, BAND, PVA GLUE, STATIONERY GLUE, BLACK SEQUINS. Technique of execution PAINTING THE MASK WITH THE BACKGROUND, SELECTION OF THE CORPORATED CARDBOARD OF THE REQUIRED COLOR; CREATING A PATTERN AND ITS CUTTING; GLUING THE CUT-OUT PART TO THE MASK; TWISTING THE PAPER INTO A TUBE AND GLUE ON THE CORPORATED CARDBOARD GLUE THE STRIP TO THE PRODUCT, GLUE THE SEQUINS. IN THE CLASSES, WE WERE PROPOSED TO DO OUR OWN CREATIVE WORK - A MASQUERADE MASK. I VIEWED THE BOOKS THAT WERE IN THE ASSOCIATION, I LOOKED ABOUT MASKS ON THE INTERNET AND I DEVELOPED SOMETHING OWN. COVERED THE MASK WITH BLACK ACRYLIC. I DECORATED THE MASK IN THE FORM OF WAVES AND ANCHORS WITH A SILVER BRAID. I GUT BLACK SEQUINS ON THE MASK. I CHOOSE SILVER FROM CORPORATED CARDBOARD, DRAW AND CUT A DETAILS LIKE A SHIP, GLUED IT BY THE CORNERS TO THE MASK. I TWISTED WHITE PAPER ON THE PENCIL, GLUE THE TIP WITH GLUE, GLUE TUBE FROM PAPER OF DIFFERENT LENGTHS ON THE CORRUGATED CARDBOARD. SILVER BAND DECORATED THE SHIP AND THE MASTS WITH THE HELP OF PVA GLUE, SAILS AND FLAGS ON THE MASTS ALSO FROM SILVER CORPORATED CARDBOARD. In the course of work on this project, the pupils form: - skills of independent creative activity, - skills for the development of fine motor skills, spatial vision of their work, - the development of the correct selection of colors, the development of aesthetic perception
Anastasia Melnikova
Target: explore (Bauta) as one of the required elements Venice Carnival;
Tasks: to study the literature on traditions and History of the Venice Carnival, view photo and video material dedicated to Venetian masks, explore papier-mâché technology, create a plasticine base for masks, recreate at home Bauta mask manufacturing technology, design of the finished base;
Leading activity: search and creative;
Scope of application: cultural and aesthetic;
Used technology: papier mache;
Presentation type: layout, video demonstrating and handout material;
Working hours: average duration of work 2 months;
Efficiency: mask can be used as a decorative decoration of the room and as part of the costume at the school New Year's ball-carnival;
List of used sources of information: attached at the end of the work.
How it all started in Venice:
AT Venice, during the plague, when doctors visited the sick, they put on masks with a long bird's beak. In a long, beak-shaped nose masks they dripped aromatic oils and other substances, as they believed that these aromatic substances prevented from contracting the plague. A dark long cloak was worn over the doctor's clothes. Doctors in this guise looked very ominous and looked like a creepy bird. This image was made even more gloomy by a special stick that they held in their hands so as not to touch the plague patient with their hands.
Venetian carnival of masks:
Venetian mask carnival - the most famous and oldest, the most original and unexpected: here the kingdom of masks and life itself resembles a theatrical stage among the canals. Dancing in the squares, luxurious carnival costumes embroidered with gold and adorned with precious stones. Under the cover of masks, passion is born and dies, and the characters of the Italian "commedia dell'arte" take to the streets and become the characters of the carnival. Like a bright ray of sun, the carnival breaks into the damp and foggy Venetian winter. And in an instant, it is colored with gold costumes, silver lace, bright spots of masks. Only Venetian Carnival is characterized by mystery and magic, mysticism and witchcraft.
Venetian carnival is the greatest holiday in Italy, which annually attracts thousands of participants and spectators from various countries. Venetian carnival is considered one of the oldest carnivals peace: it originated in the Middle Ages, when the total duration of all holidays was several months a year. The spiritual parents of this magnificent event can be considered Venetian aristocrats who invented it in order to justify their passionate desire to show off in front of each other in unusual outfits and masks.
What are the traditional Venetian images? This is undoubtedly the Cat, Citizen, Doctor Plague, Bauta, Venetian Lady. Also very popular were masks who came to the carnival tradition from the stage of the street theater Venice - Pulcinella, Columbine, Pierrot, Harlequin, Piedrolino…
Bauta (Bauta):One of the most popular Venetian masks. It appeared in the 17th century and served as an effective cover for representatives of any class and gender. Despite her creepy appearance, she enjoyed the special love of the people, who wore her in combination with a long black cloak that hides the figure and a three-cornered hat - tricorno. The origin of the name is unknown (according to one version, it is associated with the Italian word “bau” or “babau”, denoting a fictional monster that was used to frighten small children (something like our Babaika or Buka). Bauta was considered ideal mask and for dignitaries who loved anonymously "to go to the people". Interestingly, the lower part of it was arranged in such a way that a person could eat and drink without exposing his face. I decided with the help of my parents to recreate technology and form of making this papier-mâché mask.
PAPIER-MACHE technology:Making a mask begins with the preparation of all the necessary funds.
We put on plastic plasticine mask, and sculpt the desired pattern on it.

PAPIER-MACHE technology(pasting the base): I sprinkled the resulting base with water and began to paste over it with wet toilet paper, which I had previously torn into pieces of 3-4 cm. After mask was pasted over with wet paper; I applied PVA glue with a brush. Subsequently, the operation was repeated 10 times, but with dry toilet paper, each layer was liberally smeared with PVA glue.

After mask I was removed from the base, I putty it, and when the putty dries, the surface is treated with sandpaper.

Then spray paint is applied to it (color optional)

PAPIER-MACHE technology(drawing details): After the main color has dried, I draw on mask artistic details

PAPIER MASHE technology(decoration): After the paint has dried, peck the lace of your choice. Lace glued on "moment".


List of used sources of information:« Venice Carnival» - article from Wikipedia http://ru.wikipedia.org/wiki
Fundamental electronic encyclopedia "Russian Literature and Folklore"- Brief literary encyclopedia - article "Comedy of Masks" http://feb-web.ru/feb/kle/kle-abc/ke3/ke3-6841.htm
Website Italia mia http://www.italia-mia.globalfolio.net/
Used materials from the book of Francoise Decroisette "Everyday life Venice in Goldoni's time» .
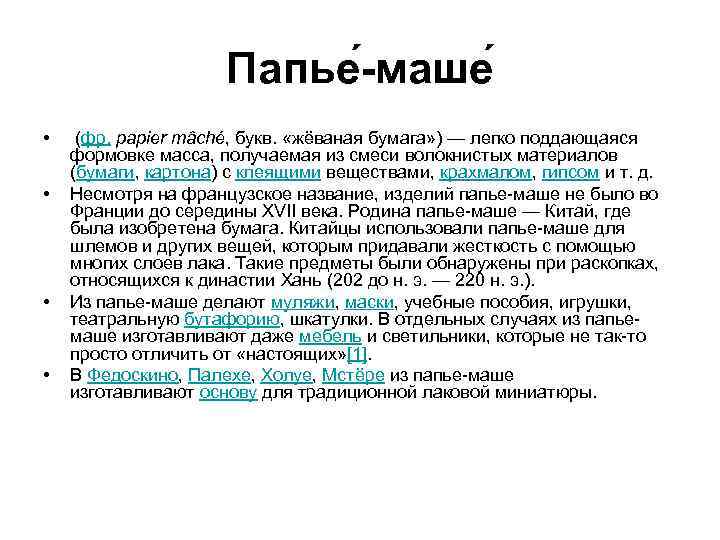 Papier-mâché (French papier mâché, lit. “chewed paper”) is an easily shaped mass obtained from a mixture of fibrous materials (paper, cardboard) with adhesives, starch, gypsum, etc. Despite the French name, products papier-mache did not appear in France until the middle of the 17th century. The birthplace of papier-mâché is China, where paper was invented. The Chinese used papier-mâché for helmets and other things that were hardened with many layers of varnish. Such objects were discovered during excavations dating back to the Han Dynasty (202 BC - 220 AD). They make dummies, masks from papier-mâché, study guides, toys, theatrical props, boxes. In some cases, even furniture and lamps are made from papier-mache, which are not so easy to distinguish from "real" ones. In Fedoskino, Palekh, Kholui, Mstera papier-mâché is used to make the basis for traditional lacquer miniatures.
 Decorative masks Decorative masks are mainly designed to decorate the room. Most often, images of the divine essences of the African or Eastern pantheon act as wall decorations. It can also be images of animals or, more rarely, celestial bodies. If in the West such adornment performs a purely aesthetic function, then in the East and in a number of African countries, decorative masks serve as totemic symbols that drive away evil spirits. Decorative masks vary in size. Sometimes there are products 1 meter in height. They can be created from wood, bronze, plaster, ceramics, or papier-mâché.
 Materials and tools old newspapers, toilet paper PVA glue or starch or flour paste, a bath of water, petroleum jelly, a primer - white emulsion (acrylic) paint, sandpaper, plasticine, a stationery knife, scissors, wire, cardboard, paints, brushes, scraps of fabric, a needle and button threads, fittings

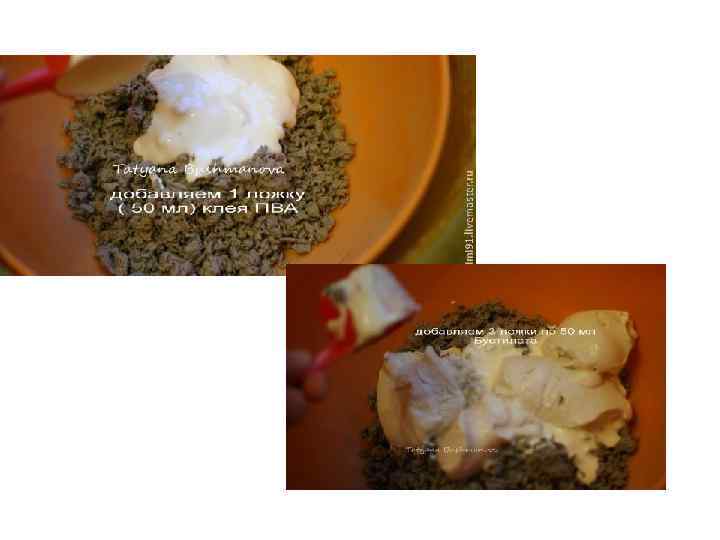
 1st way toilet (gray) paper - 58 grams (dry), chalk, starch, clay, PVA glue, Bustilat glue. drill with a nozzle, then with your hands. You can store the mass in the refrigerator, in a bag or plastic container. When sculpting, you can add Bustilat and knead in your hands.


 Making masks (2nd method) The first layer of papier-mâché consists of plain paper. When the entire mask is covered with paper, you can make the next layer on the glue. So that the mask does not come out loose, but on the contrary, it turns out to be even, hard and waterproof, it is very important to press each piece well, removing air bubbles. The third layer is thicker paper. It should be stuck especially carefully, and it is better to coat it with thicker glue; Plain paper. Cotton fabric should also be finely chopped and soaked in diluted glue. This layer threatens the appearance of wrinkles. Therefore, with some solid object, you need to constantly push through all the necessary "features of the relief" so that they do not disappear under the layers of material, and remove unnecessary ones. When gluing pieces of fabric on the bulge, you can get "pockets" - pieces that have nowhere to stick or that form these same folds. They need to be cut with scissors. Plain paper. Again thick paper. The top, last layer can be thick white soaked paper or small pieces of white cloth (do not take a bandage; it can be used on the middle layers, but, you know, it will not look on top). When the glue sets, with a damp cloth or just your hand, wipe the junctions of the pieces of paper or cloth to smooth out the bumps.
 Making masks After all this, the glued model is dried. It is necessary to dry the mask at room temperature, without removing it from the model, in order to avoid deformation of the mask (3-4 days). The mask can be covered with stretch velvet, crepe satin and in general almost any fabric. We take the fabric in the shape of the mask approximately, in the area of \u200b\u200bthe eyes, carefully cut it with an allowance, and glue it, wrapping the edges inward. When it sticks, stretch the edges and glue them inward too. The fabric is secured with superglue. It is better to take elastic material, so as not to lay down in folds. From the inside, the mask is also glued with a cloth, preferably cotton. - this fabric should cover the ends of the outer fabric. Don't forget the ties! Further, the mask can be decorated with sequins, lace, braid, feathers. . .
 Lubricate the face with a fat cream 1-2nd layer - paper with water 3 and subsequent - paper with glue

 The plaster layer on the face should be uniform. The thickness of the negative mask is no more than 1.5-2 cm. As soon as the plaster begins to heat up, you can carefully remove the cast from the face.
 SECOND PHASE. Casting of a plaster mask-positive. Lubricate the resulting negative form inside with petroleum jelly (separating layer). Dilute the plaster and carefully pour it into the mold so that no air bubbles form. After the gypsum in the form hardens, the mask can be removed. Tap on the entire surface and gently beat off the negative shape with a hammer.

 On a piece of paper, we draw the outline of the future mask, taking into account the width of the face of the person who will wear it. By analogy with the illustration, we fashion the plasticine shape of the future mask according to the drawing.
 Now let's prepare the plaster (you can read more about how to do this in this lesson). Important: pour the gypsum gradually, controlling its density, because it is no longer possible to dilute an excessively thick mass with water - the gypsum will not set. Starting with a thin layer, gradually cover the entire plasticine mold. Important: the thickness of the layer should not be less than three centimeters.
 The gypsum begins to heat up and finally hardens when it becomes cold (about 30 minutes). After that, the plaster mold is removed. The plasticine blank and the entire cast form are heated together with the gypsum and therefore easily removed. If you miss the time, the plasticine inside the plaster mold will cool and harden, which will make it very difficult to get it. Before removing the form, it is important to trim its brittle edges with a knife so that the form does not crumble. After the plasticine has been removed from the plaster mold, it should dry well for several days.
 After the form has dried sufficiently, we begin to paste over it using the papier-mâché technique, using flour glue. The glue recipe is very simple: add three tablespoons of wheat flour to a third of a glass of cold water and mix thoroughly until a homogeneous mass is obtained. Now we add boiling water to a glass, as a result of which we get a glass of wonderful papier-mâché glue. Important: in order for the future mask to be easily removed from the plaster mold, we spread the first layer of paper with glue on only one side, applying the dry side to the mold. It is convenient to glue hard-to-reach places with a flat brush.


 Steps for making a mask Step 1. Sketching Step 2. Clay model Step 3. Casting a back mold in plaster Step 4. Creating a blank mask Step 5. Drying Step 6. Sanding Step 7. Trimming the edges, cutting holes for the eyes Step 8. Primer Step 9. Painting Step 10. Gilding, applying craquelure, glitter compositions, volume contour, patination Step 11. Lacquering Step 12. Preparing accessories and decorative elements Step 13. Adding accessories Step 14. Ribbons (fasteners)


Only lovers will survive
Features of advertising aimed at children
retouching old photos in photoshop retouching old photos
What is an NPO: decoding, definition of goals, types of activities Does a non-profit organization have the right
Gleb Nikitin First Deputy